
A circular saw is a power saw primarily used for wood cutting. It’s versatile enough to make rip cuts, crosscuts, and bevel cuts, making it essential for both construction projects and DIY projects. This guide covers power saw uses, different blade types, and how to use a circular saw safely for your home improvement projects.
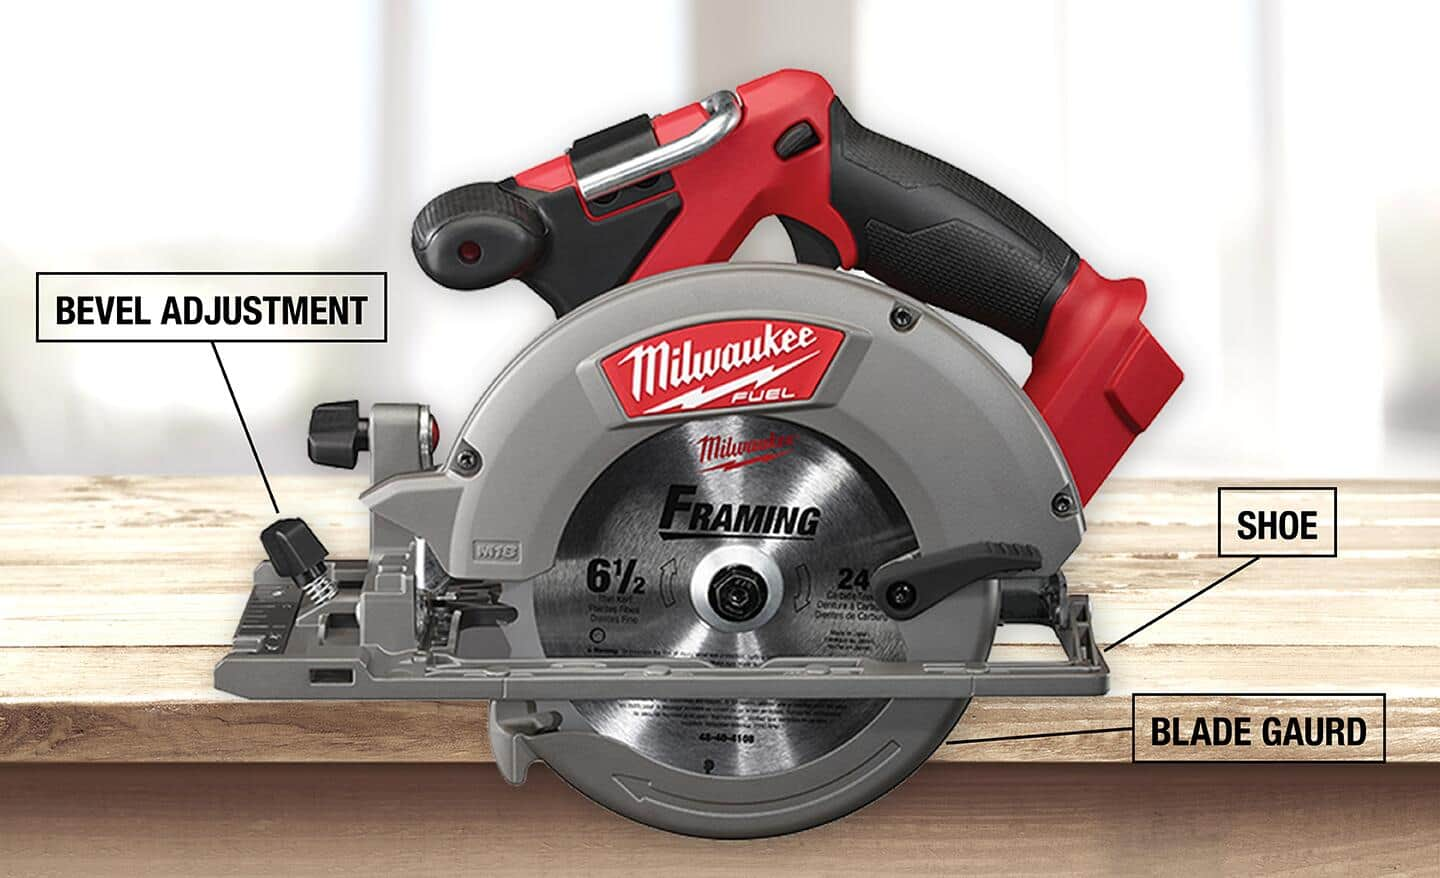
Image Source: dam.thdstatic.com
Why Choose a Circular Saw?
Circular saws are a must-have for any workshop because they have plenty of power, are easy to carry around, and aren’t too hard to learn. They are the perfect tool for cutting through thick boards or large sheets of plywood. Since they are so portable, they’re great for jobs where it’s much easier to bring the saw to the wood rather than trying to lug heavy pieces of lumber over to a big, stationary machine.
Circular Saw Advantages:
- Portability: Easy to move around.
- Power: Cuts through thick materials.
- Versatility: Handles different types of cuts.
- Cost-Effective: Generally cheaper than other saws with similar capabilities.
Grasping Circular Saw Basics
Before diving into projects, it’s important to familiarize yourself with the anatomy and key features of a circular saw.
Essential Parts of a Circular Saw:
| Part | Function |
|---|---|
| Blade | The cutting component; comes in different types for various materials. |
| Motor | Powers the blade rotation. |
| Handle | Provides grip and control. |
| Base Plate | Rests on the material being cut, providing stability. |
| Blade Guard | Protects the user from accidental contact with the blade. |
| Depth Adjustment | Controls the depth of the cut. |
| Bevel Adjustment | Allows for angled cuts. |
| Spindle Lock | Locks the blade for easy changing. |
Types of Circular Saws:
- Corded: Offer consistent power, ideal for extended use.
- Cordless: Battery-powered, providing portability and convenience.
Choosing between corded and cordless depends on your needs. Corded saws are better for heavy, continuous use, while cordless saws are more convenient for smaller jobs and areas without easy access to power outlets.
Power Saw Uses: Mastering Different Types of Cuts
Circular saws can perform various cuts. Let’s explore some common techniques:
Rip Cuts:
- What they are: Cuts made along the length of the wood, parallel to the grain.
- How to do it: Use a rip blade and a guide (like a chalk line or a straight edge) to ensure a straight cut. Keep the saw base flat on the wood.
Crosscuts:
- What they are: Cuts made across the width of the wood, perpendicular to the grain.
- How to do it: Use a combination or crosscut blade. A speed square can help guide the saw for accurate cuts.
Bevel Cuts:
- What they are: Angled cuts made by tilting the saw’s base plate.
- How to do it: Adjust the bevel angle using the bevel adjustment knob. Use a protractor to ensure accuracy.
Plunge Cuts:
- What they are: Cuts made starting from within the material rather than from an edge.
- How to do it: Tilt the saw forward with the front edge of the base plate resting on the material. With the blade guard retracted, slowly lower the blade into the material. Be careful to keep hands clear of the blade path.
Choosing the Right Blade Types
The blade you use significantly impacts the quality and efficiency of your cuts. Here’s a breakdown of common blade types:
- General Purpose Blades: Suitable for both rip cuts and crosscuts in wood cutting.
- Rip Blades: Designed for cutting along the grain.
- Crosscut Blades: Designed for cutting across the grain.
- Plywood Blades: Have more teeth for cleaner cuts on sheet goods, minimizing splintering.
- Metal Cutting Blades: Designed for cutting metal sheets, pipes, and rods.
- Diamond Blades: Used for cutting concrete, tile, and masonry.
Blade Selection Guide:
| Material | Recommended Blade | Key Features |
|---|---|---|
| Softwood | General Purpose, Rip | Fewer teeth, deeper gullets for efficient waste removal. |
| Hardwood | General Purpose, Crosscut | More teeth for a smoother finish. |
| Plywood/Sheet Goods | Plywood Blade | High tooth count to reduce tear-out. |
| Aluminum | Non-Ferrous Metal Cutting Blade | Specially designed tooth geometry and material to cut without binding or melting. |
Safety First: Using a Circular Saw Responsibly
Safety should always be your top priority when using a circular saw. Here are some essential safety tips:
- Wear Safety Gear: Always wear safety glasses, ear protection, and a dust mask.
- Secure the Material: Clamp the wood securely to prevent movement during cutting.
- Keep a Firm Grip: Use both hands to control the saw.
- Avoid Overreaching: Keep your body balanced and avoid reaching too far.
- Inspect the Saw: Check the blade and power cord before each use.
- Use Correct Blades: Always use the appropriate blade for the material.
- Be Aware of Kickback: Keep a firm grip and avoid twisting the saw during the cut.
Additional Safety Tips:
- Never remove or disable the blade guard.
- Disconnect the power source before changing the blade.
- Keep the work area clean and well-lit.
- Take breaks to avoid fatigue.
Project Ideas for Your Circular Saw
Now that you know how to use a circular saw, here are some DIY projects to get you started:
1. Building a Simple Bookshelf
- Materials: Lumber (pine, fir, or plywood), screws, wood glue.
- Steps:
- Cut the shelves and side supports to the desired dimensions using your circular saw.
- Assemble the bookshelf using screws and wood glue.
- Sand the edges and apply a finish of your choice.
2. Creating a Wooden Coffee Table
- Materials: Lumber (reclaimed wood, plywood, or hardwood), legs, screws, wood glue.
- Steps:
- Cut the tabletop and any additional supports to size.
- Attach the legs using screws and wood glue.
- Sand and finish the table.
3. Constructing a Garden Planter Box
- Materials: Cedar or redwood lumber, screws, landscape fabric.
- Steps:
- Cut the sides, bottom, and supports to the required dimensions.
- Assemble the box using screws.
- Line the inside with landscape fabric to prevent soil erosion.
4. Building a Shed
- Materials: Lumber, Plywood or OSB Sheathing, Roofing materials, fasteners.
- Steps:
1. Prepare the Site: Ensure the ground is level and stable.
2. Build the Foundation: Construct a wooden frame or concrete slab.
3. Frame the Walls: Cut studs, top plates, and bottom plates to length using your circular saw. Assemble the wall frames and secure them to the foundation.
4. Install the Roof: Construct roof trusses or rafters. Cover with sheathing and roofing material.
5. Add Siding and Finishing Touches: Install siding, doors, windows, and any desired trim.
- Steps:
5. Home Remodeling: Installing Hardwood Floors
- Materials: Hardwood planks, underlayment, fasteners (nails or staples).
- Steps:
1. Prepare the Subfloor: Ensure it is clean, level, and dry.
2. Install Underlayment: Roll out and secure underlayment material.
3. Lay the First Row: Align the first row of planks along a straight edge, using spacers for expansion gaps.
4. Cut Planks: Use your circular saw to make precise cuts for fitting planks around obstacles and at the ends of rows.
5. Fasten Planks: Secure each plank with nails, staples, or adhesive.
- Steps:
Expanding Your Skills with Sheet Goods
Sheet goods, like plywood and OSB, are frequently used in construction projects and DIY projects. Circular saws excel at cutting these materials. Here are some tips:
- Support the Sheet: Place the sheet on a stable surface to prevent sagging.
- Use a Straight Edge: Clamp a straight edge to the sheet to guide the saw.
- Score the Cut Line: Use a utility knife to score the cut line, reducing splintering.
- Use a Plywood Blade: This will provide a cleaner cut.
Troubleshooting Common Issues
Even with proper technique, you might encounter some issues. Here are some solutions:
- Saw Binding: Ensure the blade is sharp and the wood is properly supported.
- Splintering: Use a plywood blade and score the cut line.
- Inaccurate Cuts: Check the blade alignment and use a guide.
- Saw Overheating: Allow the saw to cool down and ensure the blade is sharp.
Maintaining Your Circular Saw
Regular maintenance will prolong the life of your circular saw and keep it performing optimally:
- Clean the Saw: Remove sawdust and debris after each use.
- Check the Blade: Inspect the blade for damage and replace it when necessary.
- Lubricate Moving Parts: Apply lubricant to the base plate and other moving parts.
- Store Properly: Store the saw in a dry place to prevent rust and corrosion.
Frequently Asked Questions (FAQ)
- Can I use a circular saw to cut metal?
- Yes, but you need a special metal-cutting blade designed for that purpose.
- What is the best blade for cutting plywood?
- A plywood blade with a high tooth count minimizes splintering.
- How do I prevent kickback?
- Keep a firm grip on the saw, use the correct blade, and avoid twisting the saw during the cut.
- Is a cordless circular saw as powerful as a corded one?
- Cordless saws have improved significantly, but corded saws still offer more consistent power for heavy-duty tasks.
- How deep can a circular saw cut?
- The cutting depth depends on the saw’s blade diameter. Common sizes range from 5 1/2 inches to 7 1/4 inches, providing cutting depths of around 1 1/2 to 2 1/2 inches.
By mastering these techniques and understanding the capabilities of a circular saw, you’ll be well-equipped to tackle a wide range of wood cutting, construction projects, and DIY projects with confidence. Remember to always prioritize safety and take your time to achieve the best results.

Hi, I’m Tom Scalisi, and welcome to The Saw Blog! I started this blog to share my hands-on experience and insights about woodworking tools—especially saws and saw blades. Over the years, I’ve had the chance to work with a wide range of tools, and I’m here to help both professionals and hobbyists make informed decisions when it comes to selecting and using their equipment. Whether you’re looking for in-depth reviews, tips, or just advice on how to get the best performance out of your tools, you’ll find it here. I’m excited to be part of your woodworking journey!