
Can you change the blade on a Ryobi circular saw? Yes, you absolutely can! It’s a crucial maintenance task for optimal cutting performance and safety. This comprehensive guide will walk you through the entire circular saw blade change steps, ensuring you can safely and effectively perform a Ryobi circular saw blade replacement. Let’s delve into the circular saw blade changing procedure.
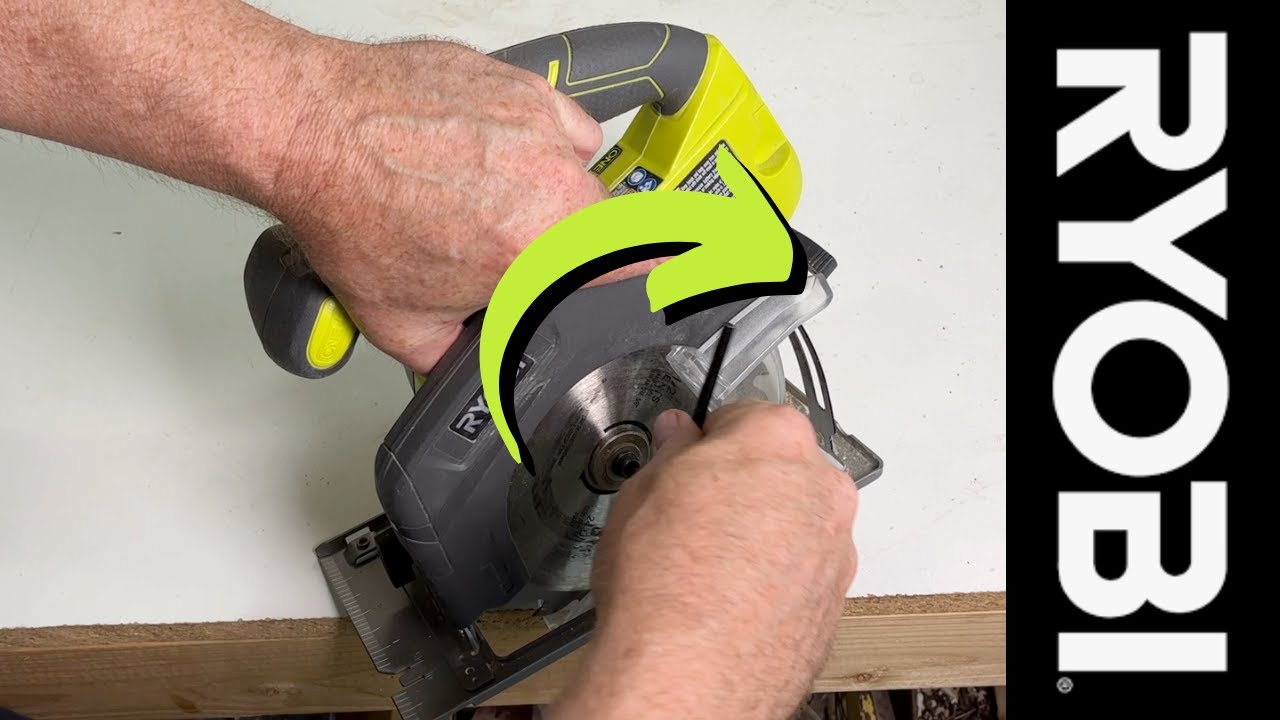
Image Source: i.ytimg.com
Safety First: Preparing for Ryobi Circular Saw Blade Replacement
Before you even think about touching your Ryobi circular saw, safety is paramount. Neglecting safety measures can lead to serious injuries. Follow these precautions diligently:
- Unplug the Saw: This is the single most important step. Ensure the saw is completely disconnected from the power source. This prevents accidental activation while you’re working on it.
- Wear Safety Glasses: Flying debris is a real hazard when working with power tools. Protect your eyes with approved safety glasses.
- Wear Gloves: Protect your hands from sharp blade edges and potential splinters. Work gloves with good grip are recommended.
- Read the Manual: Your Ryobi circular saw’s manual contains specific safety information and instructions relevant to your model. Take the time to familiarize yourself with it.
- Work in a Well-Lit Area: Good visibility is essential for avoiding mistakes and ensuring accuracy.
- Clear the Workspace: Remove any obstacles or distractions from your work area. A cluttered space can lead to accidents.
Gathering Your Tools and Materials for Ryobi Blade Change Instructions
Having the right tools readily available will streamline the Ryobi circular saw blade removal and installation process. Here’s what you’ll need:
- New Circular Saw Blade: Choose a blade that is compatible with your Ryobi circular saw and suitable for the material you’ll be cutting. Consider the blade diameter, arbor size, and tooth count.
- Wrench or Allen Key: Most Ryobi circular saws use a wrench or Allen key to loosen the arbor bolt. Check your saw’s manual to determine the correct size.
- Gloves: As mentioned earlier, gloves are essential for protecting your hands.
- Safety Glasses: Protect your eyes.
- Blade Wipes or Cleaner: A clean blade cuts more efficiently and lasts longer.
- Soft Cloth or Rag: For wiping down the saw and blade.
- (Optional) Block of Wood: To help stabilize the blade while loosening the arbor bolt.
Step-by-Step Guide: Ryobi Circular Saw Blade Change Steps
Now, let’s get down to the nitty-gritty of installing new circular saw blade on Ryobi. Follow these steps carefully:
Step 1: Locating the Arbor Lock
The arbor lock is a crucial feature that prevents the blade from rotating while you loosen the arbor bolt.
- Identify the Arbor Lock: The arbor lock is usually a button or lever located near the blade. Refer to your Ryobi circular saw’s manual if you’re unsure of its location.
- Engage the Arbor Lock: Press and hold the arbor lock button or lever. You may need to rotate the blade slightly until the lock engages fully. You should feel or hear it click into place.
Step 2: Loosening the Arbor Bolt
The arbor bolt secures the blade to the saw.
- Locate the Arbor Bolt: The arbor bolt is the bolt in the center of the blade.
- Determine the Correct Tool: Identify whether your saw uses a wrench or an Allen key for the arbor bolt.
- Loosen the Bolt: While holding the arbor lock engaged, use the wrench or Allen key to loosen the arbor bolt. Important: Ryobi circular saw arbor bolts typically loosen in the opposite direction of what you might expect. Check your manual, but generally, you’ll need to turn the bolt clockwise to loosen it. This is because the motor’s rotation direction would otherwise tighten the bolt during use.
- Use a Block of Wood (Optional): If the blade is difficult to hold in place, wedge a block of wood against the blade to prevent it from rotating while you loosen the bolt.
Step 3: Ryobi Circular Saw Blade Removal
With the arbor bolt loosened, you can now remove the old blade.
- Remove the Arbor Bolt Completely: Once loosened, fully unscrew the arbor bolt and remove it, along with any washers or flanges that are present. Keep these parts safe, as you’ll need them to install the new blade.
- Remove the Old Blade: Carefully slide the old blade off the arbor. Be mindful of the blade’s teeth, as they can be sharp.
- Inspect the Flanges: Check the flanges (the metal discs that sandwich the blade) for any damage or debris. Clean them thoroughly with a cloth or rag. Make sure they are properly seated when you reassemble the saw.
Step 4: Installing New Circular Saw Blade on Ryobi
Now for the exciting part – installing new circular saw blade on Ryobi.
- Mount the New Blade: Carefully slide the new blade onto the arbor, ensuring that the blade’s rotation direction arrow matches the direction indicated on the saw’s blade guard. This is crucial for proper cutting.
- Replace the Flanges and Arbor Bolt: Reinstall the flanges and arbor bolt in the correct order. Ensure the flanges are properly seated against the blade.
- Tighten the Arbor Bolt: While holding the arbor lock engaged, use the wrench or Allen key to tighten the arbor bolt securely. Remember the reverse-threaded bolt – tighten it counter-clockwise (usually)! Don’t overtighten it, as this can damage the threads. Tighten it firmly, but avoid using excessive force.
Step 5: Testing and Final Checks
Before using your saw, perform these final checks to ensure everything is in order.
- Release the Arbor Lock: Release the arbor lock and manually rotate the blade to ensure it spins freely and doesn’t wobble.
- Check the Blade Guard: Make sure the blade guard moves freely and returns to its original position automatically. The blade guard is a vital safety feature.
- Plug in the Saw: Only plug the saw back in after you have completed all checks and are confident that the blade is installed correctly.
- Perform a Test Cut: Make a test cut on a scrap piece of wood to verify that the blade is cutting smoothly and accurately.
Choosing the Right Blade for Your Ryobi Circular Saw
Ryobi circular saw blade replacement necessitates selecting the appropriate blade for your intended purpose. Different blades are designed for different materials and applications. Here’s a brief overview:
| Blade Type | Best For | Characteristics |
|---|---|---|
| General Purpose | Wood, plywood, and some plastics | Moderate tooth count, good for general cutting. |
| Framing | Softwoods | Lower tooth count, aggressive cutting, fast material removal. |
| Fine Finish | Hardwoods, trim, and delicate materials | High tooth count, produces smooth, clean cuts with minimal splintering. |
| Metal Cutting | Ferrous and non-ferrous metals | Specialized teeth and blade material designed for cutting metal. |
| Masonry | Concrete, brick, and tile | Abrasive blade made of diamond or carbide grit. |
Consider the following factors when choosing a blade:
- Material: What material will you be cutting most often?
- Cut Quality: Do you need a smooth, clean cut, or is a rough cut acceptable?
- Blade Diameter: Ensure the blade diameter is compatible with your Ryobi circular saw.
- Arbor Size: Make sure the blade’s arbor hole matches the arbor size of your saw.
- Tooth Count: Higher tooth counts generally produce smoother cuts.
Ryobi Circular Saw Maintenance for Longevity
Regular Ryobi circular saw maintenance is essential for extending the life of your saw and ensuring optimal performance.
- Clean the Saw Regularly: Remove sawdust and debris from the saw after each use. Use a brush or compressed air to clean hard-to-reach areas.
- Inspect the Power Cord: Check the power cord for any damage or fraying. Replace the cord if necessary.
- Lubricate Moving Parts: Apply a small amount of lubricant to moving parts, such as the blade guard pivot point, to ensure smooth operation.
- Store the Saw Properly: Store the saw in a dry, safe place to protect it from the elements.
- Sharpen or Replace Blades: Dull blades can be dangerous and can damage your saw. Sharpen or replace blades as needed.
Troubleshooting Common Issues During Ryobi Blade Changes
Sometimes, things don’t go as planned. Here are some common issues you might encounter during changing circular saw blade, and how to resolve them:
- Arbor Bolt Stuck: If the arbor bolt is stuck, try applying penetrating oil and letting it sit for a few minutes before attempting to loosen it again. You can also try using a longer wrench or Allen key for more leverage.
- Blade Won’t Come Off: If the blade is stuck on the arbor, gently tap it with a rubber mallet to loosen it. Be careful not to damage the blade or the saw.
- Arbor Lock Not Engaging: If the arbor lock is not engaging, make sure the blade is not rotating too freely. Try rotating the blade slightly until the lock clicks into place.
- New Blade Wobbles: If the new blade wobbles after installation, double-check that the flanges are properly seated and that the arbor bolt is tightened securely.
- Wrong Blade Size: If the new blade is the wrong size, make sure you are using a blade that is compatible with your Ryobi circular saw. Check the blade diameter and arbor size.
Frequently Asked Questions (FAQ)
- How often should I change my Ryobi circular saw blade?
- It depends on how frequently you use the saw and the types of materials you cut. As a general rule, change the blade when it becomes dull or damaged, or when you notice a decrease in cutting performance.
- Can I use any brand of circular saw blade on my Ryobi saw?
- Yes, as long as the blade has the correct diameter and arbor size for your Ryobi circular saw.
- What is the best way to dispose of old circular saw blades?
- Wrap the old blade securely in cardboard or heavy paper and tape it shut. Label the package clearly as “Sharp Object” and dispose of it properly according to your local regulations. Some recycling centers may accept metal blades.
- What if I strip the arbor bolt?
- A stripped arbor bolt is a serious issue. You will likely need to take your saw to a qualified repair technician. Trying to force a stripped bolt can damage the saw further.
- Is there a specific direction a circular saw blade should be installed?
- Yes! Absolutely! The blade should be installed so that the teeth point in the direction of rotation. There is usually an arrow on the blade that shows the correct direction, and this should match the rotation direction indicated on the saw. Installing it backward is dangerous and will result in very poor cutting performance.
- Where can I find the right Ryobi blade change instructions for my specific model?
- The best place to find these instructions is in the owner’s manual for your Ryobi circular saw. You can also often find manuals online at the Ryobi website if you have lost your physical copy.
If you follow these steps and tips, you’ll be able to swap out your Ryobi circular saw blade safely and easily. Doing this the right way keeps your saw cutting perfectly and helps it last a lot longer. Just remember to always put safety first and check your manual if you have questions about your specific model. Taking good care of your saw is the best way to stay safe and get more done in your shop!

Hi, I’m Tom Scalisi, and welcome to The Saw Blog! I started this blog to share my hands-on experience and insights about woodworking tools—especially saws and saw blades. Over the years, I’ve had the chance to work with a wide range of tools, and I’m here to help both professionals and hobbyists make informed decisions when it comes to selecting and using their equipment. Whether you’re looking for in-depth reviews, tips, or just advice on how to get the best performance out of your tools, you’ll find it here. I’m excited to be part of your woodworking journey!