
Are you wondering how to build a table saw table? This guide offers easy DIY plans and tips for creating a custom DIY table saw workstation that enhances your woodworking experience. We’ll explore everything from a simple table saw stand to a comprehensive table saw cabinet, a convenient table saw outfeed table, and even a router table combo. This detailed guide is designed to provide you with the knowledge and confidence to build your ideal custom table saw station.
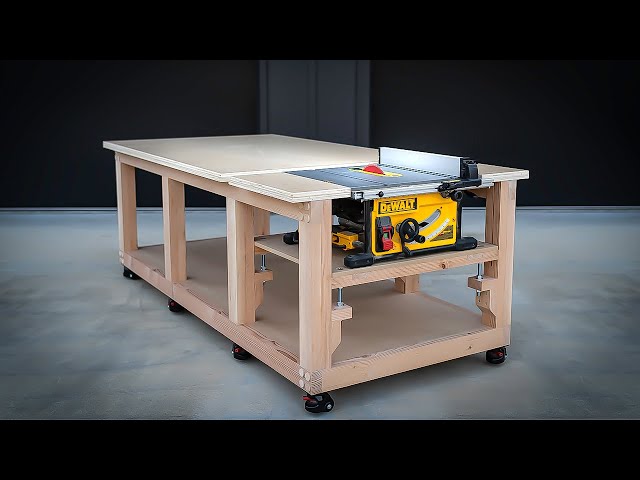
Image Source: i.ytimg.com
Why Build Your Own Table Saw Table?
Building your own table saw table provides numerous advantages over purchasing a pre-made one. It allows for complete customization to fit your specific needs and workspace, potentially saving you money.
- Customization: Tailor the table to your desired height, size, and features.
- Cost-Effectiveness: Often cheaper than buying a pre-built high-quality table.
- Improved Safety: Incorporate features that enhance safety, like dust collection.
- Increased Functionality: Add features like a table saw extension table, a router table combo, or a dedicated table saw outfeed table.
- Skill Development: A rewarding project that enhances your woodworking skills.
Planning Your Table Saw Table
Before you start cutting wood, careful planning is essential. Consider these factors:
- Available Space: Measure your workshop to determine the maximum size of your table.
- Intended Use: Will it be primarily a table saw support table, or will it incorporate other tools?
- Features: Do you want a table saw extension table, a router table combo, or built-in storage?
- Mobility: Do you need the table to be mobile? Consider adding casters.
- Budget: Determine how much you’re willing to spend on materials.
Gathering Your Materials and Tools
- Plywood: For the table top, cabinet sides, and shelves. ¾” plywood is ideal for the top and cabinet sides.
- Lumber: For framing, legs, and supports. 2x4s or 4x4s work well.
- Hardware: Screws, bolts, nuts, washers, and casters (if desired).
- Table Saw Accessories: Miter gauge, fence, feather boards, push sticks.
- Fasteners: Wood screws of various lengths, nails, and construction adhesive.
- Finishing: Sandpaper, primer, paint, or polyurethane.
- Tools:
- Table saw
- Circular saw
- Drill/driver
- Sander
- Measuring tape
- Level
- Square
- Clamps
- Safety glasses
- Hearing protection
Choosing the Right Design
Several table saw table designs cater to different needs and skill levels. Here are some common options:
- Basic Table Saw Stand: A simple frame with a flat top. This is the easiest and most affordable option.
- Table Saw Cabinet: A fully enclosed cabinet with drawers and shelves for storage. Provides ample space and dust collection options.
- Table Saw Extension Table: Expands the table saw’s surface area for handling larger workpieces.
- Table Saw Outfeed Table: Supports material as it exits the saw, preventing it from tipping.
- Router Table Combo: Integrates a router table into the table saw setup, maximizing space and functionality.
Building a Basic Table Saw Stand
This is the simplest option, perfect for beginners.
Step-by-Step Guide
- Cut the Legs: Cut four legs from 4×4 lumber to your desired height (typically 34-36 inches).
- Build the Frame: Construct a rectangular frame from 2×4 lumber, sized to fit your table saw. The frame should be slightly larger than the table saw’s base.
- Attach the Legs: Secure the legs to the inside corners of the frame using screws and construction adhesive.
- Add Support Braces: Add 2×4 braces between the legs for added stability.
- Prepare the Table Top: Cut a piece of ¾” plywood to the desired size.
- Mount the Table Saw: Carefully position your table saw on the frame. Secure it to the plywood top using bolts or screws, ensuring it’s level.
- Attach the Table Top: Secure the plywood table top to the frame using screws.
Ensuring Stability
- Use high-quality lumber and plywood.
- Ensure all joints are square and tight.
- Add diagonal braces for extra support.
- Use a level to ensure the table is flat and stable.
Constructing a Table Saw Cabinet
A table saw cabinet offers storage and dust collection capabilities.
Designing the Cabinet
- Plan the dimensions based on your table saw and storage needs.
- Consider incorporating drawers, shelves, and a dust collection port.
- Use software or online tools to create detailed woodworking table plans.
Assembling the Cabinet
- Cut the Pieces: Cut all cabinet sides, top, bottom, and shelves from ¾” plywood according to your woodworking table plans.
- Assemble the Sides: Join the cabinet sides together using screws and construction adhesive.
- Add the Bottom and Top: Attach the bottom and top pieces to the assembled sides.
- Install Shelves and Drawers: Install shelves and drawer slides. Construct drawers from ½” plywood.
- Mount the Table Saw: Cut an opening in the cabinet top to accommodate your table saw. Secure the saw to the top using bolts or screws.
- Add Dust Collection: Install a dust collection port on the back of the cabinet and connect it to your dust collector.
Enhancing Storage Options
- Install drawers with dividers for small tools.
- Add shelves for larger items like blades and accessories.
- Consider a flip-down door for easy access to the cabinet’s interior.
Creating a Table Saw Extension Table
This adds extra surface area for handling long or wide workpieces.
Choosing the Right Type
- Wing Extension: A simple extension that attaches to the side of the table saw.
- Outfeed Table: A larger table positioned behind the table saw to support exiting material.
Building the Extension
- Cut the Extension Table Top: Cut a piece of ¾” plywood to the desired size.
- Build the Frame: Construct a frame from 2×4 lumber to support the extension table top.
- Attach the Frame to the Table Saw: Secure the frame to the existing table saw using bolts or screws.
- Attach the Table Top to the Frame: Secure the plywood table top to the frame using screws.
- Level the Extension: Ensure the extension table is level with the table saw’s surface.
Ensuring a Smooth Transition
- Use shims to fine-tune the height of the extension table.
- Apply wax or lubricant to the table surface to reduce friction.
Integrating a Router Table Combo
Combining a table saw and router table saves space and increases versatility.
Planning the Router Table Integration
- Determine the location of the router table within the table saw setup.
- Ensure adequate space for the router and its accessories.
Installing the Router Table
- Cut the Router Table Opening: Cut an opening in the table saw table to accommodate the router plate.
- Install the Router Plate: Install the router plate flush with the table surface.
- Mount the Router: Mount the router to the router plate.
- Add a Router Fence: Build or purchase a router fence and attach it to the table.
Ensuring Accurate Routing
- Use a high-quality router plate.
- Ensure the router is securely mounted.
- Use a precise router fence.
Building a Table Saw Outfeed Table
An outfeed table supports material as it exits the table saw, improving safety and accuracy.
Designing for Support
- The outfeed table should be level with the table saw’s surface.
- It should be large enough to support the longest workpieces you typically use.
Constructing the Outfeed Table
- Cut the Table Top: Cut a piece of ¾” plywood to the desired size.
- Build the Frame: Construct a frame from 2×4 lumber to support the table top.
- Attach the Frame to the Table Saw: Attach the frame to the table saw using hinges or a similar mechanism, allowing it to be folded down when not in use.
- Attach the Table Top to the Frame: Secure the plywood table top to the frame using screws.
- Ensure Level Alignment: Ensure the outfeed table is level with the table saw’s surface.
Creating a Folding Design
- Use hinges to allow the outfeed table to be folded down.
- Add support legs that can be easily folded or removed.
Building a Table Saw Fence
A good fence is crucial for accurate cuts. You can create a building a table saw fence.
Understanding Fence Types
- Rip Fence: Used for making parallel cuts along the length of the board.
- Miter Gauge: Used for making angled cuts.
Building a Simple Rip Fence
- Cut the Fence Face: Cut a piece of hardwood or plywood for the fence face.
- Build the Fence Body: Construct a frame from 2×4 lumber to support the fence face.
- Attach the Fence Face to the Body: Secure the fence face to the frame using screws and construction adhesive.
- Add Adjustment Hardware: Install hardware that allows you to adjust the fence’s position accurately.
- Ensure Straightness: Ensure the fence is perfectly straight and parallel to the saw blade.
Calibrating Your Fence
- Use a precision square to ensure the fence is square to the table.
- Use a dial indicator to check for parallelism.
Finishing and Protecting Your Table Saw Table
Finishing the table protects it from damage and enhances its appearance.
Sanding and Priming
- Sand all surfaces smooth using progressively finer grits of sandpaper.
- Apply a coat of primer to seal the wood and provide a smooth surface for paint.
Painting or Applying a Protective Finish
- Apply several coats of paint or polyurethane to protect the table from moisture and wear.
- Consider using a durable epoxy coating for added protection.
Adding Edge Banding
- Apply edge banding to the edges of the plywood to cover the exposed plies and give the table a more finished look.
Tips for Success
- Measure Twice, Cut Once: Avoid costly mistakes by double-checking all measurements.
- Use Quality Materials: Invest in high-quality lumber and plywood for a durable and long-lasting table.
- Work Safely: Wear safety glasses and hearing protection when using power tools.
- Take Your Time: Don’t rush the process. Take your time to ensure accuracy and quality.
- Consult Plans and Resources: Utilize online woodworking table plans and resources for guidance and inspiration.
FAQs
What is the best height for a table saw table?
Most workbenches are usually between 34 and 36 inches high, but the best height really depends on how tall you are. A good rule of thumb is to adjust the table so that when your hands are resting on the surface, your elbows are bent at a perfect 90-degree angle.
Can I build a table saw table with limited woodworking experience?
Yes, a basic table saw stand is a great project for beginners. Start with a simple design and gradually add more features as you gain experience.
Who is this project best suited for?
This project is suitable for woodworkers of all skill levels, from beginners looking to build a simple stand to experienced craftsmen aiming for a complex custom station.
What kind of dust collection system do I need for a table saw cabinet?
A shop vacuum or a dedicated dust collector with a 4-inch hose is recommended. Ensure the cabinet is sealed as much as possible to maximize dust collection efficiency.
Is it necessary to add casters to my table saw table?
Adding casters is optional but highly recommended if you need to move the table around your workshop. Choose heavy-duty casters with locking mechanisms for safety.

Hi, I’m Tom Scalisi, and welcome to The Saw Blog! I started this blog to share my hands-on experience and insights about woodworking tools—especially saws and saw blades. Over the years, I’ve had the chance to work with a wide range of tools, and I’m here to help both professionals and hobbyists make informed decisions when it comes to selecting and using their equipment. Whether you’re looking for in-depth reviews, tips, or just advice on how to get the best performance out of your tools, you’ll find it here. I’m excited to be part of your woodworking journey!