
Can I change the blade on my Ryobi circular saw myself? Yes, you can! Changing the blade on your Ryobi circular saw is a straightforward process. This guide will walk you through the steps, ensuring you can safely and efficiently perform a Ryobi circular saw blade replacement. Whether you’re replacing a worn blade or switching to a different type for a specific task, mastering the blade change process is essential for any DIY enthusiast or professional. This article will offer Ryobi blade change instructions to assist you with Ryobi circular saw maintenance.
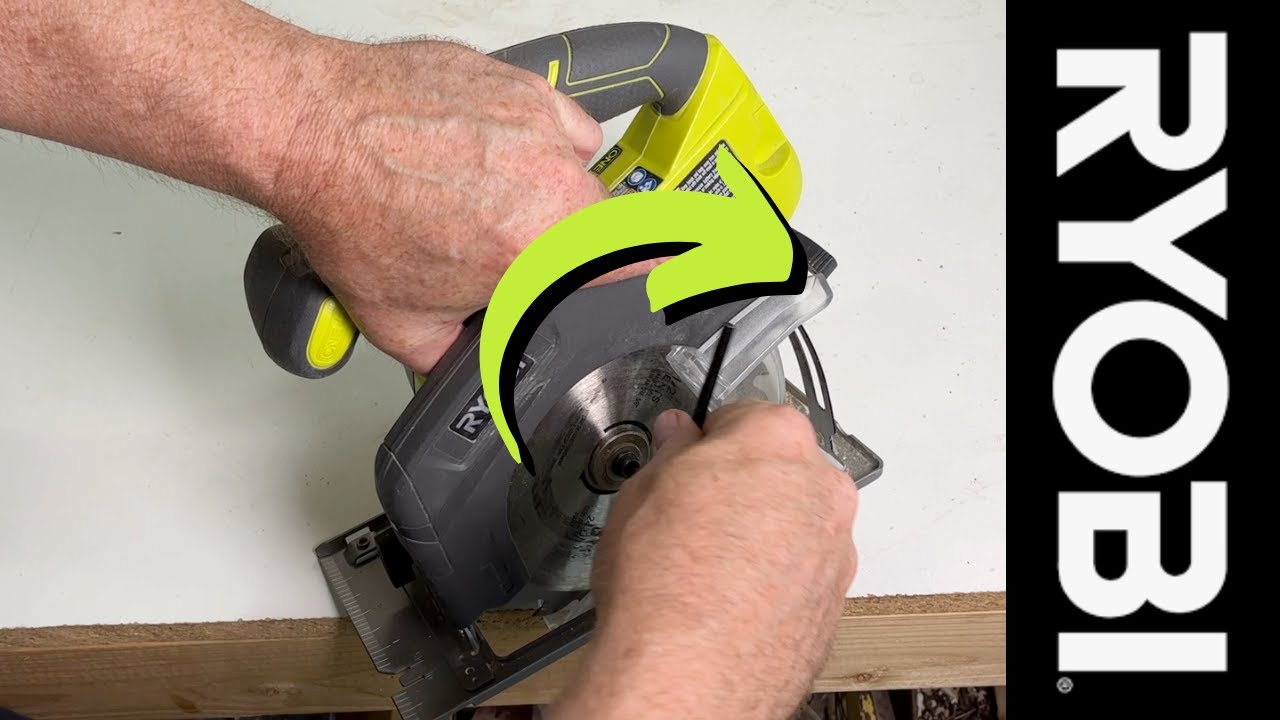
Image Source: i.ytimg.com
Gathering Your Tools and Ensuring Safety
Before you even pick up your Ryobi circular saw, you really need to get your tools ready and make sure everything is safe. If you rush into this without preparing, you could easily hurt yourself or break your saw. Taking a few minutes to put safety first is the best way to make sure changing the blade goes smoothly and correctly.
Essential Tools for the Job
Having these tools on hand will make the process faster and easier:
- New Circular Saw Blade: Select the appropriate blade for the material you’ll be cutting. Different blades are designed for wood, metal, plastic, and other materials.
- Wrench or Allen Key (if required): Your Ryobi circular saw likely came with a wrench or Allen key to loosen the arbor nut. If you don’t have it, check your saw’s manual to determine the correct size.
- Gloves: Protect your hands from sharp blade edges.
- Safety Glasses: Shield your eyes from debris that may fly during the process.
- Piece of Wood (Optional): Placing a piece of wood under the saw can protect your work surface and provide better stability.
- Cleaning Brush (Optional): To remove sawdust and debris from the saw.
Prioritizing Safety First
Safety should always be your top concern when working with power tools. Here’s how to minimize risks during Ryobi blade change:
- Disconnect the Power: The most crucial step! Unplug your corded Ryobi circular saw or remove the battery from your Ryobi cordless circular saw. This prevents accidental starting.
- Engage the Blade Lock: Most Ryobi circular saws have a blade lock button. Press and hold it to prevent the blade from spinning while you’re loosening the nut.
- Wear Safety Gear: Gloves and safety glasses are essential.
- Work in a Well-Lit Area: Proper lighting allows you to see what you’re doing clearly.
- Read the Manual: Familiarize yourself with your specific Ryobi circular saw model’s instructions for replacing the blade. The Ryobi blade change instructions can vary slightly depending on the model.
Step-by-Step Guide: Ryobi Circular Saw Blade Replacement
Now that you have your tools and safety measures in place, let’s get started with the Ryobi circular saw blade change Ryobi.
1. Locating and Engaging the Blade Lock
The blade lock is usually a button or lever located near the arbor nut (the nut that holds the blade in place).
- Purpose: The blade lock prevents the blade from spinning, making it easier to loosen the arbor nut.
- Procedure: Press and hold the blade lock button. You might need to rotate the blade slightly until the lock engages fully. You’ll feel or hear it click into place.
2. Loosening the Arbor Nut
This is where the wrench or Allen key comes in. Remember, the direction to loosen the nut can vary depending on your Ryobi circular saw model.
- Determining the Loosening Direction: Consult your Ryobi circular saw manual. Some Ryobi saws have a standard right-hand thread (loosen counter-clockwise), while others have a left-hand thread (loosen clockwise).
- Using the Wrench:
- Place the wrench or Allen key securely on the arbor nut.
- Apply firm, steady pressure in the correct direction.
- You may need to use a bit of force to break the nut loose, especially if it hasn’t been removed in a while.
- Once the nut is loose, you can usually unscrew it by hand.
3. Removing the Old Blade
With the arbor nut removed, you can now take out the old blade.
- Removing the Outer Washer: There’s typically a washer or flange on the outside of the blade. Remove it.
- Carefully Taking out the Blade: Gently slide the old blade off the arbor. Be careful of the teeth, as they can be sharp.
- Inspecting the Inner Washer: Check the inner washer or flange (the one that sits against the saw housing). Make sure it’s clean and in good condition.
- Cleaning (Optional): Use a brush to remove any sawdust or debris from the arbor and the surrounding area. This will ensure a proper fit for the new blade.
4. Installing the New Ryobi Circular Saw Blade
Now it’s time to put in the new blade.
- Positioning the New Blade:
- Ensure the blade is facing the correct direction. Most circular saw blades have arrows indicating the direction of rotation. The teeth should point towards the direction the blade will be spinning when cutting.
- Align the blade’s arbor hole with the arbor on the saw.
- Slide the blade onto the arbor until it sits flush against the inner washer.
- Replacing the Outer Washer: Place the outer washer or flange back onto the arbor, ensuring it sits flush against the blade.
- Securing the Arbor Nut:
- Thread the arbor nut back onto the arbor by hand, turning it in the correct direction (opposite of how you loosened it).
- Once the nut is snug, use the wrench or Allen key to tighten it securely.
- Important: Don’t overtighten the nut. Tighten it firmly, but avoid excessive force.
- Double-Checking: Before releasing the blade lock, double-check that the blade is properly seated and that the arbor nut is securely tightened.
5. Testing and Final Checks
Before you start cutting, perform a few final checks to ensure everything is in order.
- Releasing the Blade Lock: Release the blade lock button.
- Manual Rotation: Carefully rotate the blade by hand (while the saw is still unplugged or the battery is removed) to ensure it spins freely and doesn’t wobble.
- Visual Inspection: Check the blade alignment to make sure it’s running true.
- Test Cut (Optional): If you’re unsure, perform a test cut on a scrap piece of wood to verify that the blade is cutting smoothly and accurately. This is a good way to ensure proper Ryobi circular saw blade installation.
- Re-tighten (If Necessary): After the test cut, re-tighten the arbor nut if needed.
Tips for a Smooth Ryobi Blade Change
Here are some extra tips to make the process even easier:
- Keep Your Blades Clean: Regularly clean your circular saw blades to remove resin and pitch buildup. This will improve their cutting performance and extend their lifespan.
- Use the Right Blade for the Job: Using the wrong blade can damage the blade, the material you’re cutting, and even your saw.
- Sharpen Your Blades: Dull blades are dangerous and can cause kickback. If your blade is dull, either sharpen it or replace it.
- Store Blades Properly: Store your circular saw blades in a dry place to prevent rust. Consider using a blade case or holder to protect the teeth.
- Consult the Manual: Your Ryobi circular saw manual is your best resource for specific instructions and troubleshooting tips.
Deciphering Common Issues During Blade Changes
Sometimes, things don’t go exactly as planned. Here are some common issues and how to address them:
- Arbor Nut is Stuck:
- Apply penetrating oil to the threads and let it sit for a few minutes.
- Use a longer wrench or Allen key for more leverage.
- If all else fails, take the saw to a qualified repair technician.
- Blade is Difficult to Remove:
- Make sure the arbor nut is completely removed.
- Gently wiggle the blade back and forth to loosen it.
- Check for any debris or buildup that might be preventing the blade from sliding off.
- Blade Doesn’t Sit Flush:
- Ensure the inner and outer washers are properly seated.
- Check for any debris or damage on the arbor or the blade’s arbor hole.
- Make sure you’re using the correct blade size for your saw.
- Saw Vibrates Excessively After Blade Change:
- The blade may not be properly tightened. Retighten the arbor nut.
- The blade may be damaged or unbalanced. Replace the blade.
- The arbor or other saw components may be damaged. Consult a qualified repair technician.
Choosing the Right Circular Saw Blade
Selecting the appropriate blade is crucial for achieving optimal cutting performance and ensuring safety. Different blades are designed for specific materials and applications. Here’s a brief overview:
| Blade Type | Material | Characteristics |
|---|---|---|
| General Purpose | Wood, Plywood | Versatile, suitable for a variety of wood cutting tasks. |
| Framing | Wood | Designed for fast, efficient cutting of framing lumber. |
| Fine Finish | Wood, Plywood | Produces clean, smooth cuts with minimal splintering. Ideal for cabinetry and trim work. |
| Metal Cutting | Metal | Made with carbide teeth and designed to cut through various types of metal, such as steel and aluminum. |
| Masonry | Concrete, Brick | Abrasive blades designed for cutting through masonry materials. |
| Combination | Wood, Metal, etc. | Offers the ability to cut through a variety of materials, but not necessarily as efficiently as a dedicated blade. |
Ryobi Circular Saw Maintenance Tips Beyond Blade Changes
Regular maintenance is essential for keeping your Ryobi circular saw in good working condition and extending its lifespan. Here are some additional maintenance tips:
- Cleaning: Regularly clean your saw to remove sawdust, debris, and pitch buildup. Use a brush or compressed air to clean hard-to-reach areas.
- Lubrication: Lubricate moving parts, such as the blade guard pivot points, with a light oil.
- Cord Inspection (for corded models): Check the power cord for any signs of damage, such as cuts or frayed wires. Replace the cord if necessary.
- Battery Care (for cordless models): Follow the manufacturer’s recommendations for charging and storing your batteries.
- Carbon Brush Replacement (if applicable): Some Ryobi circular saws have carbon brushes that need to be replaced periodically. Consult your manual for instructions.
- Professional Servicing: Consider having your saw professionally serviced every year or two to ensure it’s in top working condition.
Changing blade on Ryobi cordless circular saw
The process of changing the blade on a Ryobi cordless circular saw is virtually identical to changing it on a corded model. The primary difference is the power source. Always remove the battery pack from the saw before beginning any maintenance or blade changes. This eliminates the risk of accidental start-up. Once the battery is removed, follow the same steps outlined above for engaging the blade lock, loosening the arbor nut, removing the old blade, installing the new blade, and testing.
FAQ: Ryobi Circular Saw Blade Replacement
Here are some frequently asked questions about Ryobi circular saw blade replacement:
Q: How often should I change my circular saw blade?
- A: It depends on how often you use your saw and the materials you’re cutting. Replace the blade when it becomes dull, damaged, or if you notice a decrease in cutting performance.
Q: Can I use any brand of circular saw blade on my Ryobi saw?
- A: Yes, you can use any brand of blade as long as it’s the correct size (diameter and arbor hole) for your saw.
Q: What size blade does my Ryobi circular saw use?
- A: Refer to your Ryobi circular saw manual or the label on the saw itself to determine the correct blade size. Common sizes include 6-1/2 inch, 7-1/4 inch, and 5-1/2 inch.
Q: How do I dispose of old circular saw blades?
- A: Wrap the blade securely in cardboard or heavy paper to protect yourself and others from the sharp teeth. Dispose of it in a designated metal recycling container or take it to a hazardous waste disposal facility.
Q: What is blade “kickback,” and how can I prevent it?
- A: Kickback is when the saw blade suddenly binds in the material and throws the saw back towards you. To prevent kickback:
- Use sharp blades.
- Support the workpiece properly.
- Avoid forcing the saw.
- Maintain a firm grip on the saw.
- Use a riving knife or splitter.
- A: Kickback is when the saw blade suddenly binds in the material and throws the saw back towards you. To prevent kickback:
Q: Can I sharpen my own circular saw blades?
- A: Yes, you can sharpen your own blades with the right tools and techniques. However, it’s often more cost-effective and convenient to have them professionally sharpened or to simply replace them.
By following these steps and tips, you can confidently and safely perform a Ryobi circular saw blade replacement. Remember to always prioritize safety and consult your saw’s manual for specific instructions. Now you know the best way to change Ryobi circular saw blade!

Hi, I’m Tom Scalisi, and welcome to The Saw Blog! I started this blog to share my hands-on experience and insights about woodworking tools—especially saws and saw blades. Over the years, I’ve had the chance to work with a wide range of tools, and I’m here to help both professionals and hobbyists make informed decisions when it comes to selecting and using their equipment. Whether you’re looking for in-depth reviews, tips, or just advice on how to get the best performance out of your tools, you’ll find it here. I’m excited to be part of your woodworking journey!