
What is the best way to change a blade on a Dewalt table saw? The best way to change the blade on a Dewalt table saw involves unplugging the saw, using the correct tools to loosen and remove the arbor nut, replacing the blade with the teeth pointing in the correct direction, and then carefully tightening the nut. This process prioritizes safety at every step. This detailed table saw blade change tutorial will provide all the information needed to change the blade on your Dewalt table saw safely and effectively.
The Dewalt table saw is a workhorse in many workshops, providing the power and precision needed for various cutting tasks. But like any tool, it requires regular maintenance, and one of the most frequent tasks is Dewalt table saw blade replacement. Changing the blade might seem simple, but it’s crucial to follow the correct procedure to prevent injury and ensure optimal performance. This comprehensive table saw blade removal guide will walk you through each step, emphasizing safety above all else. We’ll cover Dewalt blade change tools, and everything else you need to know for safely changing the blade on your Dewalt jobsite saw.
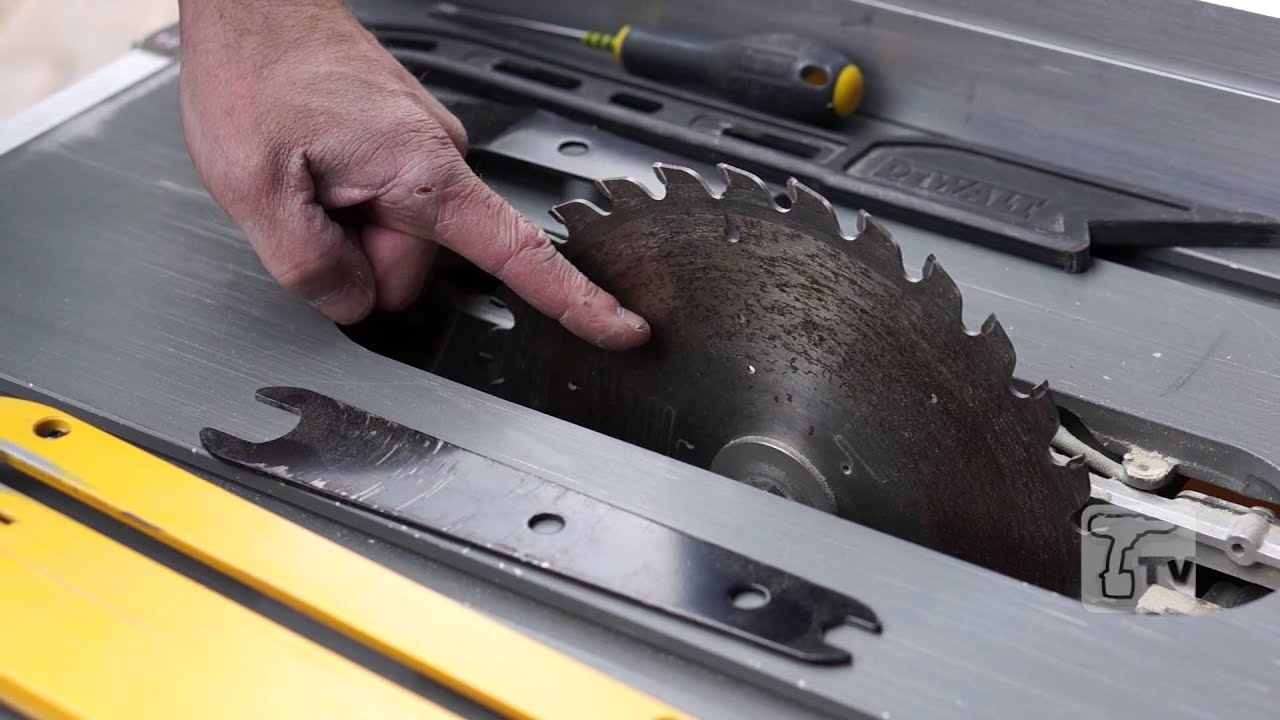
Image Source: i.ytimg.com
Prioritizing Safety: The Foundation of Any Blade Change
Before we even think about Dewalt table saw blade replacement, safety is paramount. A table saw blade is a formidable cutting tool, and any lapse in concentration or disregard for safety rules can lead to severe injuries.
Essential Safety Measures
- Disconnect the Power: This is the single most important step. Always unplug the table saw from the power outlet before starting any maintenance or blade changes. This eliminates the risk of accidental activation.
- Wear Safety Glasses: Protect your eyes from flying debris, which can be generated during blade removal or installation.
- Use Gloves: Wear work gloves to improve your grip and protect your hands from sharp blade edges and potential cuts.
- Read the Manual: Familiarize yourself with your specific Dewalt table saw model’s instructions for blade changes. Manuals often contain model-specific warnings and recommendations.
- Stay Focused: Avoid distractions and concentrate on the task. Table saw maintenance is not the time for multitasking.
Gathering Your Tools: Dewalt Blade Change Tools
Having the right tools makes the process much smoother and safer. Here’s what you’ll need for changing blade on Dewalt jobsite saw:
- Wrench(es): Dewalt table saws typically require one or two wrenches to loosen the arbor nut. The specific sizes will be in your saw’s manual.
- Arbor Lock Pin (if applicable): Some models have an arbor lock pin that helps hold the blade steady while you loosen the nut.
- Clean Cloth or Towel: Use this to clean the blade and arbor flanges.
- New Table Saw Blade: Choose a blade that suits the material you plan to cut.
Step-by-Step: Table Saw Blade Change Instructions
Now, let’s get into the detailed, step-by-step process for replacing table saw blade safely.
Step 1: Preparing the Saw
- Unplug the Saw: Double-check that the saw is disconnected from the power outlet.
- Raise the Blade: Raise the blade to its maximum height. This gives you more room to work.
- Remove the Throat Plate: The throat plate is the insert around the blade. Depending on your model, it may lift out or require you to loosen a retaining mechanism. Consult your manual.
Step 2: Locking the Arbor and Loosening the Arbor Nut
- Engage the Arbor Lock (if available): Press and hold the arbor lock button. This will prevent the blade from turning while you loosen the nut.
- Loosen the Arbor Nut: Using the correct size wrench(es), carefully loosen the arbor nut. Most Dewalt table saws have a left-hand thread (reverse thread), meaning you need to turn the nut clockwise to loosen it. Refer to your manual to confirm the correct direction.
- If no Arbor Lock: If your saw doesn’t have an arbor lock, you might need to use two wrenches—one to hold the blade steady (padded with a cloth to avoid damaging the teeth) and the other to loosen the nut.
Step 3: Removing the Old Blade
- Remove the Arbor Nut: Once the nut is loose, remove it completely.
- Remove the Outer Flange: The outer flange is the metal washer that sits between the nut and the blade.
- Carefully Remove the Blade: Gently lift the old blade off the arbor. Be mindful of the blade’s teeth, as they can be very sharp.
Step 4: Installing the New Blade
- Clean the Arbor and Flanges: Use a clean cloth to wipe down the arbor and both flanges. This removes any sawdust or debris that could affect the blade’s alignment.
- Mount the Inner Flange: Ensure the inner flange is correctly positioned on the arbor.
- Mount the New Blade: Slide the new blade onto the arbor, making sure the teeth are pointing in the direction of rotation (usually forward and down towards the table).
- Mount the Outer Flange: Place the outer flange back onto the arbor.
- Install the Arbor Nut: Thread the arbor nut back onto the arbor by hand, turning it counter-clockwise (for left-hand threads) until it’s snug.
Step 5: Tightening the Arbor Nut
- Engage the Arbor Lock (if available): Press and hold the arbor lock button again.
- Tighten the Arbor Nut: Use the wrench(es) to firmly tighten the arbor nut. Do not overtighten it. A snug fit is sufficient.
- If no Arbor Lock: Use two wrenches as before, one to hold the blade steady and the other to tighten the nut.
Step 6: Final Checks and Adjustments
- Release the Arbor Lock: If you used the arbor lock, release the button.
- Spin the Blade by Hand: Rotate the blade by hand to ensure it spins freely and there are no obstructions.
- Reinstall the Throat Plate: Place the throat plate back into its position. Make sure it sits flush with the table surface.
- Double-Check Blade Alignment: Use a square to check that the blade is perpendicular to the table surface and parallel to the miter slots. Adjust as needed.
Step 7: Test Cut (Safety First!)
- Plug in the Saw: Plug the saw back into the power outlet.
- Turn on the Saw: Start the saw and let it reach full speed. Listen for any unusual noises or vibrations.
- Make a Test Cut: Use a piece of scrap wood to make a test cut. Observe the cut quality and ensure the blade is cutting smoothly and cleanly.
Choosing the Right Blade: Optimizing Performance
The right blade makes a significant difference in cut quality and safety.
Blade Types
Here’s a simple table describing common table saw blade types:
| Blade Type | Description | Ideal For |
|---|---|---|
| General Purpose | Versatile blade with a moderate number of teeth. | Cutting wood, plywood, and some composite materials. |
| Ripping | Fewer teeth with large gullets for efficient waste removal. | Cutting wood along the grain (ripping). |
| Crosscut | More teeth with a higher rake angle for cleaner cuts. | Cutting wood across the grain (crosscutting). |
| Combination | Designed for both ripping and crosscutting, but may not excel at either. | Versatile use, good for general woodworking. |
| Plywood/Melamine | High tooth count with a specialized grind to minimize tear-out. | Cutting plywood, melamine, and other veneered materials. |
| Dado | A set of blades used to cut wide grooves (dadoes). | Creating dadoes and rabbets for joinery. |
| Metal Cutting | Blades specifically designed to cut non-ferrous metals like aluminum and brass. Use ONLY on non-ferrous metals. | Cutting non-ferrous metals, aluminum, brass. Do NOT use to cut steel or other ferrous metals. |
Blade Diameter and Arbor Size
Ensure the new blade’s diameter matches your table saw’s specifications (usually 10 inches for most Dewalt jobsite saws). Also, confirm that the blade’s arbor size matches the arbor size of your saw.
Troubleshooting Common Issues
Sometimes, even with careful attention, problems can arise during a Dewalt table saw blade replacement.
- Arbor Nut Won’t Loosen: Apply penetrating oil to the threads and let it sit for a few minutes. Use a longer wrench for more leverage.
- Blade Vibrates: Ensure the blade is properly tightened and the flanges are clean and correctly positioned. Check the blade for any damage.
- Throat Plate Doesn’t Fit: Make sure you’re using the correct throat plate for your blade type (e.g., a zero-clearance throat plate for dado blades).
Dewalt Table Saw Maintenance: Keeping Your Saw in Top Condition
Changing the blade is just one aspect of table saw maintenance. Regular maintenance ensures your saw operates safely and efficiently. Here are some other essential Dewalt table saw maintenance tasks:
- Cleaning: Regularly clean the table saw to remove sawdust and debris. Use a brush or vacuum cleaner.
- Lubrication: Lubricate moving parts, such as the height and bevel adjustment mechanisms, with a dry lubricant.
- Belt Inspection: Check the drive belt for wear and tear. Replace it if necessary.
- Fence Alignment: Regularly check the fence for alignment and adjust as needed.
- Miter Slot Cleaning: Clean the miter slots to ensure smooth miter gauge operation.
FAQs: Answering Your Questions About Table Saw Blade Replacement
Here are some frequently asked questions related to changing a table saw blade.
How often should I change my table saw blade?
The frequency depends on usage and the materials you cut. Change the blade when it becomes dull, chipped, or when you switch to a different type of cut.
Can I use a blade from another brand on my Dewalt table saw?
Yes, as long as the blade diameter and arbor size are compatible with your Dewalt saw.
What is the best way to store table saw blades?
Store blades in a dry place, ideally in a blade case or wrapped in a protective material. This prevents rust and damage.
Is it safe to sharpen my own table saw blade?
Sharpening a table saw blade requires specialized tools and skills. It’s generally best to have it professionally sharpened.
What should I do with my old table saw blade?
Dispose of old blades responsibly. Wrap them securely in cardboard or heavy paper to prevent injury and take them to a recycling center or metal scrap yard.
Conclusion
Swapping out the blade on your DeWalt table saw is actually pretty simple as long as you follow the steps carefully and keep safety in mind. By learning the right way to do it and using the proper tools, you’ll keep your saw running great and working safely for a long time.
When you’re working with power tools, safety isn’t just a suggestion—it’s the most important part of the job. Use this guide to help you get comfortable and confident whenever it’s time to put on a new blade.

Hi, I’m Tom Scalisi, and welcome to The Saw Blog! I started this blog to share my hands-on experience and insights about woodworking tools—especially saws and saw blades. Over the years, I’ve had the chance to work with a wide range of tools, and I’m here to help both professionals and hobbyists make informed decisions when it comes to selecting and using their equipment. Whether you’re looking for in-depth reviews, tips, or just advice on how to get the best performance out of your tools, you’ll find it here. I’m excited to be part of your woodworking journey!