
How is wood cut when ripping with a table saw? Wood is cut along the grain when ripping with a table saw. This process involves using the saw’s rip fence as a guide to ensure a straight and accurate cut. However, ripping wood safely requires careful technique, the right blade, and a thorough understanding of potential hazards. Safety is the most important concern, so let’s dive into the details and learn how to rip wood the right way.
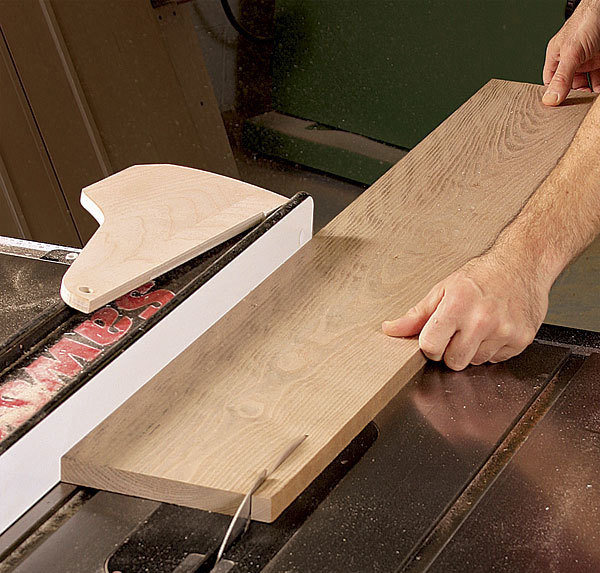
Image Source: images.finewoodworking.com
The Basics of Ripping on a Table Saw
Ripping on a table saw is a common woodworking task. It means cutting a piece of wood along the direction of the grain, making it narrower. Unlike crosscutting, which cuts across the grain, ripping usually results in longer, thinner pieces of wood. Here’s a breakdown of the essential elements:
Table Saw Ripping Techniques: The Step-by-Step Guide
Here’s a simplified way to rip wood, breaking down each step:
- Think and Plan: Before you begin, know the width you want and double-check your measurements.
- Choose the Right Blade: Pick a ripping blade. These blades are made to cut smoothly along the wood grain.
- Set Up the Fence: Set the rip fence to the width you need. Measure from the blade to the fence to be sure.
- Keep It Safe: Wear safety glasses and hearing protection. Make sure your workspace is clear.
- Turn It On: Turn on the saw and let it get up to full speed.
- Feed the Wood: Hold the wood flat against the table and the fence. Push it through the blade at a steady speed.
- Use a Push Stick: When the wood gets close to the blade, use a push stick to finish the cut. This keeps your hands away from danger.
- Turn It Off: After the cut, turn off the saw and wait for the blade to stop before you pick up the wood.
Table Saw Rip Fence Setup: Accuracy is Key
The rip fence is your guide. Setting it up correctly is very important for making straight cuts. Here’s how to do it right:
- Measure Carefully: Use a good measuring tape to set the distance between the blade and the fence. Measure at both the front and the back of the blade to make sure the fence is parallel.
- Lock It Down: After setting the fence, lock it tightly in place. A loose fence can move during the cut, making the cut uneven.
- Double-Check: Before turning on the saw, double-check the fence setting. A quick check can save you from making mistakes.
- Use Featherboards (Optional): Featherboards hold the wood tight against the fence. This helps keep the wood moving straight and reduces vibration.
Ripping Wood Grain Direction: Why It Matters
Wood has a grain, which is the direction the wood fibers run. Ripping means cutting along this grain. This is different from crosscutting, where you cut across the grain. Cutting with the grain makes the cut cleaner and easier.
- Find the Grain: Look at the wood. You’ll see lines running along its length. That’s the grain.
- Rip with the Grain: Always feed the wood into the saw so the blade cuts along the grain. This makes the cut smoother and reduces the chance of the wood splintering.
- Watch for Grain Changes: Sometimes the grain can change direction. If you see this, be extra careful. It might be harder to push the wood through the saw, and the wood might splinter.
Ripping Wood Safely: Essential Safety Tips
Safety is most important when using a table saw. Here are some key safety tips:
- Wear Safety Gear: Always wear safety glasses to protect your eyes from flying wood chips. Hearing protection is also a good idea, as table saws can be loud.
- Use a Push Stick: A push stick keeps your hands away from the blade. Use it to push the wood through the last part of the cut.
- Keep a Safe Distance: Never put your hands directly in line with the blade. Keep them to the side and out of the path of the wood.
- Stand to the Side: Stand slightly to the side of the blade, not directly behind it. This way, if the wood kicks back, it won’t hit you.
- Don’t Reach Over the Blade: Never reach over the blade while the saw is running. If you need to adjust the wood, turn off the saw first.
- Be Alert: Pay attention to what you’re doing. Don’t get distracted, and don’t rush.
- Check the Wood: Look for knots or loose pieces. These can cause the wood to kick back.
Preventing Kickback When Ripping: A Critical Skill
Kickback is when the wood suddenly shoots back toward you. It’s dangerous and can cause serious injuries. Here’s how to prevent it:
- Use a Riving Knife or Splitter: The riving knife or splitter is a metal piece behind the blade that keeps the cut wood from pinching the blade. Always use it.
- Use Featherboards: Featherboards hold the wood tight against the fence, which helps prevent it from twisting and binding.
- Feed at a Steady Pace: Don’t push too fast or too slow. Keep a steady pace.
- Keep the Wood Flat: Make sure the wood stays flat on the table and tight against the fence.
- Watch for Binding: If the wood starts to bind, stop the saw and find out what’s causing it. Don’t force it.
- Use Anti-Kickback Pawls: Anti-kickback pawls dig into the wood if it starts to move backward. These can help prevent kickback.
Push Stick for Ripping: Your Hand’s Best Friend
A push stick is a simple tool that helps you push the wood through the saw without putting your hands too close to the blade.
- How to Use It: Use the push stick to push the last part of the wood through the blade. Keep your hand on the handle and push firmly.
- Types of Push Sticks: There are many types of push sticks. Some are simple sticks with a notch, while others are more complex with handles and grips.
- Make Your Own: You can easily make your own push stick from a piece of scrap wood. Make sure it’s strong and comfortable to hold.
Choosing the Right Tools and Materials
Using the right tools and materials is essential for safe and accurate ripping.
Ripping Blade Selection: Finding the Perfect Match
The right blade makes a big difference in how well the wood cuts and how safe the process is.
- Ripping Blades: Ripping blades have fewer teeth than crosscut blades. The teeth are designed to remove wood quickly along the grain.
- Blade Size: Make sure the blade is the right size for your saw.
- Tooth Design: Look for blades with a flat-top grind. This design is best for ripping.
- Blade Quality: Buy a good-quality blade. A sharp blade cuts cleaner and is safer to use.
Best Wood for Ripping: Considerations for Different Species
Some woods are easier to rip than others. Here’s what to consider:
- Softwoods: Softwoods like pine and cedar are generally easier to rip because they are softer and have a straighter grain.
- Hardwoods: Hardwoods like oak and maple can be harder to rip, especially if they have knots or irregular grain.
- Plywood: Plywood can be tricky to rip because it is made of layers of wood glued together. Use a blade with more teeth to reduce splintering.
- Check for Knots: Avoid ripping wood with large knots. Knots can cause the wood to bind or kick back.
Table Saw Ripping Speed: Finding the Right Pace
The right speed is important for both safety and cut quality.
- Don’t Rush: Don’t push the wood through the saw too fast. This can cause the blade to bind or kick back.
- Steady Pace: Keep a steady pace. If you push too slow, the wood can burn.
- Listen to the Saw: Listen to the sound of the saw. If it sounds like it’s working too hard, slow down.
Table Saw Ripping Troubleshooting: Solving Common Problems
Sometimes things go wrong when ripping wood. Here’s how to fix common problems:
- Wood Binding: If the wood starts to bind, stop the saw and find out what’s causing it. It could be a knot, a warped board, or a misaligned fence.
- Burning: Burning happens when the blade gets too hot. This can be caused by pushing the wood too slowly or using a dull blade.
- Splintering: Splintering happens when the blade tears the wood fibers. This can be caused by using the wrong blade or pushing the wood too fast.
- Uneven Cut: An uneven cut can be caused by a loose fence or pushing the wood unevenly.
- Kickback: If the wood kicks back, stop the saw and check your setup. Make sure you’re using a riving knife or splitter and that the fence is properly aligned.
Here’s a table summarizing common issues, causes, and solutions:
| Problem | Possible Cause(s) | Solution(s) |
|---|---|---|
| Wood Binding | Knot in the wood, warped board, misaligned fence | Stop the saw, remove the wood, inspect for issues, realign fence, use a sharp blade |
| Burning | Pushing wood too slowly, dull blade | Increase feed rate slightly, use a sharp blade, ensure proper dust collection |
| Splintering | Wrong blade, pushing wood too fast | Use a blade with more teeth, reduce feed rate, use a zero-clearance insert |
| Uneven Cut | Loose fence, uneven pushing | Tighten fence, ensure fence is parallel to the blade, maintain consistent pressure on the wood |
| Kickback | Pinching, binding, not using riving knife/splitter | Ensure riving knife/splitter is installed, use featherboards, avoid knots, maintain consistent feed rate |
Mastering Ripping: Practice Makes Perfect
Ripping wood on a table saw takes practice. Start with simple projects and work your way up to more complex ones. Always focus on safety and take your time. The more you practice, the better you’ll get.
Frequently Asked Questions (FAQ)
- What is the difference between ripping and crosscutting? Ripping is cutting wood along the grain, while crosscutting is cutting across the grain.
- Can I rip plywood on a table saw? Yes, but use a blade with more teeth to reduce splintering.
- Who is responsible if someone gets hurt using my table saw? The person operating the saw is primarily responsible for their safety.
- What safety gear should I wear when ripping wood? Always wear safety glasses and hearing protection.
- What is the purpose of a riving knife? A riving knife keeps the cut wood from pinching the blade, which helps prevent kickback.
- What do I do if the wood starts to bind? Stop the saw immediately and find out what’s causing the binding.
- How often should I replace my table saw blade? Replace your blade when it becomes dull or damaged.
- Is it okay to rip wet wood? It’s generally not recommended. Wet wood can bind and increase the risk of kickback. If you must, ensure the wood is as dry as possible and use extra caution.
- What’s the best way to clean a table saw blade? Use a blade cleaner and a stiff brush to remove pitch and residue.
- How can I improve my table saw ripping accuracy? Use a high-quality rip fence, featherboards, and take your time to set up the cut properly.
- What’s the minimum width I can safely rip on a table saw? It depends on the stability of your workpiece and your comfort level. For very narrow pieces, consider using a sled or other specialized jig for added safety.
If you stick to these guidelines, you can rip wood on your table saw safely and accurately. Just remember that staying safe is always the most important thing. Don’t rush, use the correct tools, and stay focused on what you are doing. Enjoy your woodworking!

Hi, I’m Tom Scalisi, and welcome to The Saw Blog! I started this blog to share my hands-on experience and insights about woodworking tools—especially saws and saw blades. Over the years, I’ve had the chance to work with a wide range of tools, and I’m here to help both professionals and hobbyists make informed decisions when it comes to selecting and using their equipment. Whether you’re looking for in-depth reviews, tips, or just advice on how to get the best performance out of your tools, you’ll find it here. I’m excited to be part of your woodworking journey!