
Changing the blade on your DeWalt table saw is a crucial part of Dewalt table saw maintenance, and it’s something every woodworker needs to know how to do safely. How do you change a blade on a DeWalt table saw? You change the blade by first unplugging the saw, then raising the blade to its highest position, removing the throat plate, locking the arbor with the table saw blade lock, and using the Dewalt table saw blade wrench to loosen and remove the arbor nut and outer flange. Once the nut and flange are removed, you can remove the old blade and install the new one, reversing the process to tighten everything back up. Before you even think about starting, safety should be your absolute top priority. This guide provides a step-by-step process that ensures your Dewalt table saw blade replacement is done correctly, safely, and efficiently.
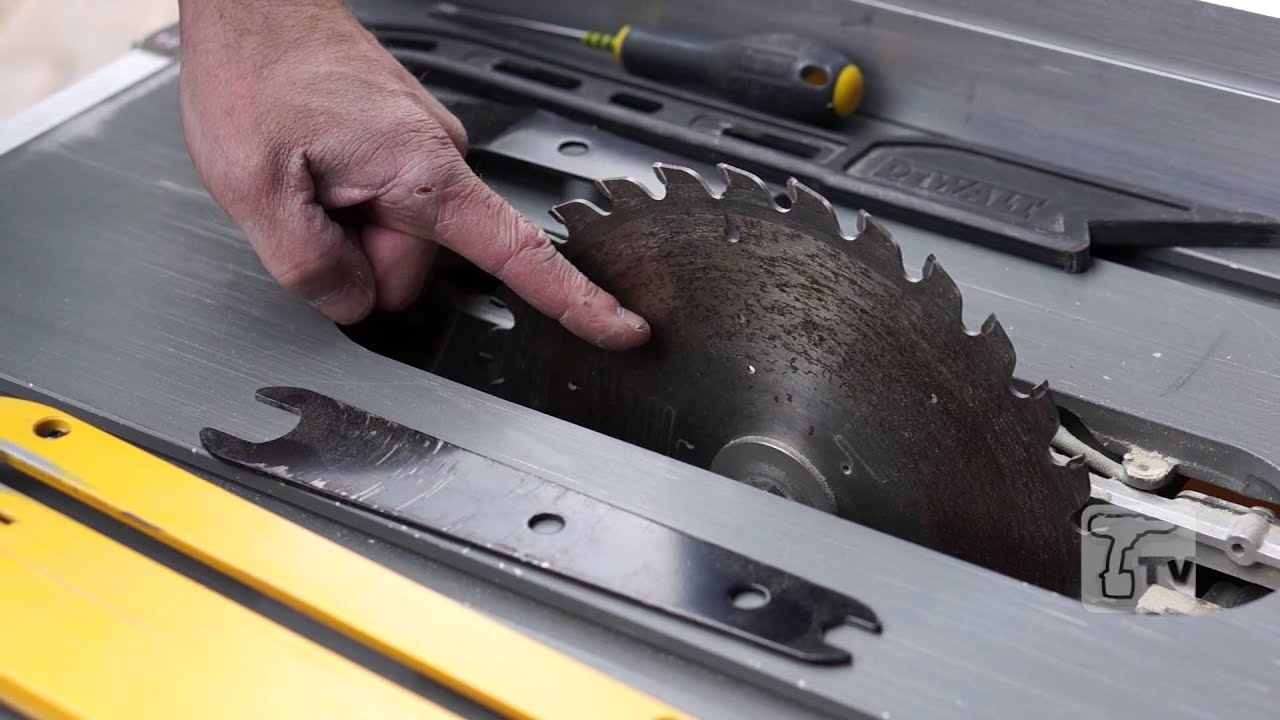
Image Source: i.ytimg.com
Why Safe Blade Changes Matter
The table saw is likely the most dangerous tool in any workshop. That blade spins at thousands of rounds per minute, which means a serious accident can happen in the blink of an eye. Whenever you’re changing the blade on your DeWalt, following the right safety steps is the best way to keep yourself out of harm’s way. It’s not just about your own safety, either—it’s about making sure the tool is set up correctly for anyone else who uses it later. The biggest danger is getting too comfortable and skipping steps. Never rush through it, and always double-check your work before you finish.
Preparing for a Dewalt Table Saw Blade Replacement
Before you even think about touching your DeWalt table saw, make sure you have the following:
- Safety Glasses: Protect your eyes from flying debris.
- Work Gloves: Improve your grip and protect your hands.
- DeWalt Table Saw Blade Wrench: This is the correct wrench for your saw.
- New Table Saw Blade: Ensure it’s the correct size and type for your saw and intended use.
- Clean Rags: For wiping down the blade and arbor.
- Arbor Lock (Built-in or External): Most DeWalt saws have this.
- Owner’s Manual: Consult it for specific details about your saw model.
Essential Safety Checks Before Starting
These checks are non-negotiable:
- Power Disconnection: Unplug the saw! This is the most important step.
- Inspect the Saw: Look for any damage or loose parts.
- Clear the Work Area: Remove any clutter that could get in your way.
- Read the Manual: Refresh your memory on specific safety instructions for your Dewalt model.
Step-by-Step: The Dewalt Table Saw Blade Change Process
Now, let’s get into the detailed steps of how to remove table saw blade and how to do table saw blade installation on your DeWalt saw.
Step 1: Raise the Blade and Remove the Throat Plate
- Raise the Blade: Use the blade height adjustment crank to raise the blade to its highest position. This gives you more room to work.
- Remove the Throat Plate: Most DeWalt saws have a throat plate that simply lifts out or requires a slight push and lift. Some may have a locking mechanism; consult your manual.
Step 2: Engaging the Arbor Lock
- Locate the Arbor Lock: The arbor lock is a mechanism that prevents the blade from rotating while you loosen the arbor nut.
- Rotate the Blade: Slowly rotate the blade by hand until the arbor lock engages. You should hear or feel it click into place. It is crucial to find this position for successful Dewalt table saw blade change.
- Important Note: Never force the arbor lock. If it doesn’t engage easily, rotate the blade slightly until it does.
Step 3: Loosening the Arbor Nut
- Position the Wrench: Place the Dewalt table saw blade wrench onto the arbor nut. Note that the arbor nut has standard right-hand threads on most DeWalt table saws, so you’ll need to turn the wrench clockwise to loosen it. This may feel counterintuitive, but that’s how it works!
- Apply Firm Pressure: Use a firm, steady pressure to loosen the nut. Avoid jerking or straining, as this could damage the arbor or slip the wrench.
- If the Nut is Stuck: If the nut is stuck, try tapping the wrench with a rubber mallet. You can also apply a penetrating oil and let it sit for a few minutes before trying again.
Step 4: Removing the Arbor Nut, Flange, and Old Blade
- Remove the Nut and Flange: Once the nut is loose, carefully remove it and the outer flange. Keep these parts together and in a safe place. Note the orientation of the flange; it usually has a slightly raised lip that faces the blade.
- Remove the Old Blade: Gently lift the old blade off the arbor. Handle it carefully, as the teeth are sharp.
Step 5: Inspecting and Cleaning the Arbor
- Inspect the Arbor: Check the arbor and flanges for any damage, such as nicks, burrs, or rust.
- Clean the Arbor: Use a clean rag to wipe down the arbor and flanges. Remove any sawdust or debris. A clean arbor ensures proper blade seating and reduces vibration.
Step 6: Installing the New Blade
- Mount the New Blade: Carefully slide the new blade onto the arbor. Ensure the blade is seated properly and that the teeth are pointing in the correct direction (usually forward, towards the direction of rotation).
- Replace the Flange: Replace the outer flange, making sure it’s oriented correctly (raised lip facing the blade).
- Reinstall the Arbor Nut: Thread the arbor nut back onto the arbor by hand until it’s snug.
Step 7: Tightening the Arbor Nut
- Engage the Arbor Lock Again: Make sure the arbor lock is still engaged.
- Tighten the Nut: Use the Dewalt table saw blade wrench to tighten the arbor nut. Apply firm, steady pressure, turning the wrench counter-clockwise (remember, it’s reverse-threaded). Tighten the nut securely, but don’t overtighten it. You want it snug, not stripped.
- Disengage the Arbor Lock: Release the arbor lock.
Step 8: Reinstalling the Throat Plate
- Replace the Throat Plate: Carefully reinstall the throat plate. Make sure it’s seated properly and locked into place, if applicable.
Step 9: Final Checks and Adjustments
- Rotate the Blade: Manually rotate the blade to ensure it spins freely and doesn’t wobble.
- Check Blade Alignment: Use a square to check that the blade is parallel to the miter slot. If it’s not, you may need to adjust the trunnion. Consult your owner’s manual for instructions.
- Test Cut: Make a test cut on a piece of scrap wood to ensure the blade is cutting smoothly and accurately.
- Reconnect Power: Plug in the power cord.
Table: Torque Specifications for DeWalt Table Saw Arbor Nuts (Example)
| Saw Model | Arbor Size | Torque (ft-lbs) |
|---|---|---|
| DWE7485 | 5/8 inch | 60-70 |
| DWE7491RS | 5/8 inch | 60-70 |
| DW745 | 5/8 inch | 50-60 |
| Important: | Always consult your owner’s manual for specific torque values for your saw model. |
Note: These values are examples only. Always check your owner’s manual.
Changing Blade on Dewalt Jobsite Saw: Specific Considerations
Changing the blade on a DeWalt jobsite saw is similar to changing it on a stationary model, but there are a few things to keep in mind:
- Portability: Jobsite saws are designed to be portable, so they may have slightly different mechanisms for locking the arbor or removing the throat plate. Refer to your owner’s manual for specifics.
- Stability: Make sure the saw is stable and secure before you start working on it.
- Smaller Size: Jobsite saws are often smaller, which can make it a bit more challenging to access the arbor nut.
Dewalt Table Saw Maintenance: Beyond Blade Changes
Dewalt table saw blade change is just one aspect of overall Dewalt table saw maintenance. To keep your saw running smoothly and safely, consider these additional tips:
- Regular Cleaning: Remove sawdust and debris from the saw regularly.
- Lubrication: Lubricate moving parts, such as the blade height adjustment mechanism and the fence rails. Use a dry lubricant to avoid attracting dust.
- Blade Storage: Store your blades in a safe, dry place to prevent rust and damage.
- Fence Alignment: Check the fence alignment periodically and adjust as needed.
- Motor Maintenance: Inspect the motor brushes periodically and replace them when they’re worn.
Troubleshooting Common Issues
Sometimes, things don’t go according to plan. Here are a few common issues you might encounter and how to resolve them:
- Arbor Nut Stuck: As mentioned earlier, try tapping the wrench with a rubber mallet or applying penetrating oil.
- Arbor Lock Not Engaging: Make sure the blade is rotating freely and that the arbor lock mechanism is clean and lubricated.
- Blade Wobbling: This could be due to a bent blade, a damaged arbor, or improper blade seating. Inspect the blade and arbor carefully.
- Difficulty Removing Throat Plate: Check for any locking mechanisms or debris that might be preventing the throat plate from being removed.
- Vibration Issues Excessive vibration is usually due to a loose blade, a bent arbor, or a poorly balanced blade. Check for all of these.
Table Saw Blade Change Safety: A Recap
Let’s reiterate the critical safety points:
- Always disconnect the power before changing the blade.
- Wear safety glasses and gloves.
- Read and understand your owner’s manual.
- Never force anything.
- Double-check your work.
Alternatives to Doing it Yourself
While learning how to change your own saw blade is empowering, there are some situations where you may choose to have someone else do it for you:
- Lack of Experience: If you’re brand new to woodworking and feel unsure, it’s okay to seek help.
- Physical Limitations: If you have limited mobility or strength, changing a blade can be difficult.
- Complex Problems: If you encounter a problem you can’t solve (like a stripped arbor nut), a professional can help.
You can take your saw to a local tool repair shop or woodworking supply store. They typically charge a small fee for this service.
FAQ: Frequently Asked Questions
- What is the best type of blade for my DeWalt table saw? The best blade depends on the material you’re cutting and the type of cut you need. Combination blades are versatile for general-purpose use, while specialized blades are available for ripping, crosscutting, and cutting specific materials like plywood or hardwoods.
- Can I use any brand of blade on my DeWalt table saw? Yes, as long as the blade has the correct arbor size (usually 5/8 inch) and diameter for your saw.
- How often should I change my table saw blade? You should change your blade when it becomes dull, damaged, or when you switch to a different type of cut.
- Who is responsible if I get injured while changing my table saw blade? You are. That’s why following the guidelines and safety instructions is so important. You are responsible for working safely.
- Why is my table saw blade vibrating? Vibration can be caused by a loose blade, a bent arbor, or a damaged blade. Check all of these components.
- Are there any special tools needed? Besides the DeWalt table saw blade wrench and possibly a rubber mallet, no special tools are typically needed for Dewalt table saw blade replacement.
By following these steps and prioritizing safety, you can confidently and efficiently perform a Dewalt table saw blade change, ensuring your saw remains a valuable and safe tool in your woodworking arsenal.

Hi, I’m Tom Scalisi, and welcome to The Saw Blog! I started this blog to share my hands-on experience and insights about woodworking tools—especially saws and saw blades. Over the years, I’ve had the chance to work with a wide range of tools, and I’m here to help both professionals and hobbyists make informed decisions when it comes to selecting and using their equipment. Whether you’re looking for in-depth reviews, tips, or just advice on how to get the best performance out of your tools, you’ll find it here. I’m excited to be part of your woodworking journey!