
Are you struggling to make accurate miter saw cuts?Getting the angle on your miter saw exactly right is the secret to making your woodworking projects look professional. If the angles are even a little bit off, nothing will line up. This guide will show you how to master those adjustments and make sure your saw is calibrated perfectly so you can get clean, gap-free cuts every single time.
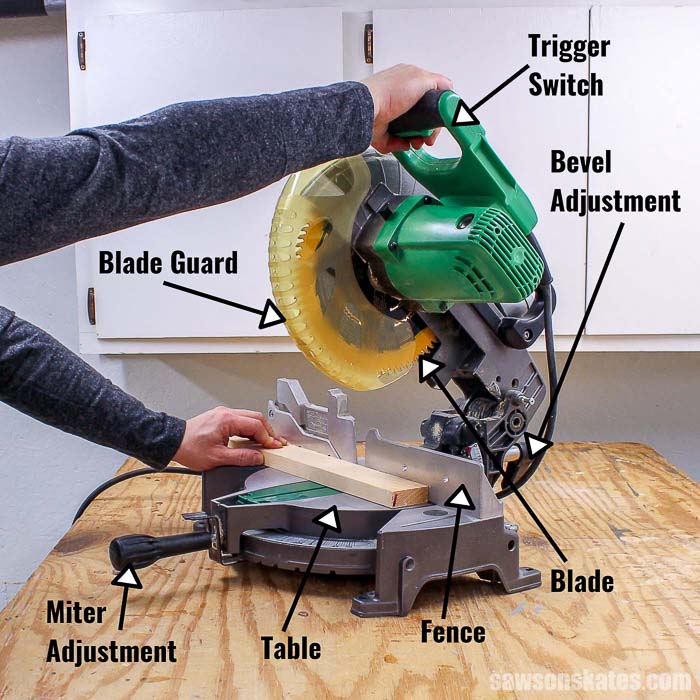
Image Source: sawsonskates.com
The Importance of Accurate Miter Saw Cuts
Accurate miter saw cuts are crucial for several reasons:
- Professional Finish: Precise cuts ensure tight, seamless joints, resulting in a professional and aesthetically pleasing finish to your projects.
- Structural Integrity: Inaccurate cuts can compromise the structural integrity of your project, leading to weak joints and potential failures.
- Material Efficiency: Accurate cuts minimize waste, saving you money and reducing the environmental impact of your projects.
- Time Savings: Properly adjusted saws save time by reducing the need for corrections and rework.
Anatomy of a Miter Saw Angle Adjustment System
Before diving into the adjustment process, let’s review the key components that control the angle of your miter saw:
- Miter Angle Scale: This scale is typically located on the base of the saw and indicates the angle of the blade relative to the fence.
- Miter Detents: These are preset stops at common angles (0°, 15°, 22.5°, 30°, and 45°) that allow for quick and repeatable cuts.
- Miter Lock Lever/Knob: This lever or knob locks the miter angle in place.
- Bevel Angle Scale: Located on the side of the saw, the bevel angle scale indicates the angle of the blade tilt.
- Bevel Lock Lever/Knob: This lever or knob secures the bevel angle setting.
Step-by-Step Guide to Miter Saw Angle Adjustment
This comprehensive guide provides a detailed walkthrough of how to adjust miter saw angle:
Step 1: Ensuring a Square Fence
Before adjusting any angles, confirm that the fence is square to the blade. This is critical for accurate miter cuts.
- Unplug the Saw: Always disconnect the power to the saw before making any adjustments.
- Lower the Blade: Bring the blade down and place a reliable square (like a machinist’s square or a combination square) against the blade and the fence.
- Check for Gaps: If there’s a gap, loosen the fence mounting screws.
- Adjust the Fence: Gently tap the fence until it is perfectly square with the blade.
- Tighten the Screws: Securely tighten the fence mounting screws.
- Re-Check: Confirm the fence is square after tightening the screws.
Step 2: Calibrating the Miter Angle
If your miter saw isn’t making accurate cuts, the angle scale might be off. You must calibrate miter saw to get precise results.
- Set to Zero Degrees: Loosen the miter lock and set the saw to 0° on the miter scale.
- Use a Square: Place a square against the blade and the fence to confirm a 90° angle.
- Check Alignment: If the blade is not square, loosen the screws holding the miter scale in place.
- Adjust the Scale: Gently adjust the scale until the blade is perfectly square to the fence.
- Tighten the Screws: Tighten the screws holding the scale, being careful not to move it.
- Test Cut: Make a test cut in a piece of scrap wood to confirm the 90° angle.
Step 3: Calibrating the Bevel Angle
The bevel angle controls the tilt of the blade. Calibrate miter saw bevel angle for accurate angled cuts.
- Set to Zero Degrees: Loosen the bevel lock and set the saw to 0° on the bevel scale.
- Use a Square: Use a square to check that the blade is perfectly vertical (90° to the table).
- Check Alignment: If the blade is not vertical, locate the bevel adjustment screws (refer to your saw’s manual).
- Adjust the Screws: Adjust the screws until the blade is perfectly vertical.
- Tighten the Lock: Tighten the bevel lock and re-check the angle.
- Test Cut: Make a test cut to confirm the accuracy.
Step 4: Utilizing Miter Detents
Miter detents are preset stops at common angles.
- Locate the Detent: Move the saw towards the desired angle (e.g., 45°).
- Engage the Detent: Most saws will “click” into place when the detent is engaged.
- Lock the Angle: Secure the miter angle using the miter lock lever or knob.
- Verify Accuracy: Even when using detents, double-check the angle with a miter saw protractor or a combination square.
- Adjust Detents (if needed): Some miter saws allow you to adjust the detents. Consult your manual for instructions.
Step 5: Fine-Tuning Miter Saw Angles
For critical projects, fine-tune miter saw settings to get truly perfect cuts.
- Make Test Cuts: Cut several pieces of scrap wood at the desired angle.
- Measure the Angle: Use a miter saw protractor or digital angle finder to precisely measure the cut angle.
- Adjust Accordingly: If the angle is off, make small adjustments to the miter scale or bevel scale.
- Repeat: Repeat the test cuts and measurements until you achieve the desired accuracy.
Step 6: Using a Miter Saw Protractor
A miter saw protractor is a valuable tool for accurately setting and measuring angles.
- Place the Protractor: Position the protractor against the miter saw’s fence and blade.
- Read the Angle: The protractor will display the exact angle between the blade and the fence.
- Adjust the Saw: Adjust the miter saw angle until it matches the desired angle on the protractor.
- Lock the Angle: Secure the miter angle.
- Double-Check: Verify the angle with the protractor again after locking.
Tools for Precise Miter Saw Angle Adjustment
Having the right tools is essential for accurate miter saw cuts:
| Tool | Description | Use |
|---|---|---|
| Combination Square | A versatile tool for checking squareness and measuring distances. | Ensuring the fence is square to the blade; verifying 90° angles. |
| Machinist’s Square | A high-precision square for critical accuracy. | Ensuring perfect squareness in demanding applications. |
| Digital Angle Finder | Provides a digital readout of angles, offering high accuracy. | Measuring and setting miter saw angles with precision. |
| Miter Saw Protractor | Specifically designed for measuring miter saw angles. | Quickly and accurately setting angles for miter cuts. |
| Calibrated Level | Essential for setting bevel angles accurately. | Verifying the vertical alignment of the blade for accurate bevel cuts. |
| Screwdrivers & Wrenches | Necessary for loosening and tightening adjustment screws. | Making adjustments to the fence, miter scale, and bevel scale. |
| Test Material (Scrap Wood) | Inexpensive material for performing test cuts. | Verifying angle accuracy and making fine-tune miter saw adjustments before cutting valuable materials. |
Maintaining Your Miter Saw for Accuracy
Regular maintenance is key to ensuring your miter saw continues to deliver accurate miter saw cuts.
- Clean the Saw: Regularly remove sawdust and debris from the saw, especially around the miter and bevel mechanisms.
- Lubricate Moving Parts: Apply a dry lubricant to moving parts, such as the miter and bevel pivots.
- Check for Loose Screws: Periodically check all screws and bolts and tighten them as needed.
- Replace the Blade: A dull blade can cause inaccurate cuts. Replace the blade when it becomes dull or damaged.
- Calibrate Regularly: Calibrate miter saw settings periodically, especially if you notice any inaccuracies.
Troubleshooting Common Angle Adjustment Problems
Here are some common issues and how to resolve them:
- Saw Does Not Cut Square:
- Problem: The fence may not be square to the blade.
- Solution: How to square a miter saw? Adjust the fence as described in Step 1.
- Inaccurate Miter Angles:
- Problem: The miter scale may be misaligned.
- Solution: Adjust the miter saw angle as described in Step 2.
- Inaccurate Bevel Angles:
- Problem: The bevel scale may be misaligned.
- Solution: Adjust the bevel angle as described in Step 3.
- Detents Are Not Accurate:
- Problem: The detents may be out of adjustment.
- Solution: Consult your saw’s manual for instructions on adjusting the detents.
- Saw Vibrates Excessively:
- Problem: The blade may be unbalanced or the saw may not be properly secured.
- Solution: Replace the blade and ensure the saw is mounted on a stable surface.
Advanced Techniques for Angle Adjustment
Beyond the basics, these techniques can further refine your accuracy:
- Using Shims: For very slight adjustments, you can use shims (thin pieces of material) behind the fence or scale to fine-tune the angle.
- Custom Detents: Some woodworkers create custom detents for frequently used angles that are not included in the saw’s preset options.
- Digital Readouts: Consider upgrading to a miter saw with a digital readout for precise angle settings.
Conclusion
Mastering miter saw angle adjustment is a critical skill for any woodworker. By following this comprehensive guide, you can ensure accurate miter saw cuts every time, resulting in professional-quality projects. Regular maintenance and careful calibration will keep your saw performing at its best for years to come. Investing time in learning how to square a miter saw and fine-tune miter saw settings will significantly improve your woodworking results. Remember to always prioritize safety and consult your saw’s manual for specific instructions.
Frequently Asked Questions (FAQ)
- What is the most common reason for inaccurate miter saw cuts?
- The most common reason is an improperly calibrated miter or bevel scale. This can be fixed by using a reliable square and adjusting the scale until the blade is perfectly aligned.
- Can I use a digital level to calibrate my miter saw?
- Yes, a digital level can be very helpful for calibrate miter saw bevel angle. Place the level on the blade to ensure it’s perfectly vertical (0 degrees).
- Who should calibrate their miter saw?
- Anyone who uses a miter saw should calibrate it, especially if they notice cuts are not accurate, the saw is new, or it has been moved or bumped.
- How often should I calibrate my miter saw?
- Calibrate your miter saw at least every few months, or more frequently if you use it heavily or if you suspect it has been bumped or misaligned.
- What is a miter saw angle gauge and how is it used?
- A miter saw angle gauge, often a digital angle finder or a miter saw protractor, is a tool used to measure angles precisely. Place it against the blade and fence to read the exact angle and adjust the saw accordingly.
- Is it necessary to unplug the saw before making adjustments?
- Yes, always unplug the saw before making any adjustments to prevent accidental start-up and potential injury.
- What are the benefits of using a miter saw calibration guide?
- A miter saw calibration guide provides step-by-step instructions and visual aids to help you accurately calibrate your saw, ensuring precise cuts. This can save time and reduce errors.
- How does temperature affect miter saw accuracy?
- Extreme temperature changes can slightly affect the materials of the saw and the wood being cut, potentially impacting accuracy. Try to calibrate and use the saw in a consistent temperature environment.
- What should I do if my miter saw detents are not accurate?
- Consult your saw’s manual for instructions on adjusting the detents. Some saws have adjustable detents, while others may require you to replace the detent plate.
- Are expensive miter saws more accurate than cheaper ones?
- While higher-end miter saws often have better build quality and more precise adjustments, even a less expensive saw can produce accurate cuts if properly calibrated and maintained.

Hi, I’m Tom Scalisi, and welcome to The Saw Blog! I started this blog to share my hands-on experience and insights about woodworking tools—especially saws and saw blades. Over the years, I’ve had the chance to work with a wide range of tools, and I’m here to help both professionals and hobbyists make informed decisions when it comes to selecting and using their equipment. Whether you’re looking for in-depth reviews, tips, or just advice on how to get the best performance out of your tools, you’ll find it here. I’m excited to be part of your woodworking journey!