
Can I use a table saw as a jointer? Yes, with the right techniques and tools like a table saw jointing jig or a reliable fence, you can effectively use a table saw as an alternative to a jointer for creating straight and square edges on lumber. Here’s a detailed guide on how to achieve accurate cuts and perfect edges using your table saw for jointing.
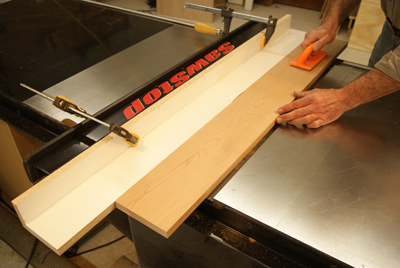
Image Source: www.woodworkersjournal.com
Why Use a Table Saw for Jointing?
A jointer is designed to create flat, square edges on boards. However, not everyone has the money or the space to own one. This is where your table saw can really come in handy. It is a great way to save space and cash, especially for small workshops or if you only do projects every now and then. You just need to learn the right techniques and know how to make a simple sled or set up your fence properly.
Safety First: Essential Precautions
Before you start jointing wood with a table saw, safety is paramount.
- Wear Safety Glasses: Protect your eyes from flying debris.
- Use Hearing Protection: Table saws are loud; protect your hearing.
- Blade Guard: Always use the blade guard if possible. If using a jig, make sure your hands are clear of the blade.
- Push Sticks: Employ push sticks or push blocks to keep your hands away from the blade when feeding the wood.
- Avoid Loose Clothing: Keep sleeves and other loose clothing away from the blade.
- Stable Stance: Maintain a balanced stance to avoid losing control.
- Dust Collection: Connect your table saw to a dust collector to minimize airborne particles.
Methods for Jointing on a Table Saw
There are a few effective table saw jointing techniques. The method you choose will depend on the size and condition of the lumber you are working with, and your own skill level.
Method 1: Using the Table Saw Fence for Edge Jointing
The easiest method involves carefully using the table saw fence as a guide. This works best for boards that are only slightly bowed.
Step 1: Preparing Your Table Saw
- Ensure the Blade is Sharp and Square: Use a high-quality blade designed for smooth cuts. Make sure it’s perfectly perpendicular to the table.
- Adjust the Fence: Move the fence close to the blade, but not touching. The distance will depend on how much material you need to remove.
- Featherboard Setup (Optional): Featherboards can help keep the wood tight against the fence.
Step 2: Jointing Process
- Align the Board: Place the bowed edge of the board against the fence.
- First Pass: Slowly push the board through the blade, keeping consistent pressure against the fence.
- Inspect and Adjust: Check the edge after the first pass. If it’s straight enough, you’re good to go. If not, make another pass, moving the fence slightly closer to the blade.
- Repeat as Needed: Continue making passes until you achieve a straight edge.
- Final Cut: Make a final pass to ensure a clean, smooth surface.
Step 3: Common Problems & Solutions
- Wandering Cut: This can happen if the board isn’t held firmly against the fence. Use featherboards or apply more pressure.
- Blade Deflection: A dull or warped blade can cause the cut to wander. Replace the blade.
- Kickback: If the wood pinches the blade, it can be violently thrown back. Ensure the wood is always moving forward and use a splitter or riving knife.
Method 2: Building a Table Saw Jointing Jig
A table saw jointing jig, also known as a jointing sled, provides a stable and controlled platform for jointing lumber. This is ideal for longer or more severely warped boards.
Step 1: Designing Your Jointing Sled
Your jig will consist of a base, a fence, and a clamping mechanism.
- Base: This is a piece of plywood or MDF that slides smoothly across the table saw. It should be slightly wider than your widest board.
- Fence: A straight board attached to the base at a 90-degree angle. This serves as the reference edge.
- Clamping Mechanism: Various methods can be used to hold the board securely to the sled, such as toggle clamps, screws, or even double-sided tape.
Table: Sample Dimensions for a Jointing Sled
| Component | Dimension |
|---|---|
| Base | 24″ x 36″ x 3/4″ |
| Fence | 4″ x 36″ x 3/4″ |
| Runners | 3/4″ x 3/8″ x 24″ |
Step 2: Assembling the Jig
- Attach Runners: Glue and screw runners to the bottom of the base to fit snugly in the table saw’s miter slots. This ensures the sled moves smoothly and accurately.
- Attach the Fence: Carefully align the fence to be perfectly square with the base. Use a square to check the angle and then screw and glue the fence in place.
- Install Clamping Mechanism: Choose your preferred method for holding the board to the sled. Toggle clamps are a good option because they are quick and easy to use.
Step 3: Using the Jointing Sled
- Secure the Board: Place the board on the sled with the bowed edge facing up. Secure it using your clamping mechanism. You may need to shim the board so that only the high spots of the bow will be removed by the blade.
- Make the Cut: Slowly push the sled through the blade, keeping consistent pressure on the sled.
- Inspect and Adjust: Check the edge after the first pass. If it’s straight enough, you’re good to go. If not, add shims where necessary and make another pass.
- Repeat as Needed: Continue making passes until you achieve a straight edge.
Step 4: Fine-Tuning Your Sled
- Zero-Clearance: Consider adding a zero-clearance insert to the sled. This helps prevent tear-out and provides better support for the wood.
- Adjustable Fence: Some woodworkers prefer an adjustable fence. This allows for precise adjustments and can be used for other operations.
Method 3: Using a Straight Edge on Table Saw
This method is useful if you don’t have a jointer sled or your board is too awkward to maneuver safely on the table saw using only the fence.
Step 1: Choosing the Straight Edge
- Select a Sturdy Material: Choose a straight, rigid piece of material like a metal ruler, a level, or a piece of straight hardwood. Its length should be greater than the length of the board you intend to joint.
- Ensure it is Straight: Use a reliable method to confirm the straightness of the edge. A known straight edge or a long ruler held against a light source can help.
Step 2: Securing the Board and Straight Edge
- Position the Board: Place the board on the table saw with the edge to be jointed facing up.
- Align the Straight Edge: Align the straight edge so it is parallel to the desired straight edge of the board, extending beyond the areas to be cut.
- Secure the Assembly: Use clamps to firmly attach the straight edge to the board. Make sure the clamps are positioned so they won’t interfere with the blade or the fence.
Step 3: Making the Cut
- Adjust the Table Saw Fence: Set the fence to the distance required to cut the board along the straight edge. The blade should be aligned to trim the board to the straight edge.
- Push the Assembly Through: Carefully push the board and straight edge assembly along the fence, keeping consistent pressure.
- Inspect the Cut: Check the cut edge for straightness. If necessary, repeat the process with minor adjustments to the straight edge or fence position.
Tips for Accurate Table Saw Jointing
- Sharp Blades are Crucial: Dull blades cause tear-out and require more force, increasing the risk of errors.
- Consistent Feed Rate: Feed the wood at a steady pace. Avoid stopping or hesitating mid-cut.
- Support Long Boards: Use outfeed supports or rollers to help manage long boards.
- Avoid Overlapping Cuts: Only make one pass at a time to remove the minimum amount of material needed.
- Listen to the Saw: Pay attention to the sound of the saw. A change in pitch can indicate problems like binding or burning.
- Practice on Scrap Wood: Practice your technique on scrap wood before working on your final project.
Choosing the Right Blade
The blade you use can significantly impact the quality of your joint.
- For Hardwoods: A blade with a higher tooth count (60-80 teeth) is ideal for hardwoods.
- For Softwoods: A blade with a lower tooth count (40-50 teeth) is suitable for softwoods.
- Combination Blades: These blades offer a compromise between rip and crosscut capabilities and can be used for jointing.
- Thin Kerf Blades: These blades remove less material, making them a good choice for jointing delicate pieces.
Table: Recommended Blades for Table Saw Jointing
| Blade Type | Tooth Count | Material | Benefits |
|---|---|---|---|
| High Tooth Count | 60-80 | Hardwoods | Smoother cuts, less tear-out |
| Low Tooth Count | 40-50 | Softwoods | Faster cuts, less burning |
| Combination | 50 | Both | Versatile, good for general use |
| Thin Kerf | 40-60 | Various | Removes less material, good for delicate pieces and smaller saws |
Alternative to Jointer: Hand Plane
If you don’t have a table saw or prefer a more traditional approach, hand planes can be used for jointing. This requires skill and practice, but it can produce excellent results. A long jointer plane is best for creating straight edges.
Benefits of Table Saw for Jointing Lumber
- Cost-Effective: Eliminates the need to purchase a separate jointer.
- Space-Saving: Ideal for small workshops where space is limited.
- Versatile: The table saw can be used for many other woodworking tasks.
- Portable: Table saws are generally more portable than jointers.
Challenges of Table Saw for Jointing Lumber
- Accuracy: Achieving the same level of accuracy as a dedicated jointer can be challenging.
- Setup Time: Building or setting up a jig can take time.
- Safety: Extra care is needed to ensure safe operation.
- Limited Capacity: Table saws may not be suitable for jointing very large or heavy boards.
Troubleshooting Common Issues
- Snipe: Snipe is a slight dip at the beginning or end of a cut. It’s caused by a lack of support. Use infeed and outfeed supports to prevent snipe.
- Wavy Edges: Wavy edges are often caused by a dull blade or inconsistent feed rate. Use a sharp blade and maintain a steady pace.
- Burning: Burning is caused by friction between the blade and the wood. Use a sharp blade, reduce the feed rate, and ensure proper dust collection.
Cost Considerations
Using a table saw for jointing is generally more cost-effective than buying a dedicated jointer. However, you may need to factor in the cost of materials for building a jointing sled, as well as the cost of a high-quality blade.
Table: Cost Comparison
| Item | Estimated Cost |
|---|---|
| Table Saw Blade | $30 – $150 |
| Sled Building Material | $20 – $50 |
| Jointer (New) | $500 – $2000+ |
Conclusion: Table Saw Edge Jointing
Using a table saw as an alternative to a jointer is a viable option for many woodworkers. By employing the right techniques, tools, and safety precautions, you can achieve accurate cuts and create straight, square edges on your lumber. Whether you choose to use the fence, build a jointing sled, or use a straight edge, practice and patience are key to mastering this valuable skill.
Frequently Asked Questions (FAQ)
Q: What is the best way to ensure my fence is square to the blade?
A: Use a precision square to check the angle between the fence and the blade. Adjust the fence until it is perfectly square and lock it in place.
Q: Can I joint plywood on a table saw?
A: Yes, but plywood can chip easily. Use a sharp blade and a zero-clearance insert to minimize tear-out.
Q: What is the maximum board length I can joint on a table saw?
A: This depends on the size of your table saw and the support you have. Use outfeed supports for longer boards.
Q: What do I do if my board keeps slipping while jointing?
A: Make sure the surface of the sled and the board are clean and dry. Use clamps or double-sided tape to secure the board to the sled.
Q: Is a jointer sled necessary for jointing on a table saw?
A: No, but it provides more stability and control, especially for longer or more severely warped boards.

Hi, I’m Tom Scalisi, and welcome to The Saw Blog! I started this blog to share my hands-on experience and insights about woodworking tools—especially saws and saw blades. Over the years, I’ve had the chance to work with a wide range of tools, and I’m here to help both professionals and hobbyists make informed decisions when it comes to selecting and using their equipment. Whether you’re looking for in-depth reviews, tips, or just advice on how to get the best performance out of your tools, you’ll find it here. I’m excited to be part of your woodworking journey!