
What is a miter saw station? A miter saw station is a dedicated workspace designed to improve the accuracy, efficiency, and safety of using a miter saw. It typically involves a stable platform for the saw, along with integrated features like extension wings for supporting long workpieces, dust collection, and storage for tools and accessories. This article will explain how to build your own, focusing on space-saving designs.
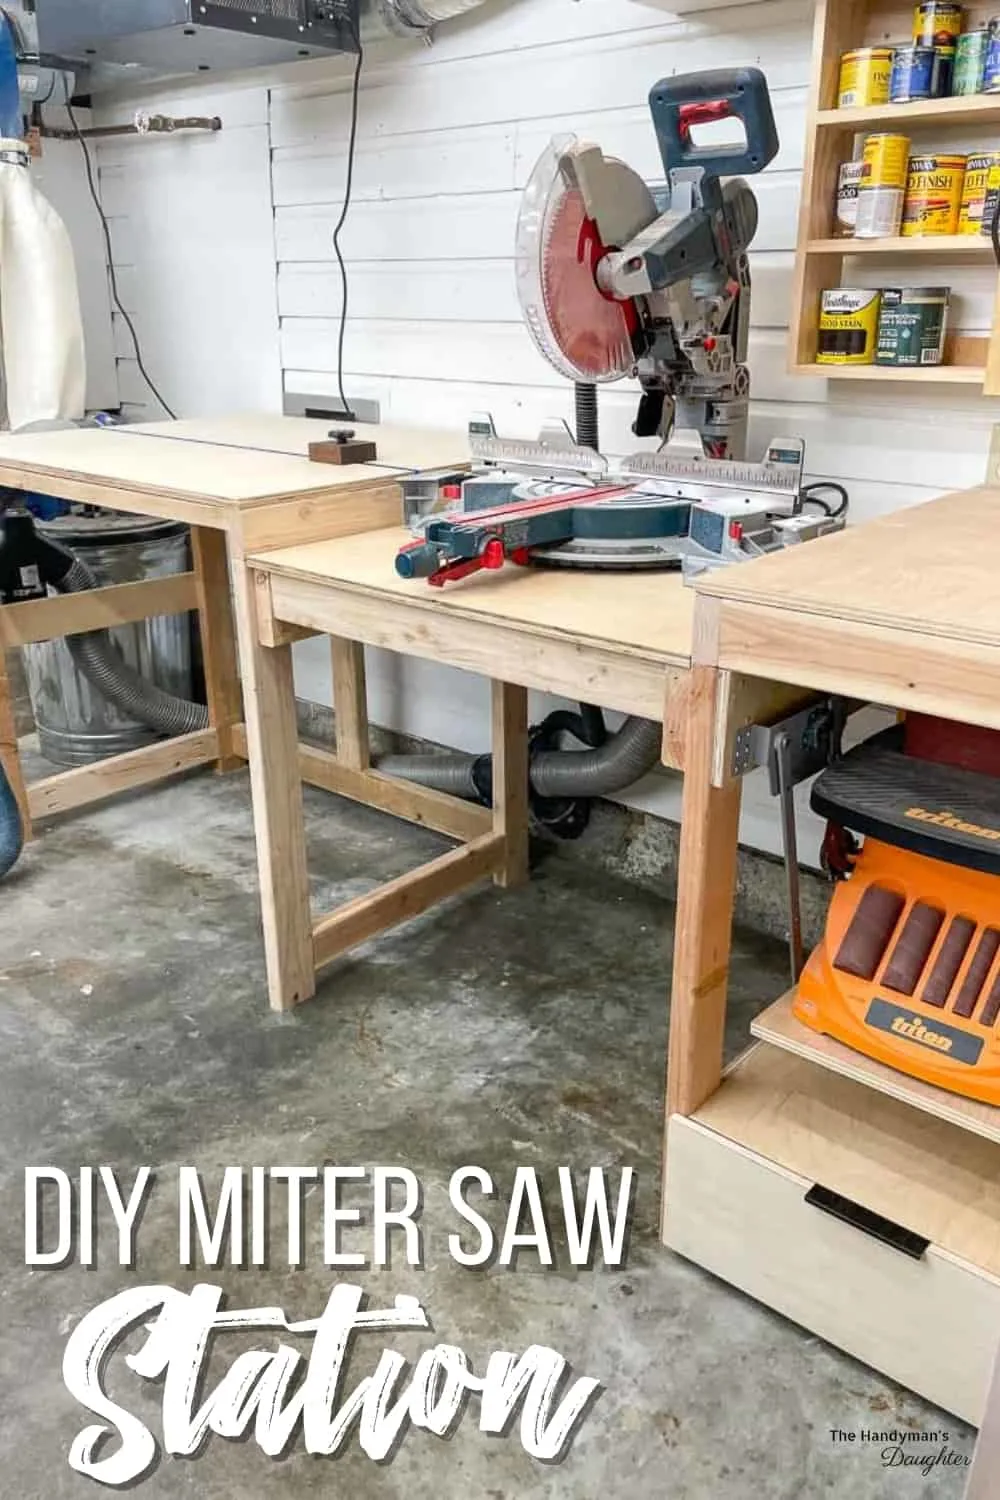
Image Source: www.thehandymansdaughter.com
Why Build a Miter Saw Station?
A miter saw station offers numerous benefits that can significantly enhance your woodworking experience:
- Improved Accuracy: A stable and level platform minimizes vibrations and ensures accurate cuts.
- Increased Efficiency: Having all your tools and materials organized in one place streamlines your workflow.
- Enhanced Safety: A dedicated workstation helps prevent accidents by providing a safe and controlled environment for using the saw.
- Dust Control: Integrating dust collection minimizes mess and improves air quality.
- Space Optimization: A well-designed station can maximize your workspace by providing storage and organization.
Planning Your Space-Saving Miter Saw Station
Before you start building, careful planning is crucial. Here’s how to approach it:
Assess Your Space
First, measure the available space where you plan to locate your miter saw workstation. Consider both the floor area and the height limitations. Think about how you move around your workshop and ensure the station won’t obstruct pathways.
Determine Your Needs
Consider the types of projects you typically work on. Do you frequently cut long boards? If so, you’ll need adequate extension wings. Do you need a lot of storage for blades, measuring tools, and other accessories? How important is miter saw station with dust collection? Make a list of your specific requirements.
Choose a Design
There are several types of space-saving miter saw stand designs. Here are a few popular options:
- Wall-Mounted: Folds up against the wall when not in use, ideal for very small spaces.
- Mobile: Mounted on casters for easy relocation. This allows you to move the station out of the way when needed. A mobile miter saw station is great for shared spaces.
- Compact Benchtop: Designed to sit on an existing workbench or table, minimizing its footprint.
- Flip-Top: A combination station that can accommodate multiple tools. The miter saw can be placed on one side of the flip top and other tools can be put on the other side.
Considering Miter Saw Station Dimensions
The size of your miter saw station will depend on your saw and the space you have available. However, here are some general guidelines:
| Dimension | Recommendation |
|---|---|
| Height | Match your existing workbench height (typically 34-36 inches) |
| Depth | Allow enough depth for the saw to operate freely, typically 24-30 inches |
| Width | Varies depending on the extension wings. Aim for at least 6-8 feet overall if possible |
Selecting Materials and Tools
Choosing the right materials and tools will ensure your miter saw station is durable and functional.
Material Selection
- Plywood: A common choice for the main structure due to its strength, stability, and affordability. ¾-inch plywood is recommended.
- Solid Wood: Can be used for the frame, legs, and trim. Pine, poplar, or hardwood are good options.
- Hardware: Screws, nails, hinges, drawer slides, and casters (if building a mobile station).
- Finishing: Paint, stain, or varnish to protect the wood and give it a professional look.
Essential Tools
- Miter Saw: Obviously!
- Circular Saw: For cutting plywood sheets to size.
- Drill/Driver: For assembling the station.
- Measuring Tape: For accurate measurements.
- Square: To ensure everything is square and true.
- Level: To ensure the station is level.
- Clamps: To hold pieces together while gluing and screwing.
- Safety Glasses and Hearing Protection: Essential for safety.
Step-by-Step Guide to Building a Compact Miter Saw Station
This guide focuses on a compact benchtop DIY miter saw station design. This design is relatively simple and can be adapted to fit your specific needs and space.
Step 1: Build the Base Cabinet
- Cut the pieces: Cut the plywood for the cabinet sides, bottom, back, and top according to your chosen miter saw station plans.
- Assemble the frame: Use screws and wood glue to assemble the sides, bottom, and back of the cabinet. Ensure everything is square.
- Attach the top: Attach the plywood top to the frame using screws and glue.
Step 2: Create the Miter Saw Platform
- Measure your saw: Measure the base of your miter saw to determine the size of the platform.
- Cut the platform: Cut a piece of plywood to the required size.
- Recess for the saw: Create a recess in the platform so that the saw’s table is flush with the top of the station. This ensures accurate cuts. Use a router or jigsaw to cut out the recess.
- Attach the platform: Secure the platform to the top of the cabinet, centering it.
Step 3: Build Extension Wings (Optional)
- Cut the wings: Cut two pieces of plywood for the extension wings. The length will depend on your needs, but aim for at least 2-3 feet each.
- Support brackets: Build support brackets to hold the wings level with the saw platform. These can be made from plywood or solid wood.
- Attach the wings: Attach the wings to the cabinet using hinges or sliding supports. Hinges allow the wings to fold down when not in use, saving space.
Step 4: Add Storage (Optional)
- Drawers: Build drawers to store blades, measuring tools, and other accessories. Use drawer slides for smooth operation.
- Shelves: Add shelves inside the cabinet for larger items.
- Pegboard: Attach a pegboard to the back of the cabinet for hanging tools.
Step 5: Integrate Dust Collection (Optional)
- Dust port: Install a dust port behind the saw to connect to a shop vacuum or dust collector.
- Enclosure: Build a partial enclosure around the saw to contain dust.
Step 6: Finishing Touches
- Sand: Sand all surfaces smooth.
- Paint or stain: Apply paint, stain, or varnish to protect the wood and give the station a professional look.
- Add hardware: Install drawer pulls, knobs, and any other desired hardware.
Exploring Different Miter Saw Station Designs
Here’s a closer look at some popular miter saw station designs:
Wall-Mounted Miter Saw Station
- Pros: Saves a lot of floor space, folds away when not in use.
- Cons: Requires a strong wall for mounting, can be less stable than other designs.
Key Features:
- Folding wings: Wings are hinged to fold down when not in use.
- Secure mounting: Use heavy-duty brackets to mount the station to the wall.
- Locking mechanism: A locking mechanism to hold the station in the open position.
Mobile Miter Saw Station
- Pros: Easy to move around the shop, versatile.
- Cons: Can take up more space than a wall-mounted station.
Key Features:
- Heavy-duty casters: Use casters that can support the weight of the station and the saw.
- Locking casters: Locking casters prevent the station from moving during use.
- Sturdy frame: A strong frame is essential for stability.
Benchtop Miter Saw Station
- Pros: Compact, easy to build, can be placed on any workbench.
- Cons: May not offer as much storage as other designs.
Key Features:
- Simple design: Easy to build with basic tools and materials.
- Adjustable feet: Adjustable feet ensure the station is level on any surface.
- Non-slip surface: A non-slip surface prevents the saw from sliding.
Flip-Top Miter Saw Station
- Pros: Great way to save space when using different tools
- Cons: Requires high build quality to ensure smooth flip
Key Features:
- Locking mechanism: locks the flip top for stable use
- Strong hinges: Hinges needs to be durable
Optimizing Your Miter Saw Station for Dust Collection
Miter saw station with dust collection is essential for a clean and healthy workshop. Here are some tips for integrating dust collection into your station:
- Dust port: Install a dust port behind the saw to connect to a shop vacuum or dust collector.
- Enclosure: Build a partial enclosure around the saw to contain dust.
- Dust hood: A dust hood can be placed over the saw to capture dust at the source.
- Air filtration: Use an air filtration system to remove dust particles from the air.
Finishing and Customizing Your Miter Saw Station
Once your miter saw station is built, you can customize it to fit your specific needs and preferences. Here are some ideas:
- Add lighting: Install a light above the saw to improve visibility.
- Install a power strip: Add a power strip to provide convenient access to electricity.
- Label drawers and shelves: Label drawers and shelves to keep everything organized.
- Add a measuring tape: Install a measuring tape along the fence for quick and easy measurements.
- Personalize the finish: Use paint, stain, or varnish to match your workshop decor.
Where to Find Miter Saw Station Plans
There are many resources available for finding miter saw station plans:
- Online: Websites like Pinterest, YouTube, and woodworking forums offer free and paid plans.
- Books and magazines: Woodworking books and magazines often feature miter saw station projects.
- DIY communities: Online communities and local woodworking clubs can provide inspiration and guidance.
Best Miter Saw Station Considerations
The best miter saw station is the one that best fits your needs, space, and budget. Consider the following factors when choosing a design:
- Size: Choose a size that fits your space and the types of projects you work on.
- Storage: Determine how much storage you need and choose a design that provides adequate space.
- Dust collection: If dust collection is important, choose a design that integrates it effectively.
- Mobility: If you need to move the station around, choose a mobile design.
- Budget: Set a budget and choose a design that fits within your means.
Common Mistakes to Avoid
- Inaccurate Measurements: Double-check all measurements before cutting.
- Not Squaring the Frame: Ensure the frame is square to prevent problems later.
- Using Insufficient Support: Provide adequate support for the extension wings to prevent sagging.
- Ignoring Dust Collection: Don’t underestimate the importance of dust collection.
- Skipping Finishing: Protect the wood with paint, stain, or varnish to extend its lifespan.
Conclusion
Making your own miter saw station is a satisfying project that makes woodworking a lot more enjoyable. With a little planning and the right materials, you can build a setup that saves space and works perfectly for years. It doesn’t matter if you want it on the wall, on wheels, or on a bench—having a dedicated spot for your miter saw makes a huge difference in your shop.
Frequently Asked Questions (FAQ)
Q: What is the ideal height for a miter saw station?
A: The ideal height is typically the same as your existing workbench height, usually around 34-36 inches. This allows you to seamlessly transition workpieces from the station to your bench.
Q: Can I build a miter saw station without any woodworking experience?
A: Yes, with careful planning and patience, even beginners can build a simple miter saw station. Start with a basic design and gradually increase the complexity as you gain experience.
Q: How much does it cost to build a miter saw station?
A: The cost varies depending on the materials you use and the complexity of the design. A basic station can be built for under $100, while a more elaborate station with dust collection and storage can cost several hundred dollars.
Q: What are the best casters for a mobile miter saw station?
A: Look for heavy-duty casters with a high weight capacity. Locking casters are essential to prevent the station from moving during use.
Q: How do I ensure my miter saw station is level?
A: Use a level to check the surface of the station and adjust the feet or shims as needed. A level surface is crucial for accurate cuts.

Hi, I’m Tom Scalisi, and welcome to The Saw Blog! I started this blog to share my hands-on experience and insights about woodworking tools—especially saws and saw blades. Over the years, I’ve had the chance to work with a wide range of tools, and I’m here to help both professionals and hobbyists make informed decisions when it comes to selecting and using their equipment. Whether you’re looking for in-depth reviews, tips, or just advice on how to get the best performance out of your tools, you’ll find it here. I’m excited to be part of your woodworking journey!