
Have you ever stared at a freshly painted wall, only to see messy, uneven lines where the color meets the ceiling or trim? That frustrating, time-consuming touch-up work can turn a fun painting project into a real headache. Getting those crisp, professional edges by hand takes serious skill and endless patience, often leaving us wondering if a perfect line is even possible without professional help.
Choosing the right paint edger tool feels overwhelming. Do you need a brush edge, a roller attachment, or something totally different? Each option promises sharp lines, but the reality often involves paint bleeding under the guard or streaks that need fixing later. We understand the struggle to find a tool that actually delivers clean, straight borders quickly and easily.
This guide cuts through the confusion. We will break down exactly what makes a paint edger effective, compare the best types available today, and show you how to pick the perfect one for your next room. By the end of this post, you will know exactly which tool to grab to transform those messy boundaries into sharp, professional finishes every single time. Let’s dive into the secrets of flawless paint edging!
Top Paint Edger Tool Recommendations

- Professional-Grade Precision:The Qyueyue 12-inch Paint Shield ensures clean, sharp edges while painting walls, baseboards, and trim. Its ergonomic design allows for easy handling, making it perfect for both DIY enthusiasts and professional painters.
- Durable & Easy-to-Clean Material:Crafted from high-quality, flexible plastic, this paint edger tool is built to last. Its smooth surface resists paint buildup, ensuring quick and hassle-free cleanup after every use.
- Perfect Size for Versatile Use:Measuring 12 inches in length and 2.75 inches in width, this paint shield is ideal for covering large areas efficiently while maintaining precision. Its compact design makes it easy to store and transport.
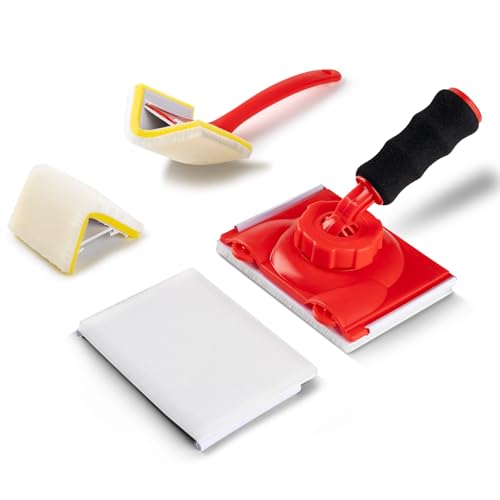
- Precision Edging Combo: The paint edge trimmer kit is your ultimate solution for achieving sharp lines. This essential combo features a 4 inch paint edger tool for walls and ceilings and a specialized 2.5 inch corner paint pad, designed for those tricky inside and outside corners
- Perfect For Corners & Tight Spaces: Our unique 2.5 inch corner pad stands out as the star of this paint edger tool kit. It fits seamlessly into wall corners and around window or door frames, ensuring clean, dripless lines where traditional paint brushes fail
- Save Time & Eliminate Tape: With its innovative 360° pivoting head, the 4-inch paint edger tool guides the pad along edges effortlessly. Achieve professional-level edge painting without the inconvenience of painter’s tape, saving you time and effort on every project

- Guide wheels ensure sharp clean lines when trimming around ceilings, baseboards, windows, doors and moldings.Our products have improved the design structure of the guide wheel to ensure that it will not fall off during use.
- The rotatable handle design, also known as universal rotator, can be adjusted from left to right, up and down, or at any angle. It is very convenient to use.Before using, please take care to lock the handle tightly to avoid the rotation of the handle affecting the application.
- The paint edge trimmer has 5 mm long, dense and flat bristles with high paint absorption capacity, resulting in a smooth film. It is a widely used edge painting tool.
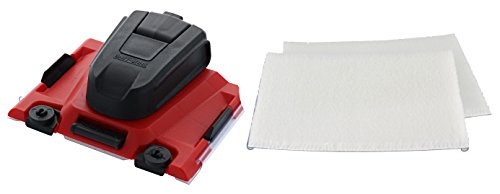
- Secure connection mechanism: Ensures wheels stay firmly attached even under heavy use, providing stable support for painting walls, ceilings, and corners with precision
- Professional clean finishes: Achieves crisp edges on window frames, baseboards, and cabinet contours, making it ideal for both DIYers and professional painters
- 360° rotating handle: Allows precise left/right/vertical/diagonal adjustments; slip-proof locking design ensures stability (always lock the handle before use). Compatible with any extension rod for versatile reach

- Package of 1
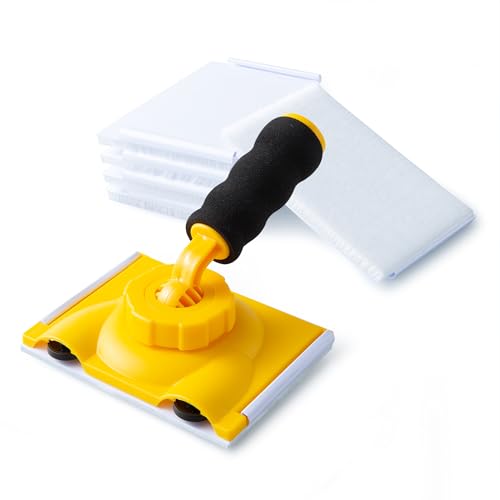
- Paint Edger "Plus" model
- Handle Attaches To Threaded Extension Poles
- PAINT EDGER PRO: At 4.75 x 3.75 inches, this compact painter’s accessory will help you create crisp lines on baseboard and ceiling edges with equal ease. Screw a paint pole into the included slot to give you extra reach so you can complete a variety of jobs around the house
- VERSATILITY: The fabric pads included in this kit can handle a variety of different paint styles, including gloss, semi-gloss, satin, eggshell, and flat
- EASY PAD REPLACEMENT: The paint edger has a button to eject wet pads, so you don’t have to get your hands messy when the job is done
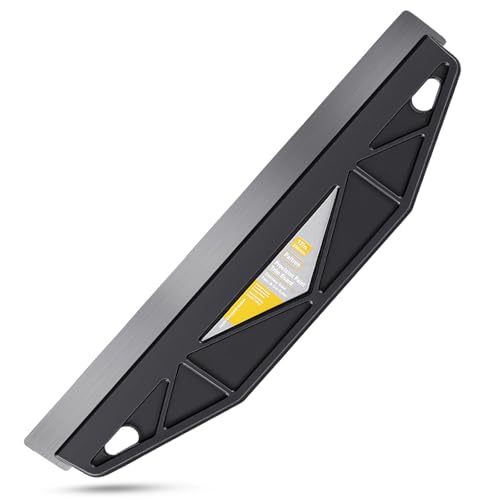
- SAY GOODBYE TO PAINTERS TAPE: Stop wasting hours on tedious prep work. This 12-inch paint guard lets you cut in directly along ceilings, trim, and baseboards, saving you time and frustration. Get professional results faster and skip the hassle of applying and removing tape.
- STRAIGHTER LINES WITH SUPERIOR CONTROL: Engineered with a rigid, straight stainless steel blade, this edger helps you create sharp, consistent paint lines. The high-quality metal guide resists flexing to help you achieve a professional-looking finish with far less bleed-through than painting freehand. For best results and the sharpest lines, use on smooth, non-textured surfaces.
- ERGONOMIC CONTROL FOR LESS FATIGUE: The lightweight yet durable ABS handle is designed to fit comfortably in your hand, reducing strain during long painting sessions. Its secure grip gives you steady, confident control, allowing you to focus on precision without hand cramps.

- PAINT EDGER TOOL KIT INCLUDES: 4 different shapes of paint edger pads, 9-Inch paint trim edger Pad, 360 ° rotating paint edge trimmer, corner painter pad, 1-Inch Mini trim pad and 9-inch paint tray, and 2 refill pads for replacement when needed. Not include extension poles
- PAINT PAD SET: 9-inch (228mm)paint pad and 360 ° rotating painting wall edges pad handle can be held directly or connected to a threaded extension poles for large-scale wall and ceiling painting. Corner painter can paint to the corners of two surfaces, and 1-inch detail paint edger trimmer are perfect for painting edges
- PORTABLE 9’ PAINT TRAY: The paint tray can be used to hold the current paint needed without contaminating all spilled paint. The paint pad slides back and forth on the raised design inside the tray, effectively distributing paint evenly across the pad for a smooth paint surface. Line areas on the sides help scrape off excess paint. Easy to clean for reuse
Choosing the Right Paint Edger Tool: A Buyer’s Guide
Painting a room can be fun, but cutting in those tricky edges next to the ceiling or trim takes patience. A good paint edger tool makes this job much faster and cleaner. This guide helps you pick the best one for your next painting project.
Key Features to Look For
1. The Applicator Material and Shape
The part that actually holds the paint and touches the wall is the most important feature. Look closely at what it is made of.
- Natural or Synthetic Bristles: High-quality edgers use dense, angled bristles. Angled tips help hug the corner perfectly.
- Foam Pads: Some edgers use thick foam. Foam works well for very smooth surfaces but might not give the sharpest line.
- Interchangeable Heads: The best tools let you swap out the pad or brush head. This lets you use the right head for different paint types or surfaces.
2. Handle Design and Grip
You will hold this tool for a long time. A poor handle causes hand cramps.
- Comfort Grip: Look for rubberized or ergonomic handles. These prevent slipping when your hands get sweaty.
- Pole Compatibility: If you paint high ceilings, check if the edger screws onto an extension pole. This saves you from constantly climbing a ladder.
3. Edge Shield or Guide
This feature keeps paint off surfaces you do not want to paint, like window glass or baseboards. A good shield moves smoothly against the surface without dragging or catching.
Important Materials and Durability
The frame and housing of the edger should be strong. Cheap plastic breaks easily after just a few uses. Look for durable ABS plastic or light metal frames.
- Brush Quality: High-quality synthetic fibers hold more paint and release it evenly. Cheap bristles often shed into your wet paint, creating little messes you have to pick out later.
- Rust Resistance: If the tool has any metal parts, ensure they resist rust. Water and paint can cause fast corrosion on low-quality metal.
Factors That Improve or Reduce Quality
What Makes a Great Edger?
A high-quality edger provides a crisp, straight line in one pass. The paint flows smoothly from the applicator to the wall. These tools usually cost a bit more, but they save you hours of touch-up work later.
What Reduces Quality?
Poorly manufactured tools often leak paint from the sides of the shield instead of just the edge. If the bristles are too stiff or sparse, they skip across the surface, leaving tiny gaps in your painted line. Plastic components that flex too much also make precise work impossible.
User Experience and Use Cases
Consider where you plan to use your edger most often.
- Trim and Molding: For narrow areas like baseboards, you need a small, precise edger head with very stiff bristles.
- Ceilings: When painting the junction between the wall and the ceiling, a wider head that works well with an extension pole is necessary.
- Beginners vs. Pros: Beginners often benefit from tools with larger paint reservoirs, which mean fewer trips back to the paint can. Professionals usually prefer smaller, lighter tools that offer maximum control for fine detail work.
10 Frequently Asked Questions (FAQ) About Paint Edger Tools
Q: What is the main difference between a brush edger and a pad edger?
A: A brush edger uses actual bristles for a very sharp line, much like hand-cutting in. A pad edger uses a sponge or foam piece, which is faster but might give a slightly less crisp line.
Q: Can I use the same edger for latex and oil-based paints?
A: Yes, most modern edgers are designed to handle both. However, always clean the tool immediately after using oil-based paint, as it is much harder to remove when dry.
Q: How do I keep my edger from dripping?
A: Do not overload the applicator. Dip the tool lightly, then lightly scrape off the excess paint on the inside rim of the paint can before touching the wall. Keep the tool level.
Q: How often should I clean my paint edger?
A: You must clean it thoroughly after every use, even if you are switching colors. Dried paint ruins the applicator shape and stiffness.
Q: Will an edger replace the need for painter’s tape?
A: Not entirely. An edger greatly reduces the need for tape, but for very delicate trim or detailed areas, tape still offers the absolute sharpest protection.
Q: Are expensive paint edgers really worth the extra money?
A: Often, yes. More expensive models use better materials, which means the bristles or pads last longer and create cleaner lines without shedding or leaking.
Q: Can I use an edger on textured walls?
A: Edgers work best on smooth drywall or plaster. On very rough or heavily textured walls, the bristles cannot maintain contact, and you may get better results using a small trim brush instead.
Q: What is the purpose of the edge shield on the tool?
A: The shield acts as a barrier. It pushes against the surface you are protecting (like the ceiling or trim) and guides the paint applicator right up to that line cleanly.
Q: How do I attach an edger to an extension pole?
A: Most quality edgers have a screw-in port on the handle. You twist the handle off and screw the edger base onto the threaded end of your standard extension pole.
Q: Do I need different edgers for cutting in at the ceiling versus the baseboards?
A: While one tool can often do both, a slightly smaller head gives better control when working near baseboards, while a wider head helps cover more area when painting near the ceiling.

Hi, I’m Tom Scalisi, and welcome to The Saw Blog! I started this blog to share my hands-on experience and insights about woodworking tools—especially saws and saw blades. Over the years, I’ve had the chance to work with a wide range of tools, and I’m here to help both professionals and hobbyists make informed decisions when it comes to selecting and using their equipment. Whether you’re looking for in-depth reviews, tips, or just advice on how to get the best performance out of your tools, you’ll find it here. I’m excited to be part of your woodworking journey!