
Can I use my table saw as a jointer? Yes, you absolutely can! While a dedicated jointer is ideal, using a table saw as a jointer alternative can save space and money, especially in smaller workshops or for hobbyist woodworkers. This guide covers how to perform table saw jointing safely and effectively.
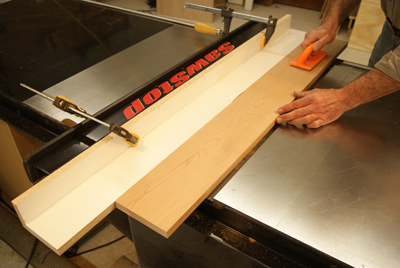
Image Source: www.woodworkersjournal.com
Why Consider Using a Table Saw for Jointing?
A jointer’s primary function is to create perfectly flat and square edges on lumber. This is crucial for creating tight, seamless joints in woodworking projects. But what if you don’t have room for a jointer or can’t justify the cost? That’s where the table saw comes in as a viable alternative.
- Space Savings: Jointers can be large and require considerable floor space. A table saw is often a more compact and versatile tool.
- Cost-Effective: High-quality jointers are expensive. Using your existing table saw avoids the additional investment.
- Versatility: A table saw performs many tasks beyond just ripping boards. Adding jointing to its capabilities expands its utility even further.
- Accessibility: For those starting out or with limited project needs, this method provides a practical entry point into woodworking.
Key Concepts: Table Saw Jointing
Before diving into the methods, let’s clarify what we’re trying to achieve with table saw edge jointing and the problems it solves:
- Straight Edges: The primary goal is to create a perfectly straight edge along a board.
- Square Edges: The edge must be square to the face of the board, ensuring proper alignment when joining pieces together.
- Addressing Imperfections: Often, rough lumber has slight curves, twists, or unevenness. Jointing removes these imperfections.
Methods for Jointing Wood on Table Saw
There are several ways to use a table saw for jointing. Each has its pros and cons, so choose the method that best suits your skill level and equipment.
1. Using a Table Saw Jointing Jig
This is often considered the safest and most accurate method. A table saw jointing jig provides a stable reference surface to guide the board along the blade.
Materials Needed:
- Plywood or MDF (for the jig base and fence)
- Screws or fasteners
- Clamps
- Optional: T-track and hold-down clamps for added stability
Steps:
- Build the Jig Base: Cut a piece of plywood or MDF larger than the longest board you plan to joint. This will be the base of the jig.
- Attach the Fence: Cut a straight piece of material (plywood or hardwood). Attach this fence to the base, making sure it is perfectly square. This fence will act as a reference edge for the straight side of your workpiece.
- Secure the Workpiece: Place the board you want to joint against the fence. Use clamps to hold it securely in place. Ensure the curved edge is facing the blade.
- Make the Cut: With the table saw running, carefully push the entire jig along the fence, removing a small amount of material from the curved edge.
- Repeat as Needed: Repeat steps 3 and 4, making multiple passes until the edge is perfectly straight. Adjust the blade height for shallower or deeper cuts.
Pros:
- Provides a stable reference surface.
- Increases accuracy.
- Safer than freehand methods.
Cons:
- Requires building a jig.
- Can be time-consuming.
- Requires storage space for the jig.
Here’s an example of the steps in a table:
| Step | Description |
|---|---|
| 1 | Cut the base of the jig from plywood or MDF. Make it larger than the boards you will be jointing. |
| 2 | Attach the fence, making sure it is square. |
| 3 | Clamp the workpiece to the jig, curved edge facing the blade. |
| 4 | Make multiple passes to straighten the edge. |
2. Using a Table Saw Jointer Fence (Shop-Made)
Just like a jig, you can build your own jointer fence that clamps right onto your existing table saw fence. This gives you a wider and sturdier surface to guide your wood against. By adding this extra support, you’ll get much better accuracy and straighter edges when using your table saw for jointing.
Materials Needed:
- Plywood or MDF
- Clamps
- Screws or fasteners
Steps:
- Build the Fence Extension: Cut a piece of plywood or MDF longer than your existing table saw fence. This will extend the fence’s surface area.
- Attach to Table Saw Fence: Attach the plywood or MDF extension to your table saw fence using clamps and screws. Ensure it is perfectly aligned and square.
- Create a Relief Cut: On the outfeed side of the blade, shim the fence extension slightly away from the blade (about 1/32″ to 1/16″). This creates a “relief” and prevents the newly jointed edge from rubbing against the fence as you push the board through.
- Joint the Edge: Place the board against the extended fence, with the curved edge facing the blade. Push the board through, keeping it firmly against the fence.
- Repeat as Needed: Make multiple passes until the edge is straight. Adjust the blade height and fence position as needed.
Pros:
- Increased stability compared to freehand methods.
- Relatively easy to build.
- Improves accuracy.
Cons:
- Requires careful alignment of the fence extension.
- The relief cut is crucial for preventing kickback.
- May require modifications to your existing table saw fence.
3. Freehand Table Saw Jointing (Use with Extreme Caution)
This is the least recommended method as it’s the most dangerous and least accurate. It involves using the table saw fence as a reference, but without a jig or fence extension.
WARNING: This method requires significant skill and carries a high risk of kickback. It should only be attempted by experienced table saw users.
Steps:
- Set the Fence: Position the table saw fence so that it will remove a small amount of material from the curved edge of the board.
- Hold the Board Firmly: Hold the board firmly against the fence, keeping your hands well away from the blade.
- Push the Board Through: Slowly and steadily push the board through the blade, maintaining constant pressure against the fence.
- Repeat as Needed: Make multiple passes until the edge is straight.
Pros:
- No jig or fence extension required.
- Quickest method (if done safely).
Cons:
- High risk of kickback.
- Difficult to maintain accuracy.
- Requires significant skill and experience.
- Not recommended for beginners.
Why is Freehand Dangerous?
- Lack of Support: Without a stable jig or fence extension, the board is more likely to wobble, leading to uneven cuts and potential kickback.
- Hand Position: Maintaining a safe hand position close to the blade is difficult, increasing the risk of injury.
- Control: It’s harder to control the board’s movement, making it more prone to catching on the blade.
Safety Precautions When Using a Table Saw for Jointing
Safety is paramount when using any power tool. Here are essential safety precautions:
- Wear Safety Glasses: Protect your eyes from flying debris.
- Use Push Sticks/Paddles: Keep your hands away from the blade. Always use push sticks or paddles to guide the board through the cut.
- Check for Obstructions: Ensure the wood is free of knots, nails, or other obstructions that could cause kickback.
- Use Featherboards: Featherboards help keep the wood pressed against the fence, increasing accuracy and safety.
- Maintain a Firm Grip: Keep a firm grip on the board, but don’t overreach or put yourself in an awkward position.
- Avoid Rushing: Take your time and focus on making accurate cuts.
- Use Proper Blade: Use a sharp, high-quality blade designed for ripping.
- Dust Collection: Connect your table saw to a dust collection system to minimize dust exposure.
- Be Aware of Kickback: Know the signs of potential kickback (e.g., the wood starting to bind or vibrate) and be prepared to react quickly.
- Never Reach Over the Blade: Always go around the saw to retrieve the board.
- Keep the Table Saw Clean: Regularly clean the table saw to remove sawdust and debris, which can affect its performance and safety.
Tips for Accurate Table Saw Jointing
Achieving perfectly straight and square edges requires attention to detail. Here are some tips for improving accuracy:
- Start with Straight Stock: Choose lumber that is as straight as possible to begin with. This reduces the amount of material you need to remove.
- Take Light Cuts: Make multiple shallow passes rather than trying to remove too much material at once. This reduces the risk of tear-out and improves accuracy.
- Check for Squareness: Use a combination square to check the edge for squareness after each pass.
- Use a High-Quality Blade: A sharp, high-quality blade will produce cleaner cuts and reduce the risk of tear-out.
- Ensure Proper Fence Alignment: Double-check that the table saw fence is parallel to the blade. Misalignment can lead to inaccurate cuts.
- Practice: Practice on scrap wood before jointing valuable lumber. This allows you to get a feel for the process and make adjustments as needed.
- Consider Blade Runout: Check for blade runout (wobbling). Excessive runout affects the quality of the cut.
- Inspect the Fence: Make sure your fence is straight. Any imperfections in the fence will translate into imperfections in the cut.
Alternatives to Table Saw Jointing
While using a table saw for jointing is a viable option, it’s not the only one. Here are a few alternatives to consider:
- Hand Plane: A hand plane can be used to create perfectly flat and square edges. This requires skill and practice, but it can be a rewarding experience.
- Jointer (Dedicated Machine): If you have the space and budget, a dedicated jointer is the best option for jointing lumber.
- Planer (for Flattening Faces): A planer is great for flattening the faces of boards but not for creating square edges.
- Ask a Local Woodworking Shop: Many woodworking shops offer jointing services for a fee. This can be a convenient option if you only need to joint a few boards.
FAQ: Using a Table Saw As Jointer
Q: What is table saw jointing?
Table saw jointing is the process of using a table saw to create a straight and square edge on a piece of lumber, similar to what a dedicated jointer does. It’s a space-saving and cost-effective alternative.
Q: Can I use any table saw for jointing?
Yes, but a table saw with a sturdy fence and a smooth-running motor is preferred. A longer fence provides better support for larger boards.
Q: Is table saw jointing as accurate as using a dedicated jointer?
With proper technique and a good jig, table saw jointing can be very accurate, though a dedicated jointer usually offers slightly higher precision.
Q: What type of blade should I use for table saw jointing?
A sharp, high-quality ripping blade with a flat-top grind is ideal for table saw jointing. Avoid using blades with a high hook angle, as they can increase the risk of kickback.
Q: How do I prevent kickback when jointing on a table saw?
Use push sticks/paddles, featherboards, and maintain a firm grip on the board. Never stand directly behind the board in line with the blade.
Q: What are the signs of potential kickback?
The wood starting to bind or vibrate, or the blade suddenly slowing down.
Q: Can I use a miter saw for jointing?
No, a miter saw is not designed for jointing. It is used for making crosscuts and miter cuts, not for flattening edges.
Q: Is it safe to joint thin pieces of wood on a table saw?
Jointing thin pieces of wood on a table saw can be dangerous because of the small surface area. Consider using a specialized jig or hand tools.
Q: How do I maintain my table saw for optimal jointing performance?
Keep the blade sharp and clean, ensure the fence is aligned properly, and lubricate moving parts as needed. Regularly clean the table saw to remove sawdust and debris.
Conclusion
Using a table saw as a jointer is a practical solution for woodworkers with limited space or budget. By understanding the different methods, practicing safety precautions, and employing accuracy-enhancing techniques, you can achieve excellent results with your table saw. While a dedicated jointer remains the ideal tool for this task, this guide illustrates that table saw jointing is a versatile and worthwhile skill to acquire.

Hi, I’m Tom Scalisi, and welcome to The Saw Blog! I started this blog to share my hands-on experience and insights about woodworking tools—especially saws and saw blades. Over the years, I’ve had the chance to work with a wide range of tools, and I’m here to help both professionals and hobbyists make informed decisions when it comes to selecting and using their equipment. Whether you’re looking for in-depth reviews, tips, or just advice on how to get the best performance out of your tools, you’ll find it here. I’m excited to be part of your woodworking journey!