
Can you use a table saw as a jointer? Yes, you can use a table saw as a jointer. While a dedicated jointer is ideal for straightening the edges of boards, it’s a tool many woodworkers can’t afford or don’t have room for. Luckily, with the right techniques and tools, you can achieve similar results using your table saw. This article will explore several methods for table saw jointing, emphasizing accuracy and safety.
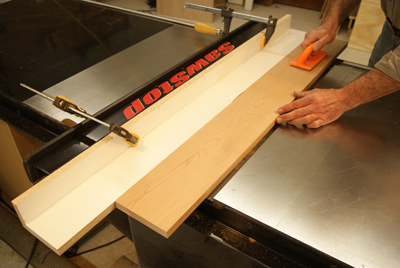
Image Source: www.woodworkersjournal.com
Why Use a Table Saw for Jointing?
- Cost-Effective: A table saw is a staple in most woodworking shops, while a jointer can be a significant investment.
- Space-Saving: Jointing on a table saw eliminates the need for a separate, bulky machine, ideal for smaller workshops.
- Versatility: Learn new ways to maximize your existing tools.
- Excellent Results: You can get very straight edges by using these methods, just like with a jointer.
Methods for Jointing on a Table Saw
There are several ways to achieve table saw edge jointing. We will cover a few popular and effective methods:
- Using a Straight Edge and Clamps
- Building a Simple Table Saw Jointer Jig
- Using a Pre-Made Table Saw Jointer Jig
Jointing with a Straight Edge and Clamps: A Simple Method
This is the most basic method and requires minimal additional equipment. It’s often referred to as the poor man’s jointer table saw technique.
How it Works:
To do this, you simply clamp a straight piece of wood to the board you want to fix. This straight piece runs along your saw’s fence like a guide. As you push it through, the blade cuts away the uneven edge, leaving you with a perfectly straight line.
Steps:
- Prepare the Board: Inspect the board you want to straighten.
- Find a Straight Edge: Use a known straight board, a metal ruler, or even a long level.
- Position the Straight Edge: Place the straight edge along the crooked edge of your board. The goal is to have the straight edge run parallel to the desired straight edge after cutting.
- Secure the Straight Edge: Use clamps to firmly attach the straight edge to your board. Make sure the clamps don’t interfere with the blade or fence.
- Adjust the Fence: Set your table saw fence so that it just touches the straight edge.
- Blade Height: Raise the blade just high enough to cut through the board.
- Feed the Board: Carefully guide the straight edge along the fence, feeding the board through the blade.
- Inspect and Repeat: After the first pass, check the edge. If it’s not perfectly straight, adjust the straight edge slightly and repeat the process.
Pros:
- Cheap: Only requires clamps and a straight piece of material.
- Simple: Easy to set up and execute.
Cons:
- Less Precise: Accuracy relies heavily on the straightness of your guide and clamp placement.
- Can be Slow: Adjustments and multiple passes might be needed.
Building a DIY Table Saw Jointer Jig: Enhanced Accuracy
A DIY table saw jointer jig provides more stability and precision than using a simple straight edge. This method involves creating a platform that slides along the table saw fence, holding the workpiece securely.
Components of a Table Saw Jointer Jig:
- Base: A flat piece of plywood or MDF that slides along the table saw fence.
- Fence: A straight piece of wood attached to the base, against which the workpiece rests.
- Clamping Mechanism: Devices to hold the workpiece firmly against the fence (toggle clamps or simple wedges).
Step-by-Step Construction:
-
Cut the Base: Cut a piece of plywood or MDF slightly larger than your typical workpiece. This will be the platform that rides along the fence.
-
Attach the Fence: Glue and screw a perfectly straight piece of hardwood (or MDF) to the base. Ensure it is perpendicular to the edge of the base that will ride against the fence. This fence needs to be very straight.
-
Add Clamping: Install toggle clamps or create a system using wedges to hold the workpiece against the fence.
-
Fine-Tune: Ensure the jig slides smoothly along the table saw fence. You might need to add runners or adjust the fence for a perfect fit.
Using the Jig:
- Place the Workpiece: Position the board on the jig with the crooked edge facing the blade.
- Secure the Workpiece: Use the clamps to hold the board tightly against the fence.
- Adjust the Fence: Set the table saw fence so the blade will remove the minimum amount of material to straighten the edge.
- Feed the Jig: With the table saw running, carefully slide the jig along the fence, feeding the board through the blade.
- Inspect and Repeat: Check the edge for straightness. If needed, adjust the workpiece on the jig and repeat.
Pros:
- More Accurate: Provides better support and stability compared to a straight edge.
- Repeatable: Once set up, it’s easier to joint multiple boards consistently.
Cons:
- Requires Building: Involves time and effort to construct the jig.
- Storage: Needs space to store when not in use.
Table: Comparison of Jig Materials
| Material | Pros | Cons |
|---|---|---|
| Plywood | Stable, readily available, affordable | Can splinter, edges need sealing |
| MDF | Very flat, smooth | Heavy, susceptible to moisture, not as strong |
| Hardwood | Durable, attractive | More expensive, requires careful selection |
Utilizing Pre-Made Table Saw Jointer Jigs: Convenience & Precision
If you don’t have the time or tools to build your own, pre-made table saw jointer jigs are available. These commercially produced jigs offer a range of features and price points.
Features to Look For:
- Adjustability: Allows for fine-tuning the cut.
- Clamping System: Secure and easy-to-use clamps.
- Sturdy Construction: Durable materials for long-lasting performance.
- Smooth Glide: Ensures smooth and consistent movement along the fence.
How to Use:
- Setup: Follow the manufacturer’s instructions to assemble and adjust the jig.
- Secure the Workpiece: Place the board in the jig and use the built-in clamping system to hold it firmly.
- Adjust the Fence: Position the table saw fence to achieve the desired cut.
- Feed the Jig: Carefully slide the jig along the fence, feeding the board through the blade.
- Inspect: Check the edge for straightness and repeat if necessary.
Pros:
- Convenient: Ready to use with minimal setup.
- Precise: Often designed for high accuracy.
- Durable: Typically made from quality materials.
Cons:
- Cost: Can be more expensive than building a DIY jig.
- Limited Customization: May not perfectly fit all workpiece sizes or shapes.
Additional Table Saw Jointing Methods
While the above are the most common methods, there are a couple of additional options for table saw jointing methods:
- Using a Featherboard: A featherboard can help keep the workpiece pressed against the fence, improving accuracy and safety.
- Jointing Thin Stock: For thin pieces, consider using a sled to provide better support and prevent flexing.
Safety First: Essential Table Saw Safety Tips
Safety is paramount when using a table saw for jointing. Always follow these safety precautions:
- Wear Safety Glasses: Protect your eyes from flying debris.
- Use Push Sticks/Paddles: Keep your hands away from the blade.
- Ensure Proper Blade Guard Use: Even when jointing, using blade guards can help prevent accidents.
- Never Reach Over the Blade: Turn off the saw and wait for it to stop before retrieving cut pieces.
- Use Hearing Protection: Table saws are loud; protect your hearing.
- Be Aware of Kickback: Understand the causes of kickback and take steps to prevent it.
- Proper Stance: Maintain a balanced stance and avoid awkward reaching.
- Sharp Blades: Always use a sharp blade. Dull blades are more likely to cause kickback.
Table: Table Saw Safety Checklist
| Item | Action |
|---|---|
| Eye Protection | Wear safety glasses or a face shield. |
| Hearing Protection | Use earplugs or earmuffs. |
| Push Sticks/Paddles | Always use push sticks or paddles to guide the workpiece. |
| Blade Guard | Ensure the blade guard is properly installed and used. |
| Kickback Prevention | Be aware of the causes of kickback and take precautions. |
| Sharp Blades | Use sharp blades and replace them when dull. |
| Proper Stance | Maintain a balanced stance and avoid reaching over the blade. |
| Clear Workspace | Keep the area around the table saw clear of clutter. |
Achieving Accuracy: Tips for Straight Edges
- Start with Straight Material: If possible, select boards that are already relatively straight.
- Take Light Cuts: Avoid removing too much material in a single pass.
- Check Your Fence: Ensure your table saw fence is perfectly parallel to the blade.
- Use a High-Quality Blade: A sharp, high-quality blade will produce cleaner cuts.
- Measure Frequently: Check the straightness of the edge frequently during the jointing process.
- Consistent Feed Rate: Feed the workpiece through the blade at a consistent speed.
Troubleshooting Common Problems
- Wavy Edges: Could be caused by a loose fence, inconsistent feed rate, or a dull blade.
- Snipe: Occurs at the beginning or end of the cut due to lack of support. Ensure the workpiece is fully supported throughout the cut.
- Kickback: Stop immediately and re-evaluate your setup. Ensure you are using push sticks and that the blade is sharp. Never stand directly behind the blade.
Conclusion: Jointing on a Table Saw is Possible
While a dedicated jointer is the ideal tool for straightening edges, jointing on a table saw is a viable option for many woodworkers. By using the methods described above, prioritizing safety, and taking your time, you can achieve accurate and professional results. Remember to choose the method that best suits your skill level, available tools, and the specific project at hand. Whether you opt for the simple straight edge method or invest in a pre-made jig, how to straighten wood with table saw methods can significantly expand your woodworking capabilities.
Frequently Asked Questions (FAQ)
Q: Is table saw jointing as good as using a dedicated jointer?
A: While a dedicated jointer is generally faster and more convenient, a table saw can produce equally accurate results with proper technique and setup.
Q: Can I joint wide boards on a table saw?
A: Yes, but it might require a larger jig or a modified setup to provide adequate support.
Q: What is the best blade for jointing on a table saw?
A: A flat-top grind (FTG) blade or a general-purpose blade with a high tooth count is a good choice for achieving clean, straight cuts.
Q: Who is this method best suited for?
A: This method is best for woodworkers who have a table saw but don’t have a jointer and are looking for a cost-effective and space-saving solution.
Q: How do I prevent kickback when jointing on a table saw?
A: Use push sticks, ensure the blade is sharp, avoid forcing the workpiece, and be aware of the wood’s grain direction. Never stand directly behind the blade.
Q: How to make a sled for table saw jointing?
A: Sleds for table saw jointing are similar to those used for other tasks. They consist of a base that slides in the miter slots of your table saw, with a fence attached at a 90-degree angle. You secure the workpiece to the fence and push the entire sled through the blade.

Hi, I’m Tom Scalisi, and welcome to The Saw Blog! I started this blog to share my hands-on experience and insights about woodworking tools—especially saws and saw blades. Over the years, I’ve had the chance to work with a wide range of tools, and I’m here to help both professionals and hobbyists make informed decisions when it comes to selecting and using their equipment. Whether you’re looking for in-depth reviews, tips, or just advice on how to get the best performance out of your tools, you’ll find it here. I’m excited to be part of your woodworking journey!