
Can I use a table saw as a jointer? Yes, you can absolutely use a table saw as a jointer! While a dedicated jointer is ideal for creating perfectly flat and square edges on lumber, it’s a significant investment. This article will explore how to achieve jointing results using your table saw, saving you money and space in your workshop. Learn different table saw jointing techniques, alternative to jointer, the poor man’s jointer table saw methods, and table saw jointing jig builds.
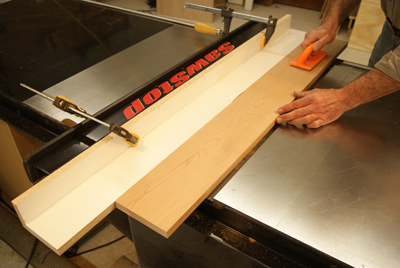
Image Source: www.woodworkersjournal.com
Why Use a Table Saw for Jointing?
A jointer’s primary function is to create a flat, square edge on a piece of wood. This is crucial for assembling furniture, cabinets, and other woodworking projects where tight-fitting joints are essential. However, quality jointers can be expensive and take up considerable space. Using a table saw as a jointer offers several advantages:
- Cost-Effective: Avoid the expense of purchasing a separate jointer.
- Space-Saving: Utilize existing equipment, especially important for small workshops.
- Versatile: A table saw can perform many woodworking tasks beyond just jointing.
- Accessibility: Most woodworkers already own a table saw.
Essential Tools and Safety Precautions
Before attempting any jointing techniques on your table saw, ensure you have the following tools and understand the necessary safety precautions.
Tools Needed
- Table Saw: A stable and well-maintained table saw is essential.
- Accurate Measuring Tools: A good ruler, measuring tape, and square are crucial.
- Safety Glasses: Always protect your eyes.
- Hearing Protection: Table saws are loud; protect your hearing.
- Push Sticks/Pads: Keep your hands safely away from the blade.
- Featherboards (Optional but Recommended): Featherboards provide consistent pressure and help prevent kickback.
- Clamps: Used for securing jigs and auxiliary fences.
- Straight Edge: A long, straight piece of material (metal or wood) to check for flatness.
- Jointing Jig (DIY or Purchased): Crucial for most methods to get straight edge table saw results.
Safety First
Table saws can be dangerous if not used properly. Always follow these safety precautions:
- Read the Manual: Thoroughly read and comprehend your table saw’s manual.
- Use Safety Gear: Always wear safety glasses and hearing protection.
- Keep Hands Away from the Blade: Use push sticks or pads to guide the wood.
- Never Reach Over the Blade: Reposition yourself to avoid reaching over the blade.
- Avoid Kickback: Use featherboards and ensure the wood is properly supported.
- Work Slowly and Deliberately: Rushing can lead to mistakes and accidents.
- Ensure Proper Blade Alignment: A misaligned blade can cause dangerous situations.
- Use a Sharp Blade: A dull blade requires more force and increases the risk of kickback.
Jointing Techniques on a Table Saw
Several methods can be used to achieve jointing results on a table saw. Each technique has its advantages and disadvantages.
1. The Straight Edge Method: Ripping Straight Edges Table Saw
This method is best suited for boards with only a slight bow. It relies on creating a straight reference edge to guide the board through the saw. This is a poor man’s jointer table saw approach that many beginners start with.
Procedure
- Assess the Board: Determine the straightest edge of the board. This will be your reference edge.
- Position the Board: Place the board against the fence, with the bowed edge facing the blade. Ensure the bow is oriented so the blade only removes material where it’s needed to create a straight edge.
- Make the Cut: Slowly and carefully push the board through the saw, keeping the reference edge firmly against the fence. Use push sticks or pads to maintain control and keep your hands away from the blade.
- Repeat if Necessary: If the edge is not perfectly straight, repeat the process, taking off only a small amount of material each time.
- Square the Opposite Edge: Once you have a straight edge, you can use it against the fence to square the opposite edge.
Pros
- Simple and requires no jig.
- Suitable for slightly bowed boards.
Cons
- Not effective for severely bowed or twisted boards.
- Requires a steady hand and careful attention.
- Higher risk of kickback if not done properly.
2. Using a Jointing Jig: Table Saw Jointer Jig
A jointing jig is basically a sled that holds your wood as you slide it past the saw blade. It uses a straight edge as a guide, helping you put a perfectly straight edge on your board. This is easily one of the most effective ways to straighten out rough lumber using just your table saw.
Types of Jigs
- Simple Sled: A flat platform with a straight edge that runs along the table saw fence.
- Tapering Jig: Allows for tapering one or more edges of the board.
- Adjustable Jig: Features adjustable components for fine-tuning the straightness of the cut.
Building a Simple Jointing Sled
Here’s a basic design for a simple jointing sled to enable table saw edge jointing:
| Material | Dimension | Quantity |
|---|---|---|
| Plywood (Base) | 24″ x 36″ x 3/4″ | 1 |
| Plywood (Fence) | 3″ x 36″ x 3/4″ | 1 |
| Wood (Runners) | 3/4″ x 3/4″ x 24″ | 2 |
| Screws/Wood Glue |
Instructions
- Prepare the Base: Cut a piece of plywood to the dimensions specified in the table. This will be the base of your sled.
- Attach the Runners: Attach two runners to the bottom of the base, parallel to each other and spaced to fit snugly in the table saw’s miter slots. Use wood glue and screws to secure them in place. Ensure the runners slide smoothly in the miter slots.
- Attach the Fence: Cut a piece of plywood to the dimensions specified for the fence. Attach the fence to the base, perpendicular to the runners. This fence must be perfectly straight and square to the base. Use wood glue and screws to secure it in place.
- Secure the Workpiece: Use clamps to secure the workpiece to the sled, with the edge to be jointed overhanging the edge of the sled. Position the board so the blade will remove material only where necessary to create a straight edge.
- Make the Cut: With the saw turned off, position the sled so the blade will make a slight cut into the board. Turn on the saw and slowly push the sled through the blade. Keep the sled firmly against the table saw fence.
- Repeat if Necessary: If the edge is not perfectly straight, adjust the board’s position and repeat the cut.
Pros
- More accurate than the straight edge method.
- Suitable for boards with moderate bows or twists.
- Safer than freehand jointing.
Cons
- Requires building or purchasing a jig.
- Takes up more space than the straight edge method.
- May require some fine-tuning for optimal results.
3. Using an Auxiliary Fence: DIY Jointer Table Saw
This method involves attaching a straight piece of material (wood or metal) to the table saw fence, creating a temporary jointer-like setup.
Procedure
- Prepare the Auxiliary Fence: Select a straight piece of material that is at least as long as the boards you will be jointing. Ensure the edge of the auxiliary fence is perfectly straight.
- Attach to the Table Saw Fence: Attach the auxiliary fence to the table saw fence using clamps or screws. Ensure it is securely attached and parallel to the saw blade. You can use shims to adjust the fence’s position slightly if needed.
- Offset the Fence: The auxiliary fence should be offset from the blade by the amount of material you want to remove. This offset creates the “jointer” effect. A small gap is all that’s needed.
- Make the Cut: Place the board against the auxiliary fence, with the edge to be jointed facing the blade. Slowly and carefully push the board through the saw, keeping it firmly against the auxiliary fence. Use push sticks or pads to maintain control.
- Repeat if Necessary: If the edge is not perfectly straight, adjust the fence’s offset and repeat the cut.
Pros
- Relatively simple to set up.
- Can be used for boards with moderate bows or twists.
- Provides good control and accuracy.
Cons
- Requires a straight auxiliary fence.
- Clamping can be cumbersome.
- Offset adjustment can be tricky.
4. Tapering Jig for Jointing: Angled Approach
While primarily used for creating tapered cuts, a tapering jig can be adapted for jointing edges, particularly when dealing with significant bows or irregularities.
Procedure
- Set Up the Tapering Jig: Adjust the tapering jig to create a slight angle. The angle will determine how much material is removed from the bowed edge.
- Position the Board: Secure the board to the tapering jig, aligning the bowed edge with the intended cut line.
- Make the Cut: Guide the jig through the table saw, allowing the blade to remove the excess material.
- Adjust and Repeat: Adjust the angle of the tapering jig as needed to gradually straighten the edge. This may require multiple passes.
- Final Pass: Once the edge is mostly straight, make a final pass with a minimal angle to achieve a perfectly straight edge.
Pros
- Effective for removing significant bows.
- Allows for controlled material removal.
Cons
- Can be time-consuming.
- Requires careful adjustment and multiple passes.
Choosing the Right Technique
The best technique for jointing on a table saw depends on several factors, including:
- Severity of the Bow or Twist: For slight imperfections, the straight edge method may suffice. For more significant bows, a jointing jig or auxiliary fence is recommended.
- Available Tools and Materials: If you have a jointing jig or the materials to build one, that is often the most effective option. If not, the auxiliary fence method may be more practical.
- Desired Accuracy: For critical projects where accuracy is paramount, a jointing jig is the best choice.
- Comfort Level and Experience: Choose a technique that you are comfortable with and have experience using.
Tips for Successful Table Saw Jointing
- Use a Sharp Blade: A sharp blade will produce cleaner cuts and reduce the risk of kickback.
- Take Shallow Cuts: Avoid removing too much material in a single pass. Multiple shallow cuts are better than one deep cut.
- Maintain a Consistent Feed Rate: Feed the wood through the saw at a steady pace. Avoid stopping or hesitating mid-cut.
- Use Featherboards: Featherboards help keep the wood tight against the fence and prevent kickback.
- Check for Squareness: After jointing one edge, use a square to check that it is perpendicular to the face of the board.
- Sand or Plane as Needed: After jointing, you may need to sand or plane the edge to remove any imperfections.
Troubleshooting Common Problems
- Wavy Edges: This can be caused by a dull blade, inconsistent feed rate, or loose jig.
- Tapered Edges: This can be caused by a misaligned fence or jig.
- Kickback: This can be caused by feeding the wood against the direction of the blade rotation, a dull blade, or knots in the wood.
- Torn Grain: This can be caused by a dull blade or cutting against the grain.
Alternative Solutions
What are some alternative to jointer? If using a table saw as a jointer is not feasible or doesn’t yield satisfactory results, consider these alternatives:
- Hand Plane: A hand plane can be used to flatten and square edges. This requires skill and practice, but it can produce excellent results.
- Router Table: A router table with a straight edge bit can be used to joint edges.
- Professional Millwork: If you need perfectly jointed lumber, consider having it milled professionally.
- Drum Sander: While not primarily for jointing, a drum sander can flatten edges over multiple passes.
Comparing Table Saw Jointing Methods
| Method | Accuracy | Complexity | Cost | Best For |
|---|---|---|---|---|
| Straight Edge | Low | Low | Low | Slightly bowed boards |
| Jointing Jig | High | Medium | Medium | Moderately bowed boards, high accuracy |
| Auxiliary Fence | Medium | Medium | Low/Medium | Moderately bowed boards |
| Tapering Jig | Medium | Medium | Low | Significantly bowed edges and controlled removal. |
Conclusion
Using a table saw as a jointer is a viable alternative to purchasing a dedicated jointer. By employing the correct techniques and safety precautions, you can achieve excellent results and save money. Whether you choose the simple straight edge method, build a jointing jig, or use an auxiliary fence, remember to prioritize safety and take your time. With practice and patience, you can master the art of jointing on a table saw and create beautiful, professional-quality woodworking projects.
Frequently Asked Questions (FAQ)
Q: What is the best type of blade for table saw jointing?
A: A sharp, high-quality blade with a flat grind is ideal. A general-purpose blade can work, but a blade specifically designed for ripping will provide cleaner cuts and reduce the risk of tear-out.
Q: How can I prevent kickback when jointing on a table saw?
A: Use featherboards to keep the wood tight against the fence, avoid feeding the wood against the direction of the blade rotation, and always use push sticks or pads to keep your hands away from the blade. Ensure the blade is sharp and the saw is properly maintained.
Q: Is it safe to joint small pieces of wood on a table saw?
A: Jointing small pieces of wood on a table saw can be dangerous due to the increased risk of kickback. Use a jointing jig or a push stick/pad to maintain control and keep your hands away from the blade. If possible, joint larger pieces of wood first and then cut them down to size.
Q: Can I use a miter saw to joint wood?
A: While a miter saw can make precise cuts, it is not designed for jointing. Jointing requires removing material along the entire edge of a board, which is not possible with a miter saw. Attempting to use a miter saw for jointing can be dangerous and may damage the saw.
Q: Do I really need a jointer jig, or can I just use the fence?
A: While you can technically joint wood using only the fence, a jointer jig significantly improves accuracy and safety, especially for bowed or warped boards. The jig provides a stable reference surface and helps prevent the wood from wandering during the cut.
Q: How much material should I remove in each pass?
A: It’s generally best to remove only a small amount of material in each pass, typically no more than 1/16″ to 1/8″. Taking shallow cuts reduces the risk of tear-out, kickback, and other problems. It also allows for more precise control over the final result.

Hi, I’m Tom Scalisi, and welcome to The Saw Blog! I started this blog to share my hands-on experience and insights about woodworking tools—especially saws and saw blades. Over the years, I’ve had the chance to work with a wide range of tools, and I’m here to help both professionals and hobbyists make informed decisions when it comes to selecting and using their equipment. Whether you’re looking for in-depth reviews, tips, or just advice on how to get the best performance out of your tools, you’ll find it here. I’m excited to be part of your woodworking journey!