
So, what exactly is a sliding miter saw? Basically, it’s a power tool built to help you make clean, straight, or angled cuts through wood and other stuff. This guide is here to help you use it the right way, whether you’re just starting out or you’ve been building things for years. We’ll walk through how to actually run the saw, how to stay safe, and some pro tips for getting your cuts perfectly lined up every time.
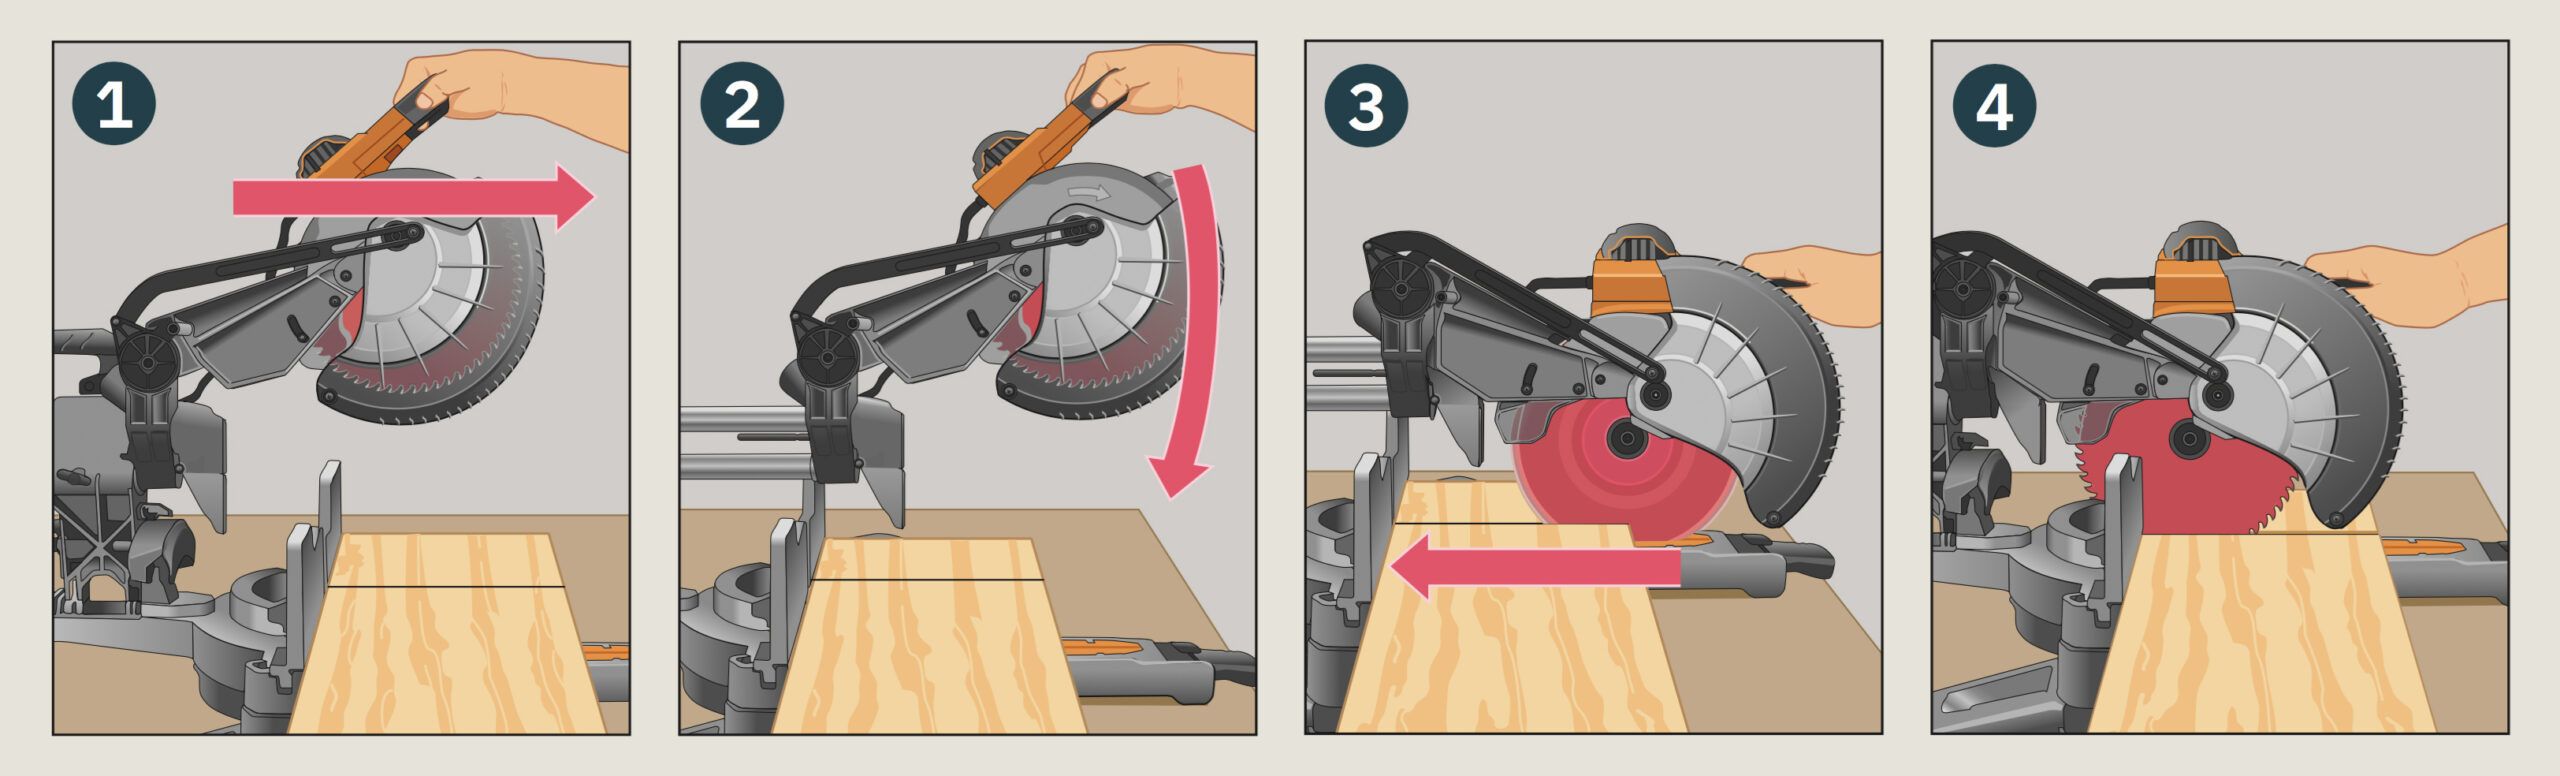
Image Source: s42814.pcdn.co
Choosing the Right Sliding Miter Saw
Before you even start cutting, selecting the right sliding miter saw is important. Consider these factors:
- Size: Miter saws come in different sizes (blade diameter). 10-inch and 12-inch models are the most common. Larger blades can cut thicker materials.
- Sliding Function: The sliding function lets you cut wider boards than a standard miter saw. Make sure the slide action is smooth and stable.
- Power: Higher amperage motors provide more power, making it easier to cut through dense materials.
- Features: Look for features like laser guides, LED lights, and dust collection ports, which can improve accuracy and convenience.
- Compound vs. Single Bevel: A compound miter saw can bevel in two directions, offering more versatility for cutting angles with a miter saw. A single bevel can only bevel in one direction.
Essential Sliding Miter Saw Safety Precautions
Sliding miter saws are powerful tools, and safety should always be your top priority. Keep in mind the below sliding miter saw safety tips:
- Read the Manual: Always read and understand the manufacturer’s manual before using the saw.
- Wear Safety Glasses: Protect your eyes from flying debris.
- Wear Hearing Protection: Miter saws are loud; use earplugs or earmuffs.
- Secure the Workpiece: Use clamps to hold the material firmly against the fence.
- Keep Hands Clear: Never place your hands in the path of the blade.
- Disconnect Power: Unplug the saw before making any adjustments or changing the blade.
- Inspect the Blade: Check the blade for damage before each use.
- Use Proper Stance: Maintain a balanced stance and keep your body out of the blade’s path.
- Avoid Loose Clothing: Loose clothing or jewelry can get caught in the saw.
- Don’t Overreach: Avoid reaching across the blade. Stop the saw and reposition the workpiece if needed.
Getting to Know Your Sliding Miter Saw
Take some time to familiarize yourself with the different parts of your miter saw.
- Base: The stable platform on which the saw is mounted.
- Fence: The vertical barrier against which you place the workpiece.
- Miter Scale: The scale used to set the miter angle.
- Bevel Scale: The scale used to set the bevel angle (on compound miter saws).
- Blade Guard: A protective cover that automatically retracts as you make a cut.
- Motor and Blade: The power source and cutting element of the saw.
- Handle: The grip you use to control the saw.
- Sliding Rails: Allow the saw head to slide forward and backward for wider cuts.
- Clamps: Secure the workpiece to the fence.
How To Make Accurate Cuts with Miter Saw
Achieving accurate cuts requires careful setup and technique. Here’s a step-by-step guide on how to make accurate cuts with a miter saw:
Step 1: Preparing Your Work Area
- Ensure you have enough space to work comfortably and safely.
- The area should be well-lit and free from obstructions.
- A sturdy workbench or stand is essential.
Step 2: Selecting the Right Miter Saw Blade
Choosing the right miter saw blade selection is crucial for clean and accurate cuts.
- Tooth Count: Higher tooth count blades produce smoother cuts, ideal for hardwoods and delicate materials. Lower tooth count blades are better for faster cuts in softer woods.
- Blade Material: Carbide-tipped blades are durable and can cut a variety of materials, including wood, plastic, and aluminum.
- Blade Type: Specific blades are designed for different tasks, such as crosscutting, ripping, and cutting non-ferrous metals.
Below is a table showing ideal tooth count to the miter saw blade for common materials:
| Material | Tooth Count | Notes |
|---|---|---|
| Softwood | 40-60 | Faster cuts, may have some tear-out |
| Hardwood | 60-80 | Cleaner cuts, slower feed rate |
| Plywood/MDF | 80+ | Prevents chipping and splintering |
| Aluminum | 80+ | Requires a non-ferrous metal blade |
| Plastic/Acrylic | 60-80 | Prevents melting and cracking |
Step 3: Setting the Miter Angle
- Loosen the miter lock and rotate the saw head to the desired angle.
- Use the miter scale to set the angle accurately.
- Tighten the miter lock securely.
- Double-check the angle with a protractor or angle finder for critical cuts.
Step 4: Setting the Bevel Angle (For Compound Cuts)
- Loosen the bevel lock and tilt the saw head to the desired angle.
- Use the bevel scale to set the angle accurately.
- Tighten the bevel lock securely.
- Again, double-check with a protractor, especially when using a compound miter saw guide.
Step 5: Securing the Workpiece
- Place the material against the fence, ensuring it is flush.
- Use clamps to hold the material firmly in place.
- Make sure the clamps don’t interfere with the blade’s path.
Step 6: Making the Cut
- Turn on the saw and let the blade reach full speed.
- Slowly pull the saw head forward (if using the sliding function) and then down through the material.
- Maintain a steady and consistent cutting speed.
- Let the blade stop completely before raising the saw head.
Step 7: Inspecting the Cut
- Examine the cut for accuracy and smoothness.
- Make any necessary adjustments to your technique or settings for future cuts.
Advanced Miter Saw Techniques
Once you’ve mastered the basics, you can explore these advanced miter saw techniques:
Cutting Crown Molding
Using a miter saw for crown molding requires precision and a good understanding of angles.
- Nested Method: Place the crown molding upside down and at the appropriate angle against the fence.
- Flat Method: Cut the molding lying flat on the saw table, using shims to achieve the correct angle.
- Cope Cuts: Create a joint where one piece of molding is cut to match the profile of the other, allowing for a seamless fit even if the corner isn’t perfectly square.
Cutting Miters and Bevels Simultaneously
- Compound miter saws allow you to cut both miter and bevel angles in a single pass.
- This is useful for creating complex shapes and joints.
Making Repetitive Cuts
- Use a stop block or a miter saw stand with a measuring system to ensure consistent lengths when making repetitive cuts.
- This is essential for projects like building frames or cutting trim.
Cutting Different Materials
- While wood is the most common material, miter saws can also cut plastic, aluminum, and other materials with the right blade.
- Use a blade specifically designed for the material you are cutting.
- Adjust the cutting speed to prevent melting or chipping.
Miter Saw Cutting Tips for Perfect Results
These miter saw cutting tips will help you achieve perfect results:
- Practice Makes Perfect: Practice on scrap material before cutting your final piece.
- Sharp Blades: Use sharp blades for clean cuts and to reduce strain on the motor.
- Slow and Steady: Avoid forcing the saw through the material. Let the blade do the work.
- Dust Collection: Use a dust collection system to keep your work area clean and improve visibility.
- Lighting: Ensure adequate lighting to see the cutting line clearly.
- Regular Maintenance: Keep your saw clean and lubricated for smooth operation.
Sliding Miter Saw Maintenance
Regular miter saw maintenance is essential for keeping your saw in good working condition and extending its lifespan. Here are some key maintenance tasks:
- Cleaning: Remove dust and debris from the saw after each use.
- Lubrication: Lubricate moving parts regularly with a silicone-based lubricant.
- Blade Inspection: Check the blade for damage or wear. Replace it when necessary.
- Calibration: Periodically check and adjust the miter and bevel scales for accuracy.
- Carbon Brushes: Check the carbon brushes in the motor and replace them when they are worn down.
Below is a schedule for routine miter saw maintenance:
| Task | Frequency | Notes |
|---|---|---|
| Cleaning | After each use | Remove dust and debris |
| Blade Inspection | Before each use | Check for damage or wear |
| Lubrication | Monthly | Apply silicone-based lubricant to parts |
| Calibration Check | Every 6 months | Adjust miter and bevel scales |
| Carbon Brush Check | Annually | Replace if worn |
Miter Saw for Beginners: Getting Started
If you’re a miter saw for beginners, start with these tips:
- Start Simple: Begin with basic crosscuts and gradually work your way up to more complex cuts.
- Read the Manual: The manual is your best resource for understanding your saw’s specific features and operation.
- Watch Tutorials: Online tutorials can provide visual guidance and tips.
- Practice: The more you practice, the more comfortable and confident you will become.
- Ask for Help: Don’t hesitate to ask experienced woodworkers for advice or assistance.
Troubleshooting Common Miter Saw Problems
Even with proper care and technique, you may encounter some common miter saw problems. Here are some troubleshooting tips:
- Saw Won’t Start: Check the power cord, switch, and carbon brushes.
- Blade Vibrates: Ensure the blade is properly installed and tightened. Check for a bent or damaged blade.
- Inaccurate Cuts: Calibrate the miter and bevel scales. Ensure the workpiece is securely clamped.
- Motor Overheats: Reduce the cutting speed and ensure the blade is sharp.
- Dust Collection Issues: Check for clogs in the dust collection port or hose.
FAQ Section
Q: Can I cut metal with a miter saw?
Yes, but you need to use a blade specifically designed for cutting metal. Aluminum cutting blades are readily available. Always wear appropriate safety gear when cutting metal.
Q: What is the difference between a miter saw and a chop saw?
A chop saw typically only makes straight crosscuts, while a miter saw can also make angled cuts. A sliding miter saw adds the ability to make wider cuts.
Q: How do I choose the right miter saw blade?
Consider the material you will be cutting and the type of cut you need to make. Higher tooth counts are better for hardwoods and delicate materials, while lower tooth counts are suitable for faster cuts in softer woods.
Q: How important is dust collection?
Dust collection is important for maintaining a clean and safe work environment. It also improves visibility and reduces the risk of respiratory problems.
Q: What safety gear should I always wear when using a miter saw?
Always wear safety glasses and hearing protection. A dust mask is also recommended, especially when cutting materials that produce a lot of dust.

Hi, I’m Tom Scalisi, and welcome to The Saw Blog! I started this blog to share my hands-on experience and insights about woodworking tools—especially saws and saw blades. Over the years, I’ve had the chance to work with a wide range of tools, and I’m here to help both professionals and hobbyists make informed decisions when it comes to selecting and using their equipment. Whether you’re looking for in-depth reviews, tips, or just advice on how to get the best performance out of your tools, you’ll find it here. I’m excited to be part of your woodworking journey!