
Cutting long boards on a table saw is definitely possible, but you have to be extra careful. Since the wood is so long, it can be tricky to keep it steady and under control. This guide will show you exactly how to do it safely. We’ll cover the best tips, techniques, and tools to help you get straight, accurate cuts every time.
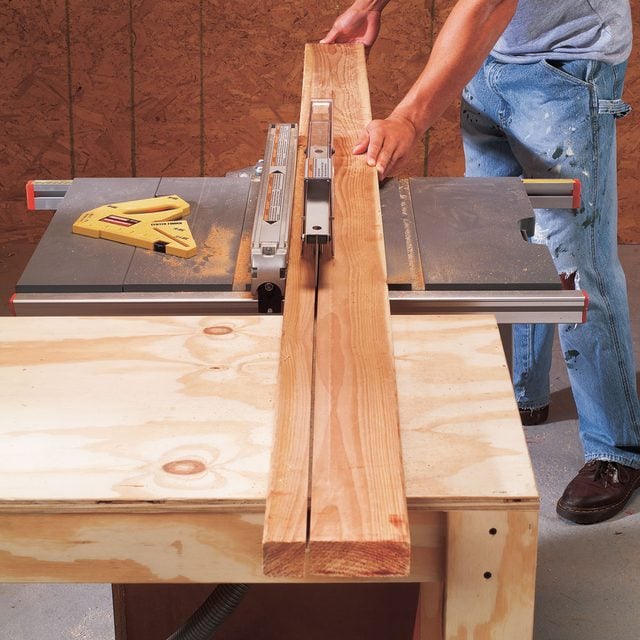
Image Source: www.familyhandyman.com
Fathoming Table Saw Long Board Ripping Challenges
Ripping long boards on a table saw introduces several challenges not present when working with shorter pieces. These challenges primarily stem from the increased surface area and potential for the board to warp, twist, or bind during the cut.
Controlling Long Boards on Table Saw: Key Issues
- Maintaining a Straight Cut: The longer the board, the more challenging it is to keep it aligned with the fence throughout the cut. Any deviation can result in a curved or uneven rip. This is where the best technique ripping long boards comes into play.
- Preventing Binding and Kickback: As the board is pushed through the saw, internal stresses within the wood can cause it to pinch the blade. This binding can lead to dangerous kickback, where the board is violently thrown back towards the operator.
- Supporting the Board: Long boards can easily tip or sag as they extend beyond the table saw’s surface. Insufficient support increases the risk of miscuts and accidents. This can be mitigated using a table saw sled for long boards.
- Operator Fatigue: Ripping long boards requires sustained focus and effort. Fatigue can lead to errors in judgment and reduced control.
Long Board Table Saw Safety: Paramount Considerations
Safety must be the top priority when ripping long boards. Here are some crucial safety measures to implement:
Personal Protective Equipment (PPE)
- Eye Protection: Always wear safety glasses or a face shield to protect against flying debris.
- Hearing Protection: Table saws are loud. Use earplugs or earmuffs to prevent hearing damage.
- Dust Mask or Respirator: Ripping wood generates a lot of dust. Wear a dust mask or respirator to avoid inhaling harmful particles.
- Appropriate Clothing: Avoid loose clothing, jewelry, or anything that could get caught in the saw. Wear closed-toe shoes.
Pre-Cut Inspection
- Check the Board: Carefully examine the board for knots, cracks, or other defects. These can weaken the wood and increase the risk of kickback.
- Relieve Internal Stress: For severely warped boards, consider making relief cuts before ripping to reduce internal tension.
Table Saw Setup and Maintenance
- Sharp Blade: A sharp blade is essential for clean cuts and reduces the risk of binding. Replace or sharpen the blade regularly.
- Proper Blade Height: The blade should be set so that the teeth extend just above the top surface of the board.
- Parallel Fence: Ensure the fence is perfectly parallel to the blade. A misaligned fence is a major cause of binding and kickback.
- Anti-Kickback Devices: Install and use anti-kickback pawls and a splitter or riving knife. These devices help prevent the board from being thrown back towards the operator.
- Outfeed Support: Use a roller stand or extension table to support the board as it exits the saw. This prevents the board from tipping and ensures a smooth, controlled cut.
Ripping Wide Boards on Table Saw: Managing Width
Ripping wide boards presents an additional set of challenges. Controlling the board across a larger surface area requires extra care.
- Featherboard Placement: Strategic placement of featherboards (discussed later) is crucial for maintaining consistent pressure against the fence.
- Multiple Passes: For very wide boards, consider making multiple passes to gradually reduce the width. This reduces the strain on the saw and the operator.
Best Technique Ripping Long Boards: Mastering the Process
The best technique for ripping long boards combines proper setup, safe practices, and smooth execution.
Preparing the Board
- Jointing: For optimal results, joint one edge of the board to create a perfectly straight reference surface.
- Planing: If necessary, plane the board to achieve a consistent thickness.
Setting Up the Cut
- Measure Carefully: Accurately measure and mark the desired width on the board.
- Position the Fence: Set the fence to the marked width, ensuring it is parallel to the blade.
- Secure Outfeed Support: Position a roller stand or extension table to support the board as it exits the saw.
Executing the Cut
- Stance and Grip: Stand to the side of the blade, with a firm, balanced stance. Use both hands to guide the board, keeping your fingers well away from the blade.
- Feed Rate: Feed the board at a consistent rate, neither too fast nor too slow. A slow feed rate can cause burning, while a fast feed rate can lead to loss of control.
- Maintain Pressure: Apply consistent pressure against the fence to ensure a straight cut.
- Avoid Stopping Mid-Cut: If possible, avoid stopping the saw mid-cut. If you must stop, turn off the saw and wait for the blade to come to a complete stop before removing the board.
How to Build Long Board Ripping Jig: Enhancing Accuracy and Safety
A ripping jig can significantly improve the accuracy and safety of ripping long boards on a table saw. Here’s a guide on how to build a simple but effective jig:
Materials
- Plywood or MDF: 3/4″ thick, for the base and fence of the jig.
- Hardwood: For runners that fit snugly in the table saw’s miter slots.
- Screws: For assembling the jig.
- Wood Glue: For added strength.
- Clamps: To hold the pieces together while the glue dries.
Construction
- Base: Cut a piece of plywood or MDF slightly wider than the distance from the miter slot to the blade at its furthest extension. The length should be sufficient to support the entire length of the board being ripped.
- Runners: Cut two pieces of hardwood to fit snugly in the table saw’s miter slots. These should slide smoothly without excessive play.
- Attach Runners: Glue and screw the runners to the underside of the base, ensuring they are parallel and aligned with the miter slots.
- Fence: Cut a piece of plywood or MDF to serve as the fence. This should be at least as long as the base and tall enough to provide adequate support for the board.
- Attach Fence: Attach the fence to the base, ensuring it is perfectly perpendicular to the runners. Use screws and glue for a strong connection.
- Adjustable Stop (Optional): Add an adjustable stop block to the fence to allow for repeatable cuts. This can be a simple piece of wood attached with a T-track and knobs.
Using the Jig
- Place the Board: Place the board on the jig, with the edge to be ripped against the fence.
- Secure the Board: Use clamps to secure the board to the jig.
- Slide the Jig: Slide the jig through the saw, keeping it firmly against the table saw surface.
Table: Jig Advantages
| Feature | Benefit |
|---|---|
| Stable Platform | Reduces vibration and improves cut accuracy. |
| Secure Clamping | Prevents the board from shifting during the cut. |
| Controlled Feed | Ensures a smooth, consistent feed rate. |
| Repeatable Cuts | Makes it easy to rip multiple boards to the same width. |
| Enhanced Safety | Keeps hands further away from the blade and reduces the risk of kickback. |
Featherboard for Long Board Ripping: Enhancing Control
A featherboard is a simple but effective tool that helps to keep the board pressed firmly against the fence during the cut. This improves accuracy and reduces the risk of kickback.
Types of Featherboards
- Spring Featherboards: Made from a single piece of wood or plastic with flexible “fingers” that exert pressure on the board.
- Roller Featherboards: Use rollers to guide the board and apply pressure.
Placement
- Infeed Featherboard: Place a featherboard on the infeed side of the blade to keep the board pressed against the fence before it reaches the blade.
- Outfeed Featherboard: Place a featherboard on the outfeed side of the blade to maintain pressure after the board has passed the blade.
Installation
- Miter Slot Mounting: Some featherboards are designed to be mounted in the table saw’s miter slots.
- T-Track Mounting: Others are designed to be mounted in T-tracks.
- Magnetic Mounting: Magnetic featherboards can be attached directly to the table saw surface.
Table: Featherboard Benefits
| Feature | Benefit |
|---|---|
| Consistent Pressure | Ensures a straight, uniform cut. |
| Reduced Vibration | Minimizes chatter and improves cut quality. |
| Kickback Prevention | Helps to prevent the board from being thrown back towards the operator. |
| Hands-Free Operation | Allows you to keep your hands further away from the blade. |
Alternatives to Ripping on a Table Saw
While a table saw is a common choice, other options exist for ripping long boards.
Track Saw
A track saw provides excellent accuracy and portability. The saw runs along a track, ensuring a straight cut, and is especially useful for sheet goods and long boards.
Circular Saw with Edge Guide
A circular saw can be used with an edge guide to achieve straight cuts. While not as precise as a table saw or track saw, it is a more affordable option.
Hand Saw
For smaller projects or when power tools are not available, a hand saw can be used to rip long boards. This requires more time and effort but can still produce satisfactory results with practice.
FAQ: Ripping Long Boards on Table Saw
What is the biggest risk when ripping long boards on a table saw?
The biggest risk is kickback, where the board is violently thrown back towards the operator due to binding.
Can I rip long boards safely on a table saw without a jig?
Yes, but it requires extreme caution, proper technique, and the use of featherboards and outfeed support.
Who is responsible for safety when operating a table saw?
The operator is solely responsible for ensuring their safety and following all safety guidelines.
What is the best way to prevent kickback when ripping long boards?
Use a sharp blade, ensure the fence is parallel to the blade, use anti-kickback devices, and maintain a consistent feed rate.
How do I choose the right blade for ripping long boards?
Use a blade designed for ripping, with a low tooth count and a large gullet to remove waste material efficiently.
Why is outfeed support important when ripping long boards?
Outfeed support prevents the board from tipping or sagging as it exits the saw, ensuring a smooth, controlled cut.

Hi, I’m Tom Scalisi, and welcome to The Saw Blog! I started this blog to share my hands-on experience and insights about woodworking tools—especially saws and saw blades. Over the years, I’ve had the chance to work with a wide range of tools, and I’m here to help both professionals and hobbyists make informed decisions when it comes to selecting and using their equipment. Whether you’re looking for in-depth reviews, tips, or just advice on how to get the best performance out of your tools, you’ll find it here. I’m excited to be part of your woodworking journey!