
What is a table saw crosscut sled? A table saw crosscut sled is a woodworking jig that rides in the miter slots of your table saw to make accurate and safe crosscuts. It drastically improves the precision and safety of cutting smaller pieces of wood, especially when making repeated cuts.
A table saw is a very useful tool, but it can also be dangerous. Making accurate cuts is hard without the right tools. This is where a table saw crosscut sled comes in. This guide will help you learn how to make a safe and accurate sled. We’ll cover everything from choosing materials to fine-tuning for perfect cuts. Whether you’re a beginner or a seasoned woodworker, this woodworking sled tutorial will give you the skills to improve your work.
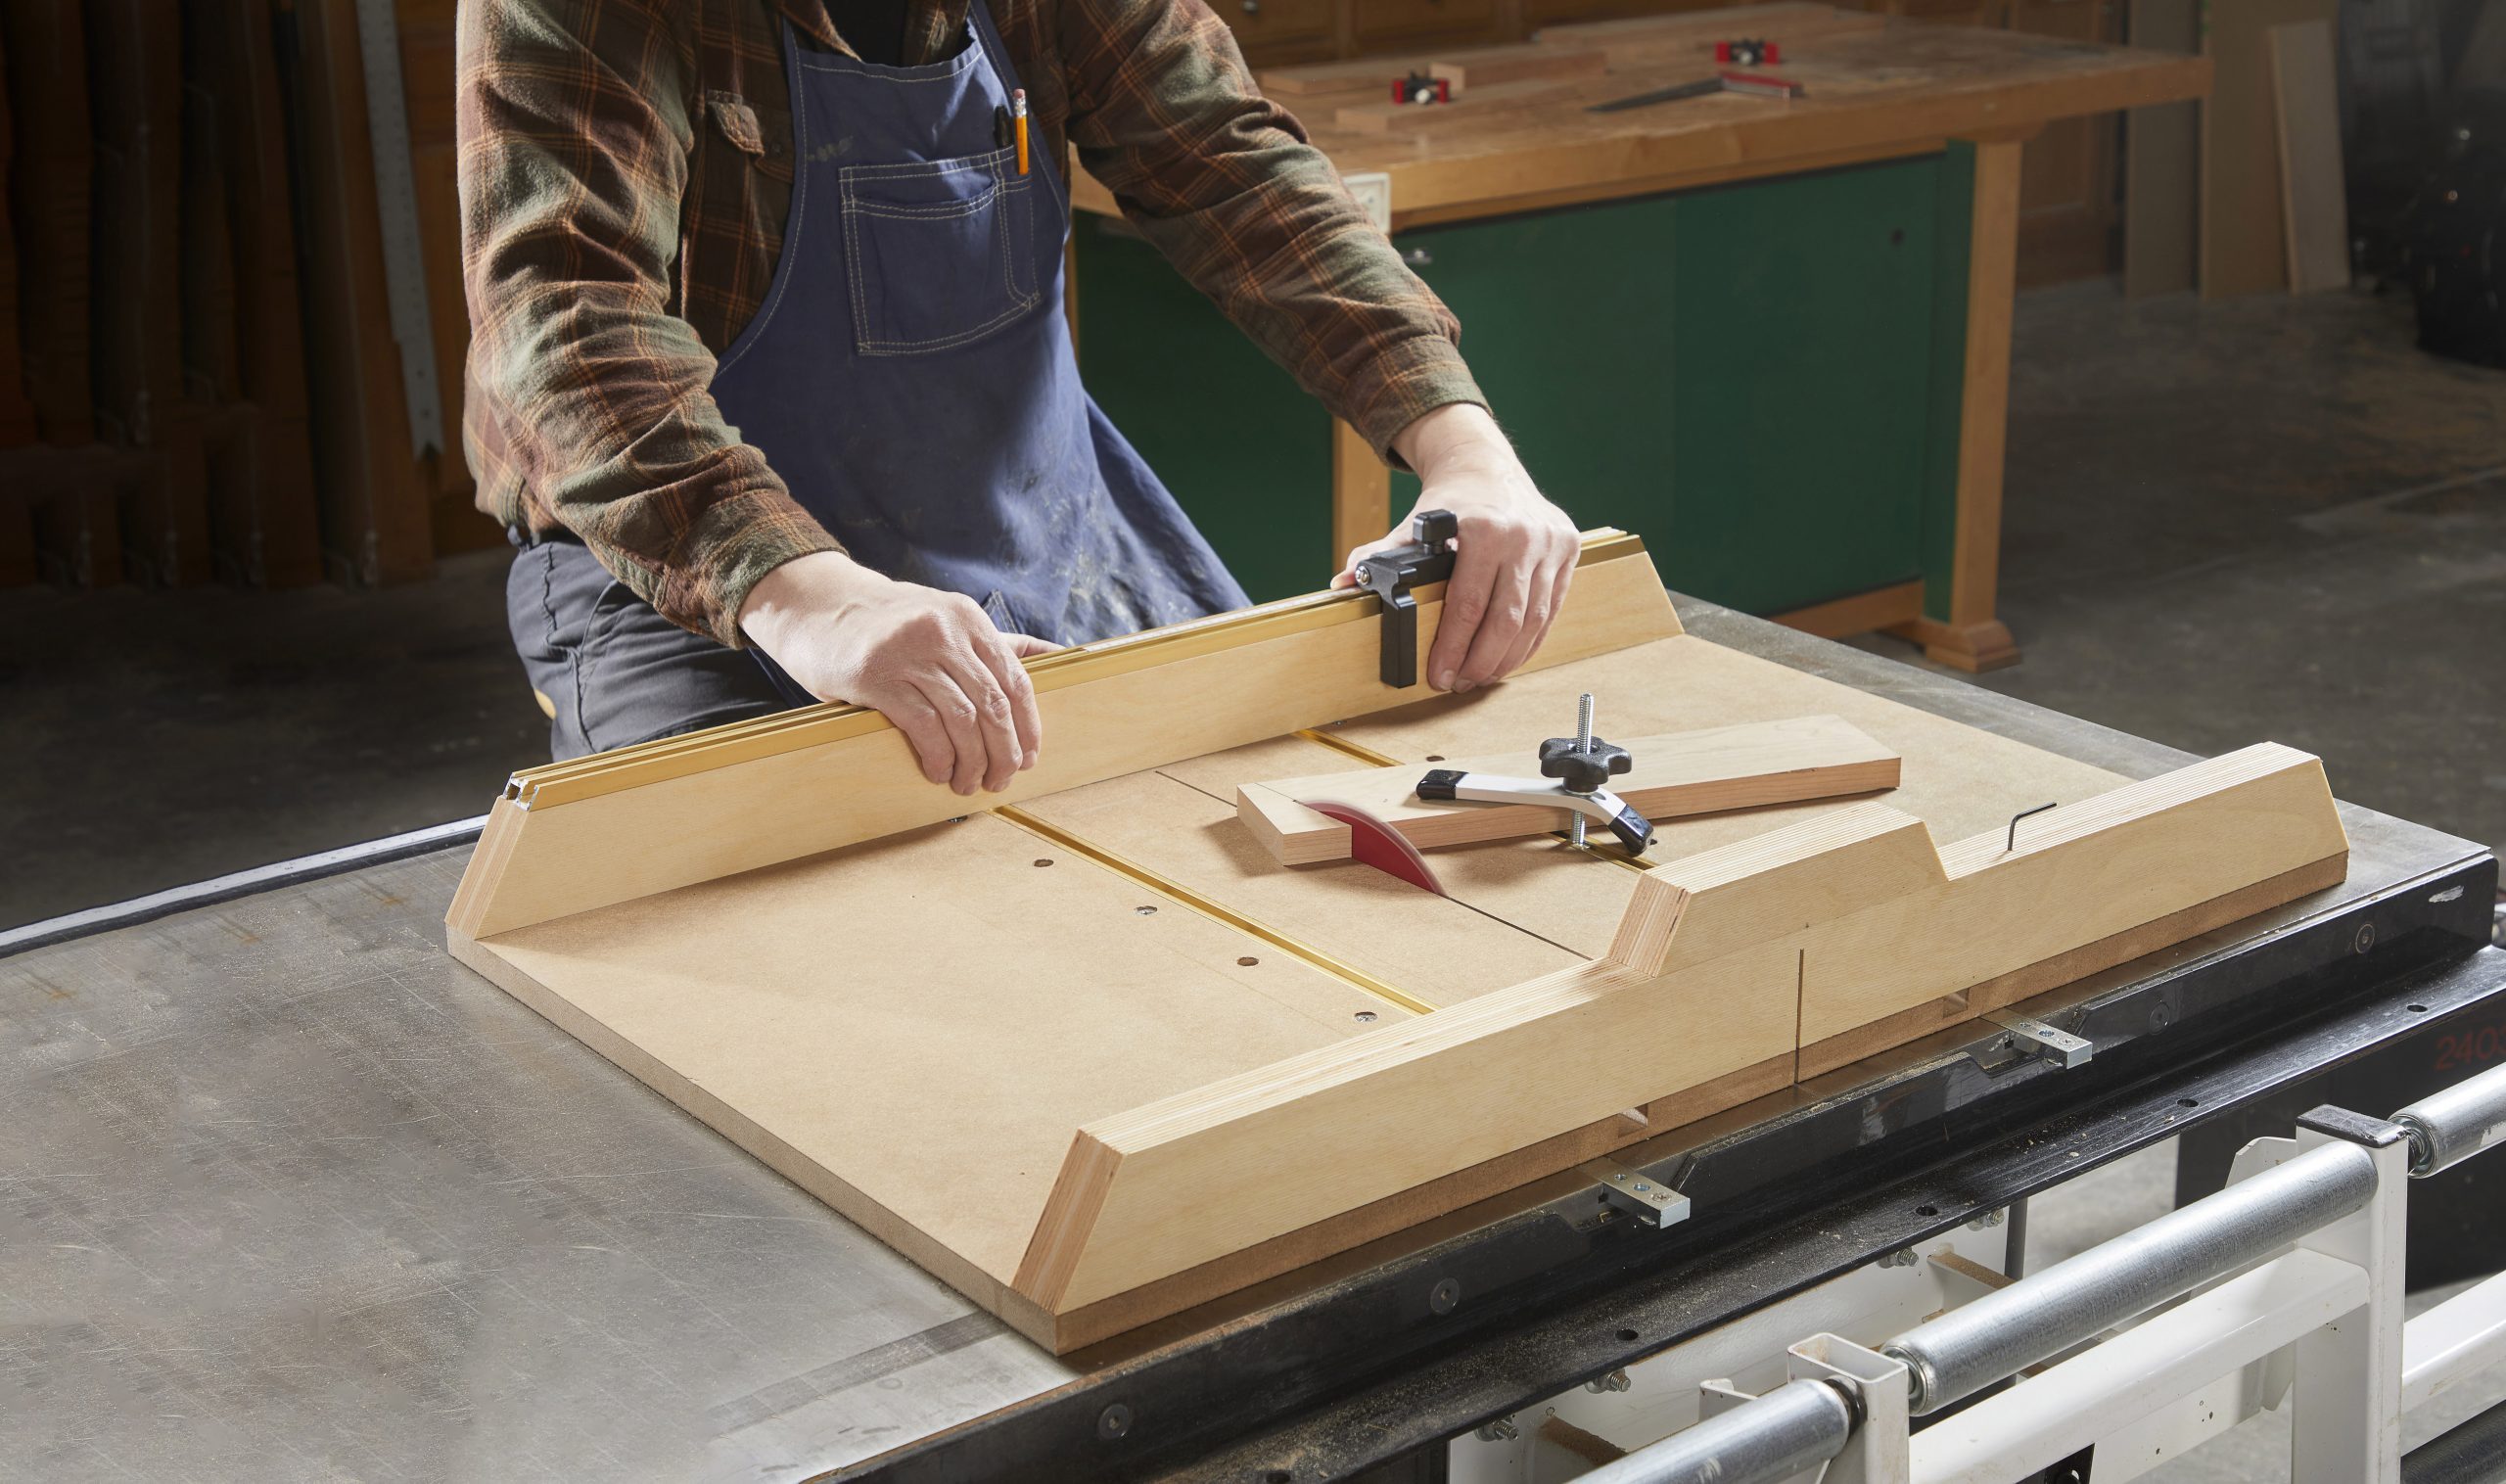
Image Source: www.familyhandyman.com
Why Build a Crosscut Sled?
A crosscut sled offers many benefits:
- Improved Accuracy: Sleds eliminate the play found in standard miter gauges, leading to cleaner, more precise cuts.
- Enhanced Safety: By keeping your hands away from the blade and providing a stable platform, sleds significantly reduce the risk of kickback and injury.
- Repeatable Cuts: A sled allows you to easily make identical cuts, perfect for projects requiring multiple pieces of the same length.
- Zero Clearance: The sled provides support right up to the blade, reducing tear-out and splintering. This zero clearance crosscut sled feature is crucial for clean cuts.
- Angled Cuts: With the addition of an adjustable fence, you can easily create angled cuts with accuracy.
- Small Part Cutting: Safely cut very small pieces of wood.
Choosing the Right Materials for Your Table Saw Sled Build
The materials you choose will affect the durability and accuracy of your sled. Here’s a breakdown:
Plywood for the Base and Fence
- Baltic Birch Plywood: This is often considered the best choice due to its stability, flatness, and void-free construction. It’s less prone to warping.
- MDF (Medium-Density Fiberboard): MDF is a cheaper alternative. It’s very flat and stable, but it’s also heavier and more prone to damage from moisture.
Hardwood Plywood: A good middle ground, offering a balance of stability and affordability.
Material Pros Cons Baltic Birch Very stable, flat, minimal voids, durable. More expensive. MDF Very flat, stable, inexpensive. Heavy, susceptible to moisture damage, produces a lot of dust. Hardwood Plywood Good balance of stability, durability, and cost. Can have voids, may not be as flat as Baltic Birch or MDF.
Runners: The Key to Smooth Movement
- Hardwood: Maple, oak, or walnut are excellent choices. They are durable and slide smoothly in the miter slots.
- UHMW (Ultra-High Molecular Weight) Plastic: This plastic is very slick and wear-resistant, making it a great option for runners. It’s also dimensionally stable.
- Aluminum: Can be used, but hardwood or UHMW are typically preferred for their smoother glide and ease of working with.
Fasteners: Holding It All Together
- Wood Screws: Choose high-quality wood screws that won’t strip easily.
- Epoxy: Use epoxy to secure the runners to the base for a strong, long-lasting bond.
- Washers: Can be used under screw heads to prevent them from sinking into the wood.
DIY Crosscut Sled Plans: A Step-by-Step Guide
Here’s a detailed guide to making your own crosscut sled. These precision crosscut sled instructions will help ensure accuracy.
Step 1: Measuring Your Miter Slots
- Measure the width and depth of your table saw’s miter slots. Accuracy here is important for a smooth-gliding sled.
- Check for any inconsistencies in the width along the length of the slots.
- Record your measurements. These will determine the size of your runners.
Step 2: Preparing the Runners
- Cut the runners to the measured width and slightly less than the depth of your miter slots. You want a snug but not tight fit. It should slide without resistance.
- The length of the runners should be a few inches shorter than the sled base for easy handling.
- Sand the runners smooth for effortless movement.
Step 3: Building the Sled Base
- Cut the plywood for the sled base. A common size is 24″ x 30″, but adjust to your needs.
- Ensure the plywood is flat and square. Any warpage will affect accuracy.
- Consider adding a backer board to the rear of the sled for added stability and zero-clearance support.
Step 4: Attaching the Runners to the Base
- Position the runners in the miter slots.
- Place the sled base on top of the runners.
- Carefully align the base so it’s square to the table saw blade.
- Use double-sided tape to temporarily secure the base to the runners.
- Pre-drill holes through the base and into the runners.
- Apply epoxy to the runners and attach them to the base using screws. Countersink the screws so they don’t interfere with the sled’s movement.
Step 5: Constructing the Fence
- Cut the plywood for the fence. The fence should be tall enough to provide good support for your workpieces.
- Ensure the fence is perfectly square. Use a reliable square to check.
- Attach the fence to the sled base using screws and glue.
- Reinforce the fence with additional supports if needed.
Step 6: Making the Initial Cut
- Install the sled on your table saw.
- Raise the blade slightly.
- Turn on the saw and slowly push the sled through the blade. This will create the initial cut in the sled base.
- Turn off the saw and let the blade come to a complete stop.
Step 7: Squaring the Fence
- Use a precision square to check the fence’s alignment with the blade cut.
- If the fence isn’t square, carefully adjust it by loosening the screws and shimming it until it’s perfectly aligned.
- Retighten the screws and recheck the alignment.
Step 8: Adding a Zero-Clearance Insert
- Cut a piece of plywood or hardboard to fit snugly in the blade slot.
- Attach the insert to the sled base using double-sided tape or screws.
- This will provide zero-clearance support and reduce tear-out.
Fine-Tuning Your Crosscut Sled for Perfect Accuracy
Achieving perfect accuracy requires careful attention to detail. Here are some tips:
- Use a Five-Cut Method: This method helps determine the accuracy of your sled. Cut five pieces of wood, rotating them after each cut. Measure the difference between the first and last piece. Adjust the fence until the difference is minimal.
- Consider an Adjustable Fence: An adjustable fence allows you to fine-tune the angle of the fence for perfect squareness.
- Use Shims: Small shims can be used to make minor adjustments to the fence’s alignment.
- Test Cuts: Always make test cuts on scrap wood to ensure accuracy before cutting your final pieces.
Safety First: Using Your Crosscut Sled Safely
Safety is paramount when using a table saw. Here are some safety tips for using your crosscut sled:
- Always wear safety glasses.
- Never reach over the blade.
- Use push sticks or push blocks to keep your hands away from the blade.
- Ensure the sled moves smoothly in the miter slots.
- Never force the sled through the blade.
- Turn off the saw and unplug it before making any adjustments.
- Keep your work area clean and free of debris.
Best Crosscut Sled Design: Factors to Consider
The best crosscut sled design depends on your specific needs and the types of projects you undertake. Here are some factors to consider:
- Size: Choose a size that’s appropriate for the size of workpieces you typically cut.
- Fence Height: A taller fence provides better support for taller pieces of wood.
- Adjustable Fence: An adjustable fence is useful for making angled cuts.
- Hold-Downs: Consider adding hold-downs to secure your workpieces to the sled.
- Dust Collection: Integrate a dust collection system into your sled to keep your work area clean.
Table Saw Jig for Crosscuts: Beyond the Basics
Once you’ve mastered the basic crosscut sled, you can explore other table saw jig for crosscuts variations:
- Miter Sled: A miter sled allows you to make angled cuts with even greater precision.
- Tapering Jig: A tapering jig is used to create tapered legs or other tapered components.
- Box Joint Jig: A box joint jig simplifies the process of making strong and attractive box joints.
Crosscut Sled Materials List: A Quick Reference
Here’s a sample crosscut sled materials list to get you started:
| Material | Quantity | Dimensions (Example) | Notes |
|---|---|---|---|
| Baltic Birch Plywood | 1 sheet | 24″ x 30″ | For the base and fence |
| Hardwood (Maple) | 2 | 3/4″ x 3/8″ x 12″ | For the runners |
| Wood Screws | 20 | #8 x 1 1/4″ | For attaching the fence and runners |
| Epoxy | 1 | Small bottle | For securing the runners |
| Double-Sided Tape | 1 roll | For temporary attachment during build |
Maintaining Your Crosscut Sled
Proper maintenance will ensure your crosscut sled remains accurate and reliable for years to come:
- Keep the sled base clean and free of debris.
- Periodically check the fence for squareness and adjust as needed.
- Apply wax to the runners to keep them sliding smoothly.
- Store the sled in a dry place to prevent warping.
Fathoming Common Crosscut Sled Problems and Solutions
Even with careful construction, you might encounter some issues with your crosscut sled. Here’s how to address them:
- Sled Doesn’t Slide Smoothly:
- Problem: Runners are too tight in the miter slots.
- Solution: Sand the runners down slightly or apply wax.
- Cuts Aren’t Square:
- Problem: Fence isn’t square to the blade.
- Solution: Adjust the fence using shims or an adjustable fence mechanism.
- Tear-Out Occurs:
- Problem: Lack of zero-clearance support.
- Solution: Add a zero-clearance insert to the sled.
- Sled Warps Over Time:
- Problem: Moisture exposure or use of unstable materials.
- Solution: Store the sled in a dry place and consider using Baltic Birch plywood for future builds.
Frequently Asked Questions (FAQ)
Q: What’s the best material for crosscut sled runners?
A: Hardwood like maple or UHMW plastic are excellent choices for their durability and smooth gliding properties.
Q: How do I ensure my crosscut sled fence is perfectly square?
A: Use a precision square and the five-cut method for fine-tuning. An adjustable fence also helps.
Q: Can I use MDF for the sled base?
A: Yes, MDF is a viable option due to its flatness, but it’s heavier and more susceptible to moisture damage than Baltic Birch plywood.
Q: How important is a zero-clearance insert?
A: Very important! It minimizes tear-out and splintering, resulting in cleaner cuts.
Q: What size crosscut sled should I build?
A: The size depends on the size of your typical workpieces. A common size is 24″ x 30″, but adjust as needed.
Q: Is building a crosscut sled worth the effort?
A: Absolutely! It significantly improves accuracy, safety, and repeatability when making crosscuts on a table saw.
If you stick to these instructions and tips, you’ll be able to build a great crosscut sled for your table saw. It’s going to make your woodworking safer and more accurate, and you’ll honestly just have more fun doing it. Enjoy the build!

Hi, I’m Tom Scalisi, and welcome to The Saw Blog! I started this blog to share my hands-on experience and insights about woodworking tools—especially saws and saw blades. Over the years, I’ve had the chance to work with a wide range of tools, and I’m here to help both professionals and hobbyists make informed decisions when it comes to selecting and using their equipment. Whether you’re looking for in-depth reviews, tips, or just advice on how to get the best performance out of your tools, you’ll find it here. I’m excited to be part of your woodworking journey!