
What is a push block for a table saw? A push block is a crucial safety device used when operating a table saw. It helps you guide wood safely past the blade, keeping your hands away from the cutting area. This article will provide DIY push block plans, and guide you through the process of building your own, ensuring safe woodworking techniques.
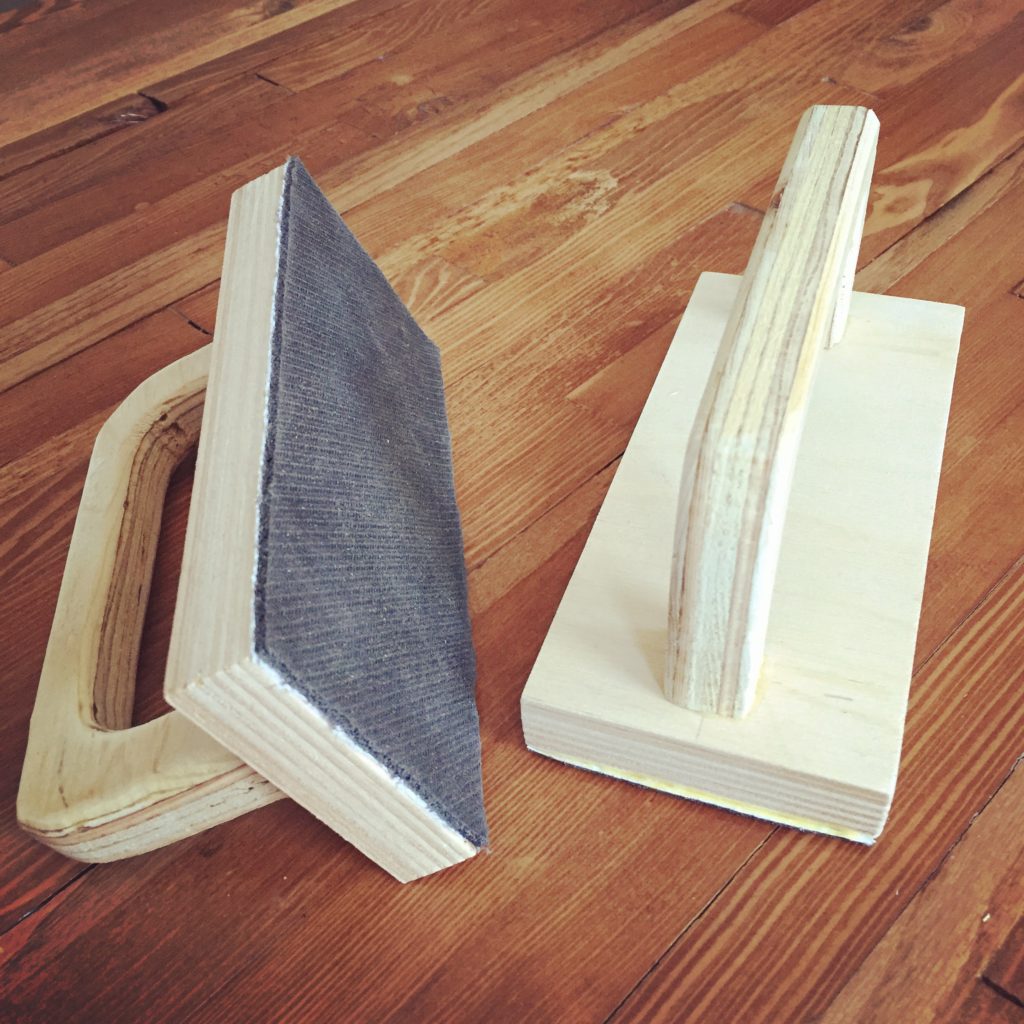
Image Source: www.diymontreal.com
Table Saw Safety: Why You Need a Push Block
Table saws are powerful tools, but they can hurt you if you don’t use them right. One common accident happens when your hands get too close to the spinning blade. That is why a push block is such an important tool to have. It acts like an extension of your hand, letting you control the wood while keeping your fingers safe. Never ignore safety when using a saw.
The Importance of Safe Woodworking Techniques
Safe woodworking techniques are paramount when using a table saw. A push block helps reduce the risk of:
- Kickback: Where the wood is thrown back towards you with force.
- Blade Contact: Prevents fingers and hands from accidentally touching the blade.
- Loss of Control: Provides a stable grip, leading to more accurate and controlled cuts.
DIY Push Block Plans: Types and Designs
There are various types of push blocks, each designed for specific cuts and applications. Choosing the right design for your needs is crucial for maximizing safety and efficiency. Here’s an overview of some common push block design ideas:
Basic Push Stick
This is the simplest type, often a thin, flat piece of wood with a handle. It’s suitable for pushing narrow pieces of wood through the saw.
L-Shaped Push Block
Provides a larger surface area and a heel to grip the end of the wood. Ideal for general ripping operations.
Long Push Block
Offers maximum control and is best for long rip cuts or when cutting thin pieces of wood.
Push Shoe for Table Saw
This push block is usually built with a non-slip base. It’s useful for applying downward pressure, ensuring the wood stays flat on the table saw surface.
Choosing the Right Push Block for Your Project
Consider the type of cuts you frequently make when selecting a push block design. For example:
- Ripping narrow pieces: Use a thin push stick or L-shaped push block.
- Making bevel cuts: A push shoe provides stable downward pressure.
- Cutting larger boards: Opt for a long push block for better control.
Building Your Own: Step-by-Step Guide to a Homemade Push Block
This guide will focus on building a versatile L-shaped homemade push block, suitable for most ripping operations.
Materials and Tools Needed
Before you begin, gather the following materials and tools:
- Wood: ¾-inch plywood or hardwood (approximately 6″ x 12″) – the best push block material.
- Wood Glue: For securely bonding the components.
- Screws: #8 x 1 ¼” wood screws.
- Non-Slip Material: Router mat, or sanding grip tape.
- Measuring Tools: Ruler, square, and pencil.
- Cutting Tools: Table saw or circular saw.
- Drilling Tools: Drill with drill bits and countersink bit.
- Sanding Tools: Sandpaper (120-grit and 220-grit).
- Clamps: To hold the pieces together while the glue dries.
Step 1: Cutting the Components
Cut the following pieces from your chosen wood:
| Component | Dimensions (inches) | Quantity |
|---|---|---|
| Base | 4 x 12 | 1 |
| Handle | 2 x 6 | 1 |
| Heel | 2 x 4 | 1 |
| Optional Top Piece | 2 x 4 | 1 |
Ensure accurate cuts for a solid and safe push block.
Step 2: Assembling the Handle
- Apply wood glue to the bottom edge of the handle.
- Position the handle vertically near the back edge of the base, leaving about 2 inches of space from the back.
- Clamp the handle to the base and pre-drill two pilot holes through the base into the handle.
- Secure the handle with screws.
Step 3: Attaching the Heel
- Apply wood glue to one edge of the heel.
- Position the heel flush with the back edge of the base, behind the handle.
- Clamp the heel to the base and pre-drill two pilot holes through the base into the heel.
- Secure the heel with screws.
Step 4: Adding the Optional Top Piece
- Apply wood glue to the top edge of the handle.
- Position the top piece horizontally across the top of the handle, ensuring it is centered.
- Clamp the top piece to the handle and pre-drill pilot holes through the top piece into the handle.
- Secure the top piece with screws.
Step 5: Sanding and Finishing
- Sand all edges and surfaces of the push block with 120-grit sandpaper to remove any sharp edges or splinters.
- Smooth the surfaces with 220-grit sandpaper for a comfortable grip.
Step 6: Adding Non-Slip Material
- Cut a piece of non-slip material slightly smaller than the base.
- Adhere the non-slip material to the underside of the base using contact adhesive or double-sided tape.
- Alternatively, you could use a router mat that is permanently fixed.
Other Considerations for Building Your Push Block
Material Choice
The best push block material is hardwood, plywood or MDF because it’s durable and stable. Avoid using softwoods, as they can easily splinter and compromise the push block’s integrity.
Ergonomics
Design your push block with comfort in mind. A well-shaped handle can improve grip and reduce hand fatigue.
Durability
Use high-quality glue and screws to ensure your push block can withstand repeated use. Reinforce joints if necessary.
Maintaining Your Push Block
Regular Inspection
Inspect your push block before each use. Check for signs of wear, damage, or loose components.
Cleaning
Keep your push block clean to maintain a good grip. Remove sawdust and debris regularly.
Replacement
Replace your push block if it becomes damaged or worn. A damaged push block is a safety hazard.
Enhancing Table Saw Safety
Building a shop-made push block is just one aspect of table saw safety. Here are some additional tips for safe woodworking techniques:
- Use safety glasses: Protect your eyes from flying debris.
- Wear hearing protection: Table saws can be loud.
- Never reach over the blade: Use a push stick or push block for all cuts within 12 inches of the blade.
- Stand to the side of the blade: Avoid standing directly in line with the blade to prevent injury from kickback.
- Use a splitter or riving knife: These devices help prevent kickback by keeping the wood from pinching the blade.
- Keep your work area clean and organized: A cluttered workspace can lead to accidents.
- Take breaks: Fatigue can impair your judgment and increase the risk of injury.
- Never force the wood: Let the blade do the work.
- Unplug the saw before making adjustments: This prevents accidental starts.
Additional Push Block Designs
There are many ways to personalize your push block to suit your needs. Here are a few additional push block designs:
- Adjustable Push Block: Allows you to adjust the height of the handle for different thicknesses of wood.
- Clear Push Block: Made from transparent acrylic, providing better visibility of the cutting area.
- Combination Push Block/Push Stick: A versatile tool that can be used as both a push block and a push stick.
Common Mistakes to Avoid When Making a Push Block
- Using Inadequate Materials: Skimping on material quality can lead to a flimsy and unsafe push block.
- Poor Construction: Sloppy joinery can weaken the push block and increase the risk of failure.
- Ignoring Ergonomics: An uncomfortable push block can lead to hand fatigue and reduced control.
- Skipping Non-Slip Material: Without non-slip material, the push block may slide on the wood surface.
Benefits of Using a Quality Push Block
- Improved Safety: Keeps your hands away from the blade.
- Enhanced Control: Provides a stable grip for accurate cuts.
- Increased Confidence: Allows you to work more confidently and efficiently.
- Professional Results: Helps you achieve cleaner and more consistent cuts.
Frequently Asked Questions (FAQ)
Q: Can I use any type of wood for a push block?
A: No, it’s best to use hardwood, plywood or MDF for a push block. Softwoods can splinter easily and are not as durable.
Q: How often should I replace my push block?
A: Replace your push block if it becomes damaged, worn, or if the non-slip material loses its grip. Regular inspection will help you determine when replacement is necessary.
Q: What is the best design for a push block?
A: The best design depends on the type of cuts you typically make. An L-shaped push block is a versatile option for general ripping operations.
Q: Is it necessary to add non-slip material to a push block?
A: Yes, non-slip material is essential for preventing the push block from sliding on the wood surface. This enhances safety and control.
Q: Are there any alternatives to using a push block?
A: While push sticks can be used for very narrow pieces, there are no direct substitutes for a push block in most table saw operations. Always prioritize safety and use the appropriate safety devices.
Q: Where can I find DIY push block plans?
A: You can find DIY push block plans online through woodworking forums, websites, and YouTube tutorials. Look for plans that match your skill level and the type of cuts you need to make.
Building your own push block is a worthwhile investment in your safety and woodworking skills. By following these DIY push block plans and safe woodworking techniques, you can create a reliable tool that will serve you well for years to come. Remember, always prioritize safety when operating a table saw.

Hi, I’m Tom Scalisi, and welcome to The Saw Blog! I started this blog to share my hands-on experience and insights about woodworking tools—especially saws and saw blades. Over the years, I’ve had the chance to work with a wide range of tools, and I’m here to help both professionals and hobbyists make informed decisions when it comes to selecting and using their equipment. Whether you’re looking for in-depth reviews, tips, or just advice on how to get the best performance out of your tools, you’ll find it here. I’m excited to be part of your woodworking journey!