
What is a miter saw table? A miter saw table is a dedicated workspace built to house and support your miter saw, making woodworking projects easier and more precise. It often includes features like extended wings for outfeed support, dust collection systems, and storage.
Building your own miter saw table is one of the best things you can do to make your workshop easier to use. This guide will walk you through exactly how to build a table that fits your space and your specific needs. We’re going to cover everything—from the first sketch and design to the actual building and the final touches—to make sure the whole project goes smoothly.
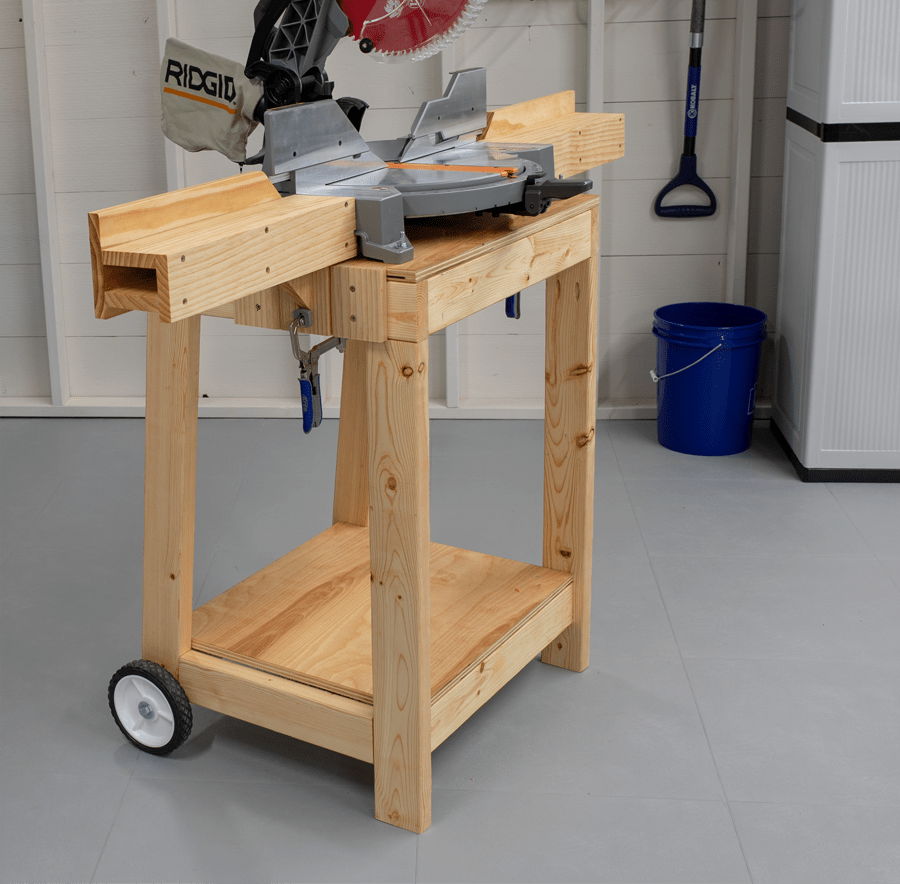
Image Source: learn.kregtool.com
Why Build a Miter Saw Table?
A miter saw table offers numerous benefits:
- Improved Accuracy: A stable and level surface provides better support for your workpieces, resulting in more accurate cuts.
- Enhanced Safety: A secure mounting system reduces the risk of the saw moving during operation.
- Increased Efficiency: Integrated features like outfeed support and dust collection streamline your workflow.
- Organization: Provides a dedicated space for your miter saw and related tools, keeping your workshop tidy.
- Customization: Tailor the design to fit your specific needs and workshop space.
Planning Your Miter Saw Table
Before diving into construction, careful planning is essential.
Assessing Your Needs
Consider these factors:
- Available Space: How much room do you have in your workshop?
- Miter Saw Size: Measure your miter saw’s footprint to determine the table size.
- Desired Features: Do you want outfeed support, dust collection, or storage?
- Portability: Do you need a portable miter saw table that can be easily moved?
- Budget: How much are you willing to spend on materials?
Miter Saw Table Designs
There are many miter saw table design options to consider:
- Basic Table: A simple platform with a cutout for the miter saw.
- Extended Wings: Includes wings on either side of the saw to support long workpieces.
- With Dust Collection: Features an integrated dust collection system to keep your workspace clean.
- With Storage: Incorporates drawers or shelves for storing tools and accessories.
- Folding Miter Saw Table: Designed to be folded up for easy storage when not in use.
Fathoming the Different Miter Saw Table Plans
Here’s an explanation of common design choices:
- Basic Miter Saw Station Plans: The simplest design. It involves creating a sturdy platform with a correctly sized opening to mount your miter saw. These miter saw station plans focus solely on providing a stable base.
- DIY Miter Saw Table with Extensions: These plans add wings or extensions on either side of the miter saw. The extensions give more support for longer boards. You can customize the length of the extensions based on the typical size of your material.
- Miter Saw Stand with Dust Collection: Include dust ports and collection chambers. These designs aim to reduce sawdust in your workspace. They need careful design to make sure effective dust capture.
- Portable Miter Saw Table: Designed for mobility. Often include folding legs or wheels. These miter saw tables are great for contractors or anyone who needs to move their setup.
- Best Miter Saw Table Design: The best design for you depends on your specific requirements and shop space. Some people like complex systems with lots of features, while others prefer a simple, durable design.
- Miter Saw Table Dimensions: The size of your miter saw table depends on the size of your miter saw and how much outfeed support you require. The height should match the height of your saw’s table to provide seamless support.
- Folding Miter Saw Table: Great for small workshops. They fold up for easy storage. The trade-off is that they may not be as sturdy as stationary tables.
- Outfeed Support for Miter Saw: Crucial for long, precise cuts. Outfeed supports can be fixed or adjustable and are often integrated into the miter saw table design.
- Building a Miter Saw Workstation: Involves creating a larger, more comprehensive setup with multiple tools and storage options integrated around the miter saw.
- Miter Saw Table Plans Free: Many free plans are available online. These can be a good starting point. Be sure to check their accuracy and adjust them to your needs.
Determining the Right Miter Saw Table Dimensions
The ideal miter saw table dimensions depend on your miter saw size and the length of material you typically work with. Here are some guidelines:
- Height: The table surface should be level with your miter saw’s table. Typically, this is around 34-36 inches.
- Depth: Ensure sufficient depth to support the saw and provide adequate workspace. A depth of 24-36 inches is common.
- Width: The width will depend on whether you include extended wings. If so, consider how long your workpieces are. A width of 6-8 feet is a good starting point.
Sketching Your Design
Create a rough sketch of your miter saw table, including dimensions and features. This will help you visualize the final product and identify any potential problems.
Gathering Materials and Tools
Materials List
Here’s a list of common materials you’ll need:
- Plywood: For the table surface, wings, and frame. ¾-inch plywood is recommended for strength.
- Lumber: For the frame and legs. 2×4 lumber is a good option.
- Fasteners: Screws, nails, and bolts for assembling the table.
- Wood Glue: For added strength.
- T-Track: For mounting accessories and fences.
- Edge Banding: To cover exposed plywood edges.
- Dust Collection Fittings: If including a dust collection system.
- Hardware: Hinges, latches, and drawer slides, if adding storage or folding features.
Tools List
- Miter Saw: To cut the lumber and plywood.
- Circular Saw: For cutting large sheets of plywood.
- Drill/Driver: For driving screws and drilling holes.
- Sander: For smoothing surfaces.
- Clamps: To hold pieces together while gluing and screwing.
- Measuring Tape: For accurate measurements.
- Square: To ensure right angles.
- Safety Glasses: To protect your eyes.
- Hearing Protection: To protect your ears.
Step-by-Step Construction Guide
Building the Base Frame
- Cut the Lumber: Cut the 2×4 lumber to the required lengths for the base frame.
- Assemble the Frame: Join the pieces together using screws and wood glue. Ensure the frame is square.
- Add Legs: Attach the legs to the frame using screws and glue. Consider adding adjustable feet for leveling.
Constructing the Tabletop
- Cut the Plywood: Cut the plywood to the required size for the tabletop.
- Cut the Miter Saw Opening: Carefully measure and cut the opening for your miter saw using a jigsaw or circular saw. Ensure the opening is slightly larger than your saw’s base.
- Attach the Tabletop to the Frame: Secure the tabletop to the base frame using screws and glue.
Adding Extended Wings (Optional)
- Cut the Wing Pieces: Cut the plywood to the desired size for the wings.
- Attach the Wings: Attach the wings to the tabletop using hinges or fixed supports. Hinged wings can be folded down for storage.
- Install T-Track (Optional): Install T-track along the wings to allow for adjustable fences and accessories.
Integrating Dust Collection (Optional)
- Create a Dust Collection Port: Design and build a dust collection port behind the miter saw.
- Connect to a Dust Collector: Attach a hose to the port and connect it to your dust collector.
- Seal Gaps: Seal any gaps around the miter saw to improve dust collection efficiency.
Adding Storage (Optional)
- Build Drawers or Shelves: Construct drawers or shelves to fit under the tabletop.
- Install Drawer Slides: Install drawer slides for smooth drawer operation.
- Secure the Drawers/Shelves: Attach the drawers or shelves to the frame.
Finishing Touches
- Sand All Surfaces: Sand all surfaces smooth to remove any rough edges.
- Apply Edge Banding: Apply edge banding to cover the exposed plywood edges.
- Apply a Finish: Apply a protective finish, such as polyurethane, to the tabletop and frame.
- Install Accessories: Install any desired accessories, such as fences, stops, and measuring tapes.
Tips for Success
- Accuracy is Key: Take your time and measure accurately. Small errors can compound and affect the final result.
- Use Quality Materials: Invest in quality materials for a durable and long-lasting miter saw table.
- Pre-Drill Holes: Pre-drilling holes before driving screws will prevent the wood from splitting.
- Use Clamps: Clamps are essential for holding pieces together while gluing and screwing.
- Take Breaks: Building a miter saw table can be a time-consuming project. Take breaks to avoid fatigue and maintain focus.
- Safety First: Always wear safety glasses and hearing protection when working with power tools.
Alternative Plans and Ideas
Portable Miter Saw Table Options
If you need a portable setup, consider these designs:
- Folding Legs: Attach folding legs to a basic table design.
- Wheeled Cart: Mount the miter saw table on a wheeled cart for easy transport.
- Collapsible Stand: Use a commercially available collapsible miter saw stand.
Simple & Budget Friendly Miter Saw Table
If you’re on a budget, you can build a functional miter saw table using basic materials and a simple design. Here are a few ideas:
- Repurpose an Old Table: Modify an old table or workbench to accommodate your miter saw.
- Use Pallet Wood: Build a table using reclaimed pallet wood.
- Minimize Features: Focus on the essential features, such as a stable platform and outfeed support, and skip the extras like dust collection and storage.
Troubleshooting
- Tabletop Not Level: Use adjustable feet to level the table.
- Miter Saw Opening Too Small: Enlarge the opening using a jigsaw or router.
- Dust Collection Inefficient: Ensure all gaps are sealed and the dust collector is powerful enough.
- Wings Not Sturdy: Add additional supports under the wings.
Maintaining Your Miter Saw Table
- Regular Cleaning: Clean the table surface regularly to remove sawdust and debris.
- Check Fasteners: Periodically check and tighten any loose screws or bolts.
- Apply a Fresh Coat of Finish: Reapply a protective finish as needed to protect the wood.
Table: Comparison of Miter Saw Table Designs
| Feature | Basic Table | Extended Wings | Dust Collection | Storage | Folding | Portable |
|---|---|---|---|---|---|---|
| Complexity | Low | Medium | Medium to High | Medium | Medium | Medium |
| Material Cost | Low | Medium | Medium | Medium | Medium | Medium |
| Space Requirements | Small | Medium | Small | Medium | Small | Variable |
| Best For | Small Shops | Long Pieces | Clean Shops | Organized Shops | Small Shops | Mobile Use |
FAQ
Q: What is the best material to use for a miter saw table? The best material is ¾-inch plywood for the tabletop and 2×4 lumber for the frame.
Q: Can I use a miter saw table outdoors? Yes, but use weather-resistant materials and apply a protective finish.
Q: How do I make a miter saw table with dust collection? Integrate a dust collection port behind the miter saw and connect it to a dust collector. Seal any gaps around the saw to improve efficiency.
Q: What are the ideal miter saw table dimensions? The height should be level with your saw’s table (around 34-36 inches), the depth should be 24-36 inches, and the width depends on whether you include extended wings (6-8 feet is a good starting point).
Q: Where can I find miter saw table plans free? Many free plans are available online on woodworking forums and websites. Always double-check the measurements for accuracy.
Building a miter saw table is a rewarding project that will enhance your woodworking capabilities. By following this guide and customizing the design to your specific needs, you can create a functional and efficient workspace that will serve you for years to come.

Hi, I’m Tom Scalisi, and welcome to The Saw Blog! I started this blog to share my hands-on experience and insights about woodworking tools—especially saws and saw blades. Over the years, I’ve had the chance to work with a wide range of tools, and I’m here to help both professionals and hobbyists make informed decisions when it comes to selecting and using their equipment. Whether you’re looking for in-depth reviews, tips, or just advice on how to get the best performance out of your tools, you’ll find it here. I’m excited to be part of your woodworking journey!