
What is a miter saw stand? A miter saw stand is a support system designed to securely hold and elevate a miter saw, providing stability, portability, and often, additional features like material support wings and dust collection capabilities. Building your own miter saw stand is a great way to customize your workspace, save money, and improve your woodworking projects. This guide provides DIY miter saw stand plans and easy instructions to build your own.
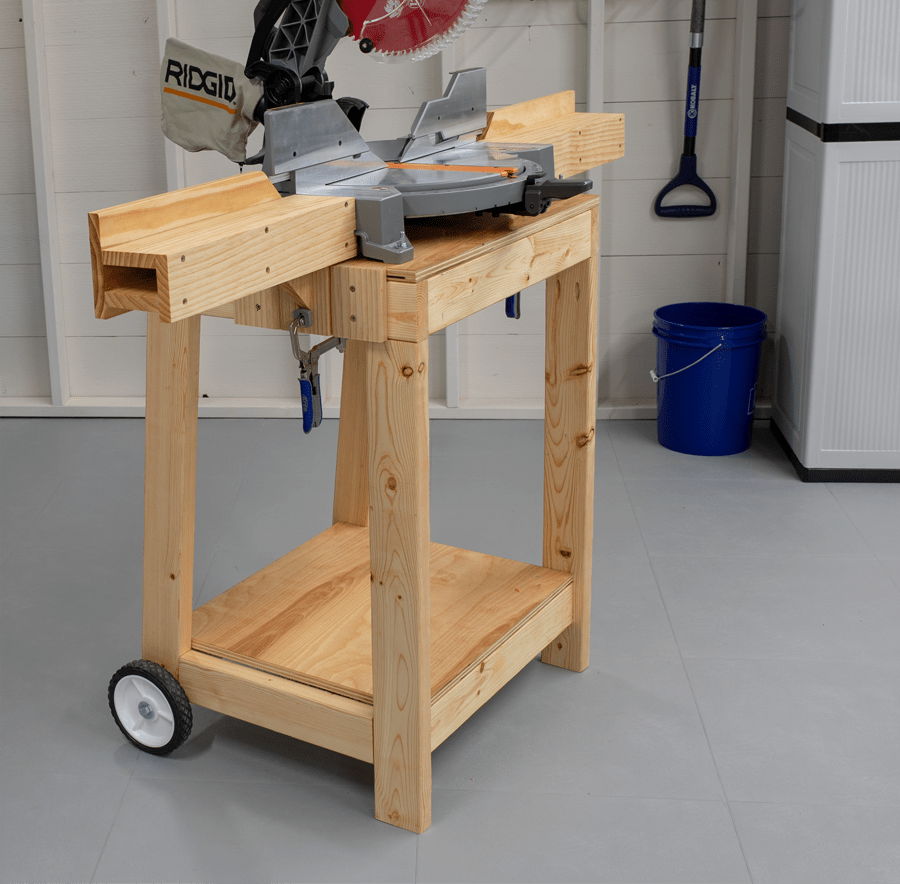
Image Source: learn.kregtool.com
Why Build a Miter Saw Stand?
A miter saw stand isn’t just a luxury; it’s a necessity for any serious woodworker. Here’s why:
- Improved Accuracy: A stable base minimizes vibration and movement, allowing for more precise cuts.
- Increased Portability: Many miter saw stand plans allow you to easily move your saw around your workshop or job site. A portable miter saw stand is a game changer.
- Enhanced Safety: A secure setup reduces the risk of accidents by preventing the saw from tipping or shifting during operation.
- Better Dust Control: Some DIY miter saw station designs incorporate dust collection features, keeping your workspace cleaner.
- Customization: Building your own allows you to tailor the stand to your specific needs and workspace.
Deciding On Your Miter Saw Stand Design
Before diving into the build, consider which type of miter saw stand best suits your needs. Here are a few popular options:
- Basic Benchtop Stand: A simple platform designed to elevate the saw. Ideal for small workshops.
- Folding Miter Saw Stand: Collapsible for easy storage and transport.
- Rolling Miter Saw Stand: Equipped with wheels for mobility and often includes material supports. A rolling miter saw stand is great for moving around.
- Miter Saw Stand with Dust Collection: Integrated dust ports and collection systems for a cleaner workspace.
- Miter Saw Workstation: A larger setup with extended wings for supporting long workpieces.
Factors to Consider:
- Space Available: How much room do you have in your shop or on your job site?
- Portability Needs: Do you need to move the stand frequently?
- Budget: How much are you willing to spend on materials?
- Skill Level: Are you a beginner or an experienced woodworker?
- Dust Collection: Is dust management a priority?
DIY Miter Saw Stand Plans: A Step-by-Step Guide
This section shares a simple but effective plan for a miter saw stand. It focuses on being easy to build and easy on your wallet, making it a great place to start if you are a beginner. This specific design creates a compact stand that doesn’t take up too much room.
Materials Needed:
- (4) 2×4 lumber (8 feet long): For the frame and legs.
- (1) 4×8 sheet of ¾-inch plywood: For the tabletop and any optional shelves.
- Wood screws (1 ½ inch and 2 ½ inch): For assembling the frame and attaching the tabletop.
- Wood glue: For added strength.
- Safety Glasses: Essential for protecting your eyes.
- Hearing Protection: To protect your ears from the noise.
- Measuring Tape: For accurate measurements.
- Pencil: For marking cut lines.
- Circular Saw or Table Saw: For cutting the lumber and plywood.
- Drill: For drilling pilot holes and driving screws.
- Sander: For smoothing rough edges.
- Clamps: To hold pieces together while the glue dries.
Step 1: Cut the Lumber
Cut the 2x4s according to the following dimensions. These dimensions create a stand that is approximately 48 inches wide, 24 inches deep, and 36 inches tall. Adjust as needed to fit your saw and preferences.
- (2) Legs: 34 ½ inches
- (2) Side Frame Pieces: 48 inches
- (2) Front/Back Frame Pieces: 21 inches
- (4) Leg Support Pieces: 18 inches
Cut the plywood to the following dimensions:
- (1) Tabletop: 48 inches x 24 inches
- (Optional) Shelf: 45 inches x 21 inches (adjust based on frame)
Step 2: Assemble the Frame
- Build the Rectangular Frame: Use wood glue and 2 ½ inch wood screws to join the side frame pieces and front/back frame pieces. Ensure the corners are square. Use clamps to hold the pieces together while the glue dries.
- Attach the Legs: Attach the legs to the inside corners of the rectangular frame using wood glue and 2 ½ inch wood screws. Make sure the legs are flush with the top of the frame.
- Add Leg Supports: Attach the leg support pieces between the legs, creating a more stable base. Use wood glue and 2 ½ inch wood screws. Position these supports about halfway down the legs.
Step 3: Attach the Tabletop
- Position the Tabletop: Center the plywood tabletop on top of the frame.
- Secure the Tabletop: Use 1 ½ inch wood screws to attach the tabletop to the frame. Drill pilot holes first to prevent the wood from splitting. Space the screws evenly around the perimeter of the frame.
Step 4: Add an Optional Shelf (For Storage)
- Position the Shelf: Place the plywood shelf inside the frame, resting on the leg support pieces.
- Secure the Shelf: Use 1 ½ inch wood screws to attach the shelf to the leg support pieces. Drill pilot holes first.
Step 5: Sand and Finish
- Sand All Surfaces: Use a sander to smooth all rough edges and surfaces. Pay particular attention to the edges of the tabletop.
- Apply Finish (Optional): Apply a coat of paint, stain, or varnish to protect the wood and give the stand a finished look.
Building a Miter Saw Stand with Integrated Dust Collection
Adding dust collection to your DIY miter saw stand significantly improves your workspace. Here’s how:
- Enclose the Back: Create a back panel for your stand using plywood or hardboard. This helps contain the dust.
- Add a Dust Port: Cut a hole in the back panel sized to fit a standard dust collection hose (usually 4 inches).
- Seal the Enclosure: Use caulk or weather stripping to seal any gaps in the enclosure, maximizing dust collection efficiency.
- Connect to a Dust Collector: Attach a dust collection hose from your shop vacuum or dust collector to the dust port.
This simple addition can dramatically reduce the amount of dust in your workshop.
Creating a Folding Miter Saw Stand
If you need a portable miter saw stand, consider building a folding version. This requires additional hardware:
- (2) Folding Leg Brackets: These brackets allow the legs to fold flat against the frame.
- Hinges: For any folding extensions or material supports.
Modifying the Basic Design:
- Attach Folding Leg Brackets: Instead of directly attaching the legs to the frame, attach them using the folding leg brackets. Follow the manufacturer’s instructions for proper installation.
- Test the Folding Mechanism: Ensure the legs fold smoothly and lock securely in both the open and closed positions.
Adding Material Supports
For working with long pieces of wood, material supports are essential. Here are a few options:
- Fixed Supports: Simple extensions made from 2x4s or plywood that are attached to the sides of the stand.
- Adjustable Supports: Use adjustable leveling feet or threaded rods to create supports that can be raised or lowered.
- Folding Supports: Attach supports with hinges, allowing them to be folded away when not in use.
When building material supports, ensure they are level with the miter saw table to prevent binding or uneven cuts.
Enhancing Your Miter Saw Workstation
Beyond the basic stand, there are several ways to enhance your miter saw workstation:
- Outfeed Support: Add a roller stand or another support at the back of the saw to help manage longer pieces after they are cut.
- Integrated Lighting: Install a small LED light above the saw to improve visibility.
- Power Strip: Mount a power strip to the stand for easy access to electricity.
- Storage Drawers: Add drawers beneath the tabletop for storing tools and accessories.
Safety Considerations
- Always wear safety glasses and hearing protection when operating a miter saw.
- Ensure the miter saw is securely mounted to the stand.
- Never reach across the blade while the saw is running.
- Use clamps to secure workpieces when necessary.
- Keep your work area clean and free of obstructions.
- Read and follow the miter saw manufacturer’s instructions.
Optimizing Your Build for Your Miter Saw
Every miter saw is different, so tailoring your miter saw stand plans is crucial.
Measuring Your Miter Saw
Start by measuring the base of your miter saw. Note the width, depth, and the location of any mounting holes.
Adapting the Plans
Use these measurements to adjust the dimensions of your tabletop. You want a snug fit that provides ample support. If your saw has specific mounting holes, transfer these measurements to your tabletop and pre-drill the holes before attaching the saw.
Creating a Flush Surface
Ideally, the surface of your miter saw should be flush with the top of your miter saw stand. This ensures smooth material flow and accurate cuts. You might need to add shims or build up the base of the stand to achieve this.
Mounting the Miter Saw
Use bolts, washers, and nuts to securely attach the miter saw to the stand. Make sure the bolts are long enough to pass through the base of the saw and the tabletop, but not so long that they interfere with the saw’s operation.
Benefits of a Well-Designed Miter Saw Stand
A well-designed miter saw stand isn’t just about convenience; it’s about improving the quality of your work and your overall woodworking experience.
Increased Accuracy
A stable and level miter saw stand minimizes vibration and movement, leading to more accurate cuts. This is especially important for precision work like trim carpentry or furniture making.
Enhanced Efficiency
With integrated material supports and storage, a well-designed stand streamlines your workflow. You’ll spend less time searching for tools and materials and more time cutting.
Improved Ergonomics
A miter saw stand elevates the saw to a comfortable working height, reducing strain on your back and shoulders. This is particularly important for long projects that require repetitive cuts.
Professional Results
Ultimately, a well-designed miter saw stand helps you achieve professional-quality results. Accurate cuts, efficient workflow, and comfortable ergonomics all contribute to a better finished product.
Choosing the Right Materials
While this guide uses common and affordable materials like 2×4 lumber and plywood, you can customize your build with different materials to suit your needs and budget.
Hardwood
For a more durable and aesthetically pleasing stand, consider using hardwood like oak, maple, or cherry. Hardwood is more expensive than softwood, but it will last longer and provide a more stable base.
Metal
Metal framing can provide exceptional strength and stability. You can use steel tubing or angle iron to build a robust miter saw stand. Welding skills are typically required for metal construction.
Composite Materials
Composite materials like MDF or particleboard are less expensive than plywood, but they are also less durable and more susceptible to moisture damage. If you choose to use composite materials, be sure to seal them properly with paint or varnish.
Recycled Materials
Consider using recycled materials like reclaimed lumber or pallet wood to build your miter saw stand. This is a great way to save money and reduce your environmental impact.
Troubleshooting Common Issues
Even with careful planning, you might encounter some challenges during your build. Here are a few common issues and how to address them:
- Wobbly Stand: Ensure all joints are tight and square. Add additional bracing if needed.
- Uneven Tabletop: Use shims to level the tabletop. A self-leveling compound can also be used to create a perfectly flat surface.
- Miter Saw Not Level: Adjust the leveling feet on the miter saw or add shims beneath the base of the saw.
- Dust Collection Ineffective: Check for gaps in the dust collection enclosure and seal them with caulk or weather stripping. Ensure your dust collector has sufficient suction.
Maintaining Your Miter Saw Stand
To keep your miter saw stand in good condition for years to come, follow these maintenance tips:
- Regular Cleaning: Wipe down the stand regularly to remove dust and debris.
- Tighten Fasteners: Check the screws and bolts periodically and tighten them as needed.
- Lubricate Moving Parts: Lubricate any hinges or folding mechanisms with a silicone-based lubricant.
- Protect from Moisture: If the stand is exposed to moisture, apply a coat of paint or varnish to protect the wood.
- Inspect for Damage: Regularly inspect the stand for any signs of damage, such as cracks or splinters. Repair any damage promptly to prevent further deterioration.
Examples of Best Miter Saw Stand Designs
The “best” miter saw stand design depends on individual needs, but some popular and effective designs include:
- The “New Yankee Workshop” Style: A classic design with a large work surface, integrated dust collection, and ample storage.
- The “Mobile Miter Saw Station”: A rolling stand with folding wings and a built-in dust collection system.
- The “Compact Folding Stand”: A lightweight and portable stand that folds flat for easy storage.
Alternative Miter Saw Stand Plans
If the above plan doesn’t quite fit your needs, here are a few other plans to consider:
- The “Paulk Workbench” Miter Saw Station: Uses the Paulk workbench design principles for a strong and versatile workstation.
- The “Rockler Miter Saw Station”: A modular system with adjustable fences and a built-in dust collection manifold.
- The “YouTube DIY Miter Saw Stand”: Many creative plans can be found on YouTube, showcasing a variety of innovative designs.
Frequently Asked Questions (FAQ)
- Can I use pressure-treated lumber for a miter saw stand? Yes, but it’s generally not necessary unless the stand will be exposed to constant moisture. Regular lumber treated with a sealant is usually sufficient.
- What is the ideal height for a miter saw stand? The ideal height is typically around 36-40 inches, or a height that allows you to work comfortably without bending over excessively.
- How do I prevent my miter saw stand from tipping over? Ensure the stand is built with a wide base and that the legs are securely attached. Adding weight to the base can also increase stability.
- Who makes the best miter saw stand commercially? There are many reputable brands, including Dewalt, Bosch, and Makita. However, building your own allows for customization.
- What is the best way to mount my miter saw to the stand? Use bolts, washers, and nuts to securely attach the saw to the stand. Ensure the bolts are the correct length and that they don’t interfere with the saw’s operation.
- Can I add a fence to my DIY miter saw stand? Yes! Adding a fence provides consistent support and improves accuracy, especially for repetitive cuts.
Building your own miter saw stand is a rewarding project that can significantly improve your woodworking experience. With the right plans, materials, and tools, you can create a customized workstation that meets your specific needs and enhances your productivity.
Disclaimer: This guide provides general information and instructions. Always follow safety precautions and consult with a qualified professional if you have any questions or concerns.

Hi, I’m Tom Scalisi, and welcome to The Saw Blog! I started this blog to share my hands-on experience and insights about woodworking tools—especially saws and saw blades. Over the years, I’ve had the chance to work with a wide range of tools, and I’m here to help both professionals and hobbyists make informed decisions when it comes to selecting and using their equipment. Whether you’re looking for in-depth reviews, tips, or just advice on how to get the best performance out of your tools, you’ll find it here. I’m excited to be part of your woodworking journey!