
Can you cut a straight line with a circular saw? Yes, you absolutely can! Achieving a circular saw straight cut requires proper technique, the right tools, and a bit of practice. This guide provides a step-by-step approach to cutting straight lines with a circular saw, ensuring accurate and clean results for all your woodworking projects.
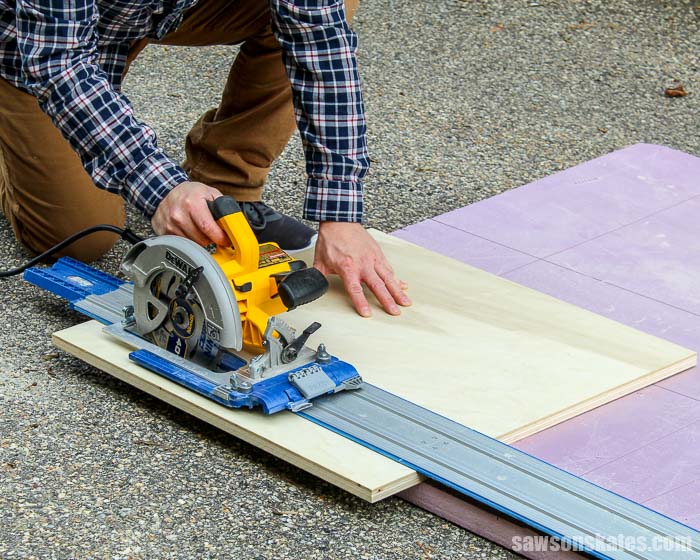
Image Source: sawsonskates.com
Preparing for a Straight Cut
Before you even think about turning on your circular saw, you need to get everything ready. Taking a few minutes to prepare is the most important part—it’s what helps you get that perfect, straight cut in the end.
Gathering the Necessary Tools and Materials
Having the right tools makes all the difference. Here’s what you’ll need for consistently accurate circular saw cuts:
- Circular Saw: A well-maintained circular saw with a sharp blade.
- Safety Glasses: Protect your eyes from flying debris.
- Hearing Protection: Circular saws are loud; protect your hearing.
- Dust Mask: Sawdust is harmful to your lungs.
- Work Gloves: Improve grip and protect your hands.
- Measuring Tape: For precise measurements.
- Pencil: For marking the cut line.
- Speed Square or Combination Square: To ensure square lines.
- Straight Edge: A long, straight board or metal ruler to guide your saw. This is crucial for achieving a circular saw guide for straight cuts.
- Clamps: To secure the straight edge.
- Work Table or Sawhorses: To support your workpiece.
- Scrap Wood: To prevent tear-out on the underside of your cut.
Setting Up Your Work Area
A well-organized workspace is essential for safety and accuracy.
- Clear the Area: Remove any obstructions from your work area.
- Stable Support: Place your workpiece on a stable surface like a work table or sawhorses.
- Adequate Lighting: Ensure you have enough light to see the cut line clearly.
- Dust Collection (Optional): If you have a dust collection system, connect it to your saw.
Inspecting Your Circular Saw
A properly functioning circular saw is vital for safety and accuracy.
- Blade Condition: Check the blade for sharpness and any signs of damage. A dull blade can cause splintering and make it harder to control the saw. Replace the blade if necessary.
- Blade Alignment: Ensure the blade is properly aligned with the saw’s base.
- Guard Operation: Make sure the blade guard moves freely and returns to its closed position automatically.
- Power Cord: Check the power cord for any damage.
Marking the Cut Line Accurately
Precision in marking is the first step toward a straight cut.
- Measure Twice, Cut Once: Verify your measurements multiple times to avoid errors.
- Use a Sharp Pencil: A fine line is easier to follow.
- Use a Square: Use a speed square or combination square to ensure your cut line is perpendicular to the edge of the board.
- Extend the Line: Draw the line along the entire length of the board where you intend to cut.
Using a Straight Edge Guide
Using a straight edge is the most effective way to ensure a circular saw straight cut. It acts as a fence, guiding your saw along the desired path.
Positioning the Straight Edge
- Account for the Saw’s Offset: The distance between the edge of the saw’s base and the blade needs to be considered. Measure this distance accurately.
- Clamp Securely: Position the straight edge parallel to your marked cut line, offset by the distance you just measured. Clamp it securely to the workpiece. Ensure the clamps are out of the path of the saw.
- Double-Check Alignment: Before cutting, double-check that the straight edge is properly aligned with your marked line.
Making the Cut
- Set the Blade Depth: Adjust the blade depth so that it extends slightly beyond the thickness of the wood. Too much blade exposure increases the risk of kickback.
- Position the Saw: Place the base of the saw firmly against the straight edge.
- Start the Saw: Turn on the saw and let the blade reach full speed before beginning the cut.
- Guide the Saw: Slowly and steadily push the saw along the straight edge, keeping the base of the saw firmly against the guide. Avoid forcing the saw; let the blade do the work.
- Follow Through: Continue the cut until you have completely cut through the wood. Don’t stop mid-cut.
- Release the Trigger: Once the cut is complete, release the trigger and allow the blade to stop spinning before lifting the saw.
Tips for Maintaining a Straight Cut
- Consistent Pressure: Apply consistent pressure to the saw, keeping it firmly against the straight edge.
- Smooth Movement: Avoid jerky movements. A smooth, steady motion is key.
- Watch the Blade: Keep your eye on the blade as you cut, making sure it stays aligned with the cut line.
- Listen to the Saw: Pay attention to the sound of the saw. If it starts to bog down, you may be pushing it too hard.
- Use a Sharp Blade: A sharp blade will cut more easily and reduce the risk of splintering.
Utilizing a Circular Saw Straight Line Jig
A circular saw straight line jig can be a valuable tool for repeatable, accurate cuts. This jig acts as a more permanent and adjustable straight edge.
Building or Buying a Jig
- DIY Jig: You can build a simple jig from plywood and a straight piece of hardwood.
- Commercial Jig: Several commercially available jigs offer adjustable features for different saw sizes and cut widths.
Setting Up the Jig
- Attach the Saw: Securely attach your circular saw to the jig according to the manufacturer’s instructions.
- Adjust for Cut Width: Adjust the jig to the desired cut width, taking into account the saw’s offset.
- Test Cut: Make a test cut on a piece of scrap wood to ensure the jig is properly aligned and the cut is accurate.
Making the Cut with a Jig
- Position the Jig: Place the jig on the workpiece, aligning the edge of the jig with your marked cut line.
- Secure the Workpiece: Clamp the workpiece to a stable surface.
- Guide the Jig: Push the jig along the workpiece, keeping it firmly against the edge of the wood.
- Complete the Cut: Follow through with the cut, ensuring the blade cuts completely through the wood.
Freehand Cutting: When and How
While using a straight edge or jig is recommended for most straight cuts, there are situations where freehand cutting may be necessary. However, it’s more challenging to achieve a perfect circular saw straight cut without a guide.
When Freehand Cutting is Necessary
- Curved Cuts: For curved cuts, a straight edge is not applicable.
- Minor Adjustments: For small adjustments to an existing cut.
Techniques for Freehand Straight Cuts
- Stance and Grip: Maintain a stable stance and grip the saw firmly with both hands.
- Line of Sight: Focus your eyes on the cut line and use it as a guide.
- Pilot Cut: Make a shallow pilot cut along the cut line to help guide the saw.
- Slow and Steady: Cut slowly and steadily, keeping the saw aligned with the cut line.
- Practice: Practice on scrap wood to improve your technique.
Drawbacks of Freehand Cutting
- Less Accurate: Freehand cuts are inherently less accurate than cuts made with a straight edge or jig.
- More Difficult: It requires more skill and concentration.
- Higher Risk of Error: The risk of making a mistake is higher.
Rip Cutting with a Circular Saw
A rip cut circular saw technique refers to cutting with the grain of the wood. This is a common type of cut and requires specific techniques to ensure accuracy.
Understanding Rip Cuts
Rip cuts are often longer than crosscuts and can be more challenging to keep straight.
Techniques for Rip Cutting Straight
- Use a Rip Fence: A rip fence is a specialized guide that attaches to the circular saw and helps you maintain a consistent distance from the edge of the board.
- Long Straight Edge: Use a long straight edge clamped to the workpiece.
- Consistent Pressure: Maintain consistent pressure on the saw, keeping it firmly against the guide.
- Check Alignment: Periodically check the alignment of the saw to ensure it is still following the cut line.
Overcoming Challenges of Rip Cuts
- Wood Movement: Wood can move during the cut, causing the saw to bind. Use wedges to keep the cut open.
- Blade Drift: The blade may drift slightly, especially when cutting thicker wood. Adjust your technique as needed.
Achieving Accurate Circular Saw Cuts: Advanced Tips
Beyond the basics, these tips can help you achieve even more precise and professional results.
Preventing Tear-Out
- Score the Cut Line: Use a utility knife to score the cut line before sawing. This helps to prevent splintering.
- Use a Zero-Clearance Insert: A zero-clearance insert reduces the gap around the blade, minimizing tear-out.
- Place Scrap Wood Underneath: Place a piece of scrap wood under the workpiece to support the fibers and prevent tear-out on the underside of the cut.
Cutting Thin Materials
- Use a Backer Board: When cutting thin materials like plywood, use a backer board to provide support and prevent flexing.
- Sharp Blade: Use a sharp blade designed for cutting thin materials.
- Slow Feed Rate: Cut slowly to avoid splintering and chipping.
Dealing with Kickback
Kickback is a dangerous situation where the saw suddenly jumps back towards you.
- Proper Stance: Maintain a stable stance and keep both hands on the saw.
- Sharp Blade: Use a sharp blade to reduce the risk of binding.
- Avoid Pinching: Prevent the wood from pinching the blade by using wedges or clamps.
- Never Reach Over the Blade: Avoid reaching over the blade while the saw is running.
Maintaining Your Circular Saw
Regular maintenance will prolong the life of your saw and ensure it operates safely and accurately.
- Clean the Saw: Clean the saw regularly to remove sawdust and debris.
- Lubricate Moving Parts: Lubricate moving parts as needed.
- Sharpen or Replace the Blade: Keep the blade sharp for optimal performance.
- Inspect the Cord and Plug: Check the cord and plug for any damage.
Deciphering Common Cutting Problems
Even with careful preparation, you might encounter issues. Knowing how to diagnose and fix these problems is crucial.
Blade Binding
- Cause: The wood is pinching the blade.
- Solution: Use wedges to keep the cut open. Ensure the wood is properly supported.
Uneven Cuts
- Cause: Inconsistent pressure or movement, dull blade, or misalignment.
- Solution: Apply even pressure. Use a sharp blade. Check the saw’s alignment.
Splintering
- Cause: Dull blade or improper cutting technique.
- Solution: Use a sharp blade. Score the cut line. Use a backer board.
Saw Not Cutting Straight
- Cause: The guide isn’t parallel, the saw is drifting, or the blade is bent.
- Solution: Recheck the guide’s position, correct the drift, or replace the blade.
Fathoming Safety Precautions
Safety should always be your top priority when working with power tools.
- Read the Manual: Familiarize yourself with the circular saw’s operating manual.
- Wear Safety Gear: Always wear safety glasses, hearing protection, and a dust mask.
- Secure the Workpiece: Ensure the workpiece is securely clamped or supported.
- Keep Hands Clear: Keep your hands away from the blade.
- Avoid Loose Clothing: Avoid wearing loose clothing or jewelry that could get caught in the saw.
- Never Force the Saw: Let the blade do the work.
- Unplug the Saw: Unplug the saw before making any adjustments or changing the blade.
Frequently Asked Questions (FAQ)
- What is the best way to cut straight with a circular saw? Using a straight edge or a circular saw jig is the most reliable way to ensure a straight cut.
- How do I prevent tear-out when cutting with a circular saw? Score the cut line with a utility knife, use a zero-clearance insert, and place a piece of scrap wood underneath the workpiece.
- Can I cut a straight line freehand with a circular saw? It’s possible, but it’s more difficult and less accurate than using a guide.
- What kind of blade should I use for cutting plywood? Use a fine-tooth blade designed for cutting plywood to minimize splintering.
- How do I adjust the blade depth on a circular saw? Most circular saws have a lever or knob that allows you to adjust the blade depth. Consult your saw’s manual for specific instructions.
- What are some common circular saw cutting techniques? Some common techniques include using a straight edge, using a circular saw jig, rip cutting, and crosscutting.
- How do I maintain my circular saw? Clean the saw regularly, lubricate moving parts, sharpen or replace the blade, and inspect the cord and plug for damage.
Mastering the art of making a circular saw straight cut requires patience and practice. By following these steps and safety guidelines, you’ll be well on your way to achieving accurate, clean cuts for all your woodworking projects. These circular saw cutting techniques will improve your overall skills, allowing for more complex projects. Good luck!

Hi, I’m Tom Scalisi, and welcome to The Saw Blog! I started this blog to share my hands-on experience and insights about woodworking tools—especially saws and saw blades. Over the years, I’ve had the chance to work with a wide range of tools, and I’m here to help both professionals and hobbyists make informed decisions when it comes to selecting and using their equipment. Whether you’re looking for in-depth reviews, tips, or just advice on how to get the best performance out of your tools, you’ll find it here. I’m excited to be part of your woodworking journey!