
Changing a Ryobi circular saw blade is straightforward. Can I change my Ryobi circular saw blade myself? Yes, you can! This guide provides simple, step-by-step ryobi blade change instructions to help you perform a ryobi circular saw blade replacement safely and efficiently. Follow these circular saw blade change steps and get back to your woodworking projects quickly.
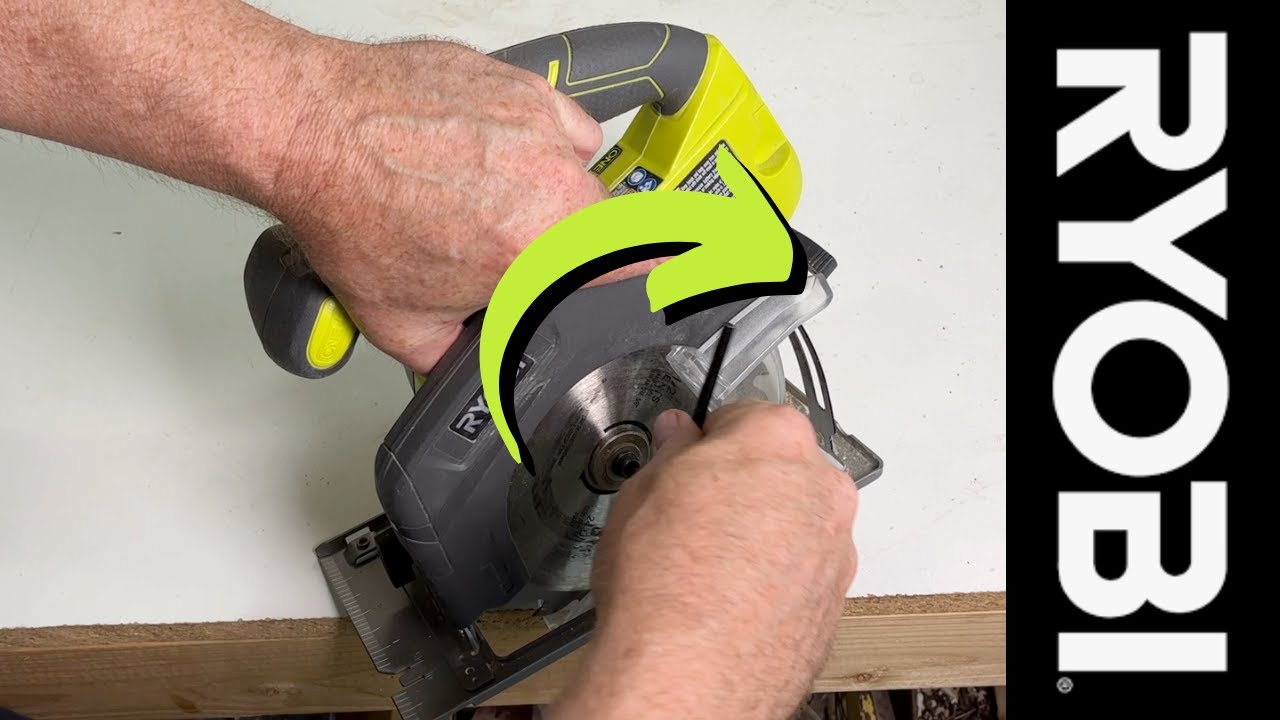
Image Source: i.ytimg.com
Preparing for Your Ryobi Circular Saw Blade Replacement
Before you even think about replacing ryobi saw blade, safety is paramount. This section will help you get ready.
Safety First: Essential Precautions
- Unplug the Saw: This is non-negotiable. Disconnect the saw from the power outlet. This avoids accidental starts.
- Wear Safety Glasses: Protect your eyes from flying debris.
- Wear Gloves: Protect your hands from sharp blade edges.
- Read the Manual: Refer to your ryobi saw blade replacement guide for model-specific instructions. Each saw is a bit different.
Gathering Your Tools and Supplies
You’ll need a few items for a smooth ryobi circular saw blade replacement.
- New Circular Saw Blade: Select the correct size and type for your saw and project.
- Wrench or Arbor Nut Wrench: Usually included with your saw. This loosens the arbor nut.
- Screwdriver (if needed): Some models may have screws securing blade guards.
- Clean Cloth: For wiping down the saw and new blade.
- Wooden Block (optional): To wedge between the blade and saw body. This keeps the blade from spinning.
Ryobi Saw Blade Removal: Step-by-Step
Now, let’s get the old blade out. Follow these ryobi saw blade removal steps carefully.
Securing the Saw
- Place the saw on a stable, flat surface.
- Make sure the blade is fully retracted into the blade guard.
Locating and Loosening the Arbor Nut
- The arbor nut is in the center of the blade, holding it in place.
- Use the wrench or arbor nut wrench to loosen the nut.
- Important: Note the direction you need to turn the wrench. It may be reverse-threaded. Look for an arrow on the saw indicating the direction.
Removing the Blade
- Once the nut is loose, carefully remove it completely.
- Some saws have a washer or flange on either side of the blade. Keep track of these.
- Gently slide the old blade off the arbor. Be careful of the sharp teeth.
Circular Saw Blade Installation Ryobi: Putting in the New Blade
With the old blade out, it’s time for circular saw blade installation ryobi.
Preparing the New Blade
- Wipe the new blade with a clean cloth to remove any oil or residue.
- Inspect the blade for any damage before installing.
Mounting the New Blade
- Position the new blade onto the arbor. Ensure the teeth are pointing in the correct direction for cutting. The direction is often marked on the saw.
- Replace any washers or flanges that were removed with the old blade. They must go back in the same order.
Tightening the Arbor Nut
- Thread the arbor nut back onto the arbor.
- Tighten the nut securely with the wrench. Do not overtighten. Follow the manufacturer’s torque specifications if available.
Final Checks and Adjustments
Before you start cutting, double-check everything.
Verifying Blade Security
- Give the blade a gentle tug to ensure it’s securely fastened.
- Make sure the blade spins freely without wobbling.
Adjusting Blade Depth and Bevel
- Adjust the blade depth to the appropriate setting for your material.
- Adjust the bevel angle as needed for your cut.
Testing the Saw
- Plug the saw back into the power outlet.
- Perform a test cut on a scrap piece of wood to ensure the blade is cutting smoothly and accurately.
The Importance of Blade Selection
The right blade makes all the difference.
Different Blade Types
Different blade types are designed for different materials. Here are some common types:
- General Purpose Blades: Good for cutting a variety of woods.
- Rip Blades: Designed for cutting wood along the grain (ripping).
- Crosscut Blades: Designed for cutting wood across the grain (crosscutting).
- Plywood Blades: Have fine teeth to prevent splintering.
- Metal Cutting Blades: Designed for cutting non-ferrous metals like aluminum.
Choosing the Right Blade for Your Project
Consider these factors:
- Material: What type of material are you cutting?
- Cut Quality: How smooth of a cut do you need?
- Thickness: How thick is the material?
A ryobi circular saw blade change tool will not make the correct blade selection, so this is an important step!
Maintaining Your Ryobi Circular Saw Blade
Proper maintenance extends the life of your blade.
Cleaning the Blade
- After each use, clean the blade with a brush or cloth to remove sawdust and resin.
- Use a blade cleaner to remove stubborn residue.
Storing the Blade
- Store the blade in a dry place to prevent rust.
- Use a blade guard or case to protect the teeth.
Sharpening the Blade
- A dull blade is dangerous and can cause kickback.
- Sharpen the blade regularly or replace it when it becomes too dull.
Tips and Tricks for Easier Blade Changes
Here are some extra tips to make changing blade on ryobi circular saw even easier:
- Use a Blade Stabilizer: This helps keep the blade from wobbling during cutting.
- Mark the Arbor Nut: Use a marker to indicate the correct tightening direction.
- Keep a Spare Blade: Always have a spare blade on hand so you can quickly replace a dull or damaged blade.
Troubleshooting Common Issues
Sometimes things don’t go as planned.
Nut Won’t Loosen
- Make sure you’re turning the nut in the correct direction.
- Use a longer wrench for more leverage.
- Apply penetrating oil to the nut and let it sit for a few minutes.
Blade Won’t Fit
- Make sure you have the correct size blade for your saw.
- Check that the arbor is clean and free of debris.
Saw Vibrates Excessively
- Make sure the blade is properly installed and tightened.
- Check the blade for damage.
- Ensure the arbor is not bent or damaged.
Table: Common Ryobi Circular Saw Models and Compatible Blades
This is not an exhaustive list, but it provides a general guideline. Always consult your saw’s manual for precise blade specifications.
| Ryobi Circular Saw Model | Common Blade Diameter | Arbor Size | Blade Type Recommendations |
|---|---|---|---|
| P506/P507 (18V ONE+) | 5 1/2 inch | 10mm (3/8 inch) | General Purpose, Plywood |
| CSB125 (7 1/4 inch) | 7 1/4 inch | 5/8 inch | General Purpose, Rip, Crosscut |
| CSB145 (7 1/4 inch) | 7 1/4 inch | 5/8 inch | General Purpose, Rip, Crosscut |
| R18CS7 (18V ONE+) | 7 1/4 inch | 5/8 inch | General Purpose, Rip, Crosscut |
| RCS1600 (13 Amp) | 7 1/4 inch | 5/8 inch | General Purpose, Framing |
Visual Aids
Consider adding diagrams showing:
- Location of the arbor nut.
- Correct direction for blade teeth.
- Proper placement of washers/flanges.
Conclusion
Changing the blade on your Ryobi circular saw doesn’t have to be a headache. If you follow these simple instructions and have a few basic tools handy, you can keep your saw working great and cutting safely. Just remember to always put safety first and stick to the tips Ryobi recommends. Have fun with your woodworking projects!
Frequently Asked Questions (FAQ)
Q: How often should I change my Ryobi circular saw blade?
A: You should change your blade when it becomes dull, damaged, or when you switch to a different type of material.
Q: What size blade does my Ryobi circular saw use?
A: Refer to your saw’s manual or the saw itself. It will usually specify the blade diameter and arbor size.
Q: Can I use any brand of circular saw blade on my Ryobi saw?
A: Yes, as long as the blade has the correct diameter and arbor size for your saw.
Q: What happens if I install the blade backwards?
A: The saw will not cut properly and may cause kickback. Always ensure the teeth are pointing in the correct direction.
Q: What is kickback, and how can I prevent it?
A: Kickback is when the saw suddenly and violently jumps back towards you. Prevent kickback by using sharp blades, supporting your material properly, and avoiding binding the blade.

Hi, I’m Tom Scalisi, and welcome to The Saw Blog! I started this blog to share my hands-on experience and insights about woodworking tools—especially saws and saw blades. Over the years, I’ve had the chance to work with a wide range of tools, and I’m here to help both professionals and hobbyists make informed decisions when it comes to selecting and using their equipment. Whether you’re looking for in-depth reviews, tips, or just advice on how to get the best performance out of your tools, you’ll find it here. I’m excited to be part of your woodworking journey!