
Are you looking for a better way to use your miter saw? A miter saw station is exactly what you need! It gives you a solid, safe spot to make your cuts and helps keep your shop organized. In this guide, we’ll show you how to build your very own station using simple plans and helpful tips from the pros.
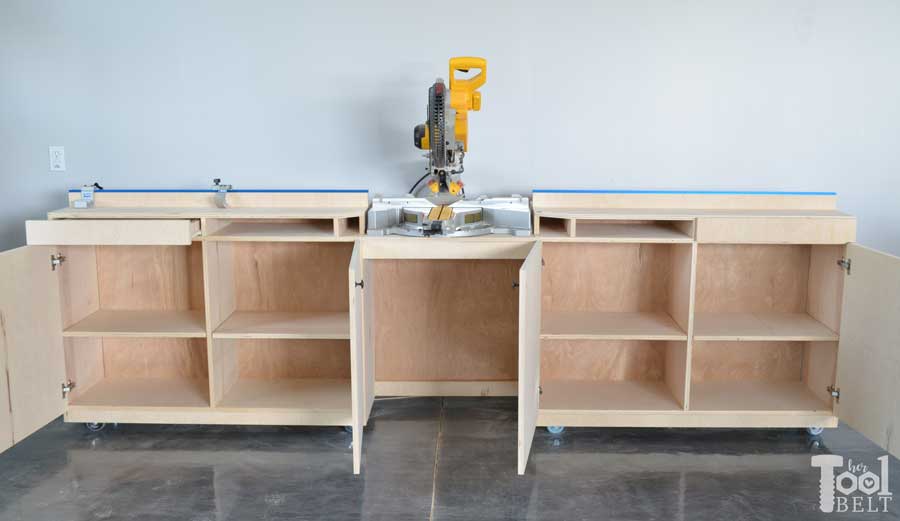
Image Source: learn.kregtool.com
Why Build a Miter Saw Station?
A miter saw station offers many benefits for both hobbyists and professionals.
- Increased Accuracy: A solid, level surface improves the precision of your cuts.
- Improved Safety: A dedicated workspace reduces the risk of accidents.
- Dust Control: Many miter saw station designs include dust collection features.
- Enhanced Organization: Built-in storage keeps your tools and materials within easy reach.
- Greater Efficiency: A well-designed station streamlines your workflow.
- Space Saving: Especially a compact miter saw station helps save space.
- Portability: If you choose a mobile miter saw station, you can move your setup easily.
Choosing the Right Miter Saw Station Design
There are many different miter saw station design options. Selecting the right one depends on your needs, space, and budget. Consider these factors:
- Available Space: Measure your workshop to determine the maximum size of your station.
- Budget: Simple designs are more affordable than complex ones.
- Desired Features: Do you need storage, dust collection, or portability?
- Skill Level: Choose a project that matches your woodworking abilities.
- Saw Size: Some miter saw stand plans are made for small saws and some for larger ones.
Types of Miter Saw Stations
Here’s a look at some popular types:
- Basic Benchtop Station: A simple platform for your miter saw.
- Extended Wing Station: Includes side extensions for supporting long workpieces.
- Mobile Station: Mounted on wheels for easy transport.
- Folding Station: Can be folded up for storage when not in use – ideal for a folding miter saw stand.
- Station with Integrated Dust Collection: Features a built-in dust collection system.
- Miter Saw Station with Storage: Includes drawers and cabinets for tools and materials.
Essential Tools and Materials
Before you start, gather the necessary tools and materials.
Tools
- Miter Saw (obviously!)
- Circular Saw
- Drill/Driver
- Screwdriver
- Measuring Tape
- Level
- Square
- Safety Glasses
- Hearing Protection
- Dust Mask
- Clamps
- Pencil
- Optional: Router
Materials
- Plywood (3/4″ is a good general thickness)
- Lumber (2x4s for framing are common)
- Screws (various sizes)
- Wood Glue
- Edge Banding (optional)
- Dust Collection Fittings (if adding dust collection)
- Casters (if building a mobile station)
- Drawer Slides (if adding drawers)
- Hardware (knobs, pulls, etc.)
Miter Saw Station Plans: A Step-by-Step Guide
This section presents a simple DIY miter saw workstation plan that you can adapt to your specific needs.
Step 1: Build the Base
- Cut the Frame: Cut 2×4 lumber to the desired dimensions for your base. A common depth is 24 inches, and the length will depend on whether you want wings.
- Assemble the Frame: Use screws and wood glue to assemble the frame. Make sure it is square.
- Add Legs: Cut legs from 2x4s and attach them to the corners of the frame. Ensure the legs are of equal length for a level surface.
- Add a Bottom Shelf (Optional): Cut plywood to fit inside the frame and attach it to the bottom to create a shelf for storage.
Step 2: Construct the Tabletop
- Cut the Tabletop: Cut a piece of plywood to the desired size for your tabletop. The miter saw table dimensions should be wide enough to accommodate your saw and any desired extensions.
- Cut the Miter Saw Recess: Place your miter saw on the plywood and trace its outline. Subtract 1/8″ to 1/4″ from the outline to ensure a snug fit. Use a jigsaw or router to cut out the recess.
- Attach the Tabletop to the Base: Secure the tabletop to the base frame using screws and wood glue.
Step 3: Add Extension Wings (Optional)
- Cut the Extension Wings: Cut plywood to the desired size for your extension wings.
- Attach the Wings: Attach the wings to the sides of the main tabletop using hinges or fixed supports. If using hinges, consider folding wings for easier storage.
- Level the Wings: Ensure the wings are level with the main tabletop. You may need to add shims to achieve a perfectly level surface.
Step 4: Implement Dust Collection (Optional)
- Create a Dust Port: Cut a hole in the back of the station to connect a dust collection hose.
- Install Dust Collection Fittings: Attach dust collection fittings to the hole.
- Connect to a Shop Vac: Connect the fittings to your shop vac or dust collector.
Step 5: Add Storage (Optional)
- Build Drawers or Cabinets: Construct drawers or cabinets to fit underneath the tabletop or within the base frame.
- Install Drawer Slides: Attach drawer slides to the drawers and the cabinet frame.
- Add Doors (for Cabinets): Cut doors to fit the cabinet openings and attach them with hinges.
Step 6: Sand and Finish
- Sand All Surfaces: Sand all surfaces smooth using sandpaper.
- Apply Finish: Apply paint, stain, or varnish to protect the wood and give your station a finished look.
- Add Edge Banding (Optional): Apply edge banding to the edges of the plywood to give it a more polished appearance.
Expert Tips for Building a Miter Saw Station
- Accurate Measurements are Key: Double-check all measurements before cutting.
- Use Quality Materials: Invest in good quality plywood and lumber for a durable station.
- Secure Fastenings: Use screws and wood glue for strong joints.
- Level Everything: Ensure the base, tabletop, and wings are perfectly level.
- Test Fit: Before permanently attaching anything, test fit all components.
- Consider Mobility: If you need to move your station, use heavy-duty casters.
- Prioritize Safety: Always wear safety glasses and hearing protection when working with power tools.
- Dust Collection is Important: Invest in a good dust collection system to keep your workspace clean and healthy.
- Customize to Your Needs: Tailor the miter saw stand plans to fit your specific tools and requirements.
Integrating Dust Collection
Miter saw dust collection is crucial for maintaining a clean and healthy workspace. Here are some options:
- Basic Shop Vac Connection: The simplest method is to connect your miter saw’s dust port to a shop vac.
- Dust Hood: A dust hood can be built around the miter saw to capture more dust.
- Integrated System: A more advanced system can include a dust separator, collection bag, and dedicated ductwork.
Enhancing Your Miter Saw Station with Storage
Adding storage to your miter saw station is a great way to keep your tools and materials organized. Consider these options:
- Drawers: Ideal for storing small tools, fasteners, and accessories.
- Cabinets: Great for storing larger items like blades, sanding discs, and power tools.
- Shelves: Perfect for storing lumber, plywood, and other materials.
- Pegboard: A pegboard can be mounted on the back of the station to hang tools within easy reach.
Making Your Miter Saw Station Mobile
If you need to move your miter saw station around your workshop, consider building a mobile miter saw station.
- Choose Heavy-Duty Casters: Select casters that can support the weight of your station and tools.
- Attach Casters to the Base: Securely attach the casters to the bottom of the base frame.
- Consider Locking Casters: Locking casters will prevent the station from moving when you’re working.
Exploring Folding Miter Saw Stands
A folding miter saw stand is an excellent option for those with limited space. These stands can be folded up and stored away when not in use.
- Purchase a Folding Stand: Many commercially available folding miter saw stands are available.
- Build Your Own Folding Stand: You can also build your own folding stand using hinges and locking mechanisms.
Workbench with Miter Saw: Combining Functionality
Consider integrating your miter saw into a larger workbench with miter saw. This can save space and provide a versatile workspace.
- Incorporate the Miter Saw into the Workbench Design: Design the workbench to include a designated area for your miter saw.
- Ensure a Level Surface: The workbench surface should be level with the miter saw table for smooth transitions.
Different Miter Saw Stand Plans
| Plan Type | Description | Skill Level | Cost | Space Requirements |
|---|---|---|---|---|
| Basic Benchtop | Simple platform for the miter saw. | Beginner | Low | Small |
| Extended Wing | Includes side extensions for supporting long workpieces. | Intermediate | Medium | Medium |
| Mobile Station | Mounted on wheels for easy transport. | Intermediate | Medium | Medium |
| Folding Station | Can be folded up for storage when not in use. | Advanced | Medium/High | Small |
| Dust Collection | Features a built-in dust collection system. | Advanced | High | Medium |
| With Storage | Includes drawers and cabinets for tools and materials. | Advanced | High | Large |
| Compact Design | Designed to take up as little space as possible, ideal for small workshops. | Intermediate | Medium | Small |
Conclusion
Building your own miter saw station is a rewarding project that can improve the accuracy, safety, and efficiency of your woodworking. By following these plans and tips, you can create a custom workstation that meets your specific needs and enhances your enjoyment of woodworking. Consider your space, budget, and desired features when choosing a design. Good luck, and happy building!
Frequently Asked Questions (FAQ)
- What is the ideal height for a miter saw station?
The ideal height is typically around 34-36 inches, matching the height of most workbenches. This allows for comfortable operation and easy integration with other tools. - Can I use a miter saw station outdoors?
Yes, but you’ll want to use weather-resistant materials and protect it from the elements when not in use. - Who is this guide for?
This guide is for anyone interested in building their own miter saw station, from beginners to experienced woodworkers. - How much does it cost to build a miter saw station?
The cost varies depending on the materials and features you choose. A basic station can be built for under $100, while a more elaborate station with storage and dust collection can cost several hundred dollars. - Are there free miter saw stand plans available online?
Yes, many websites offer free miter saw stand plans. Be sure to choose plans that are well-documented and easy to follow. - Is dust collection really necessary?
Yes, dust collection is highly recommended for health and safety reasons. Miter saws generate a lot of fine dust, which can be harmful to breathe. - What are the most important features to consider when designing a miter saw station?
The most important features include a level work surface, adequate support for long workpieces, and effective dust collection. Storage is also a valuable addition.

Hi, I’m Tom Scalisi, and welcome to The Saw Blog! I started this blog to share my hands-on experience and insights about woodworking tools—especially saws and saw blades. Over the years, I’ve had the chance to work with a wide range of tools, and I’m here to help both professionals and hobbyists make informed decisions when it comes to selecting and using their equipment. Whether you’re looking for in-depth reviews, tips, or just advice on how to get the best performance out of your tools, you’ll find it here. I’m excited to be part of your woodworking journey!