
Are you looking for miter saw stand plans? A miter saw stand offers a stable and convenient platform for your miter saw, improving accuracy and safety. This guide provides detailed plans and tips for building your own DIY miter saw station, covering everything from a basic miter saw table to a more elaborate miter saw stand with storage, or even a portable miter saw stand or folding miter saw stand. It is perfect for building a chop saw stand.
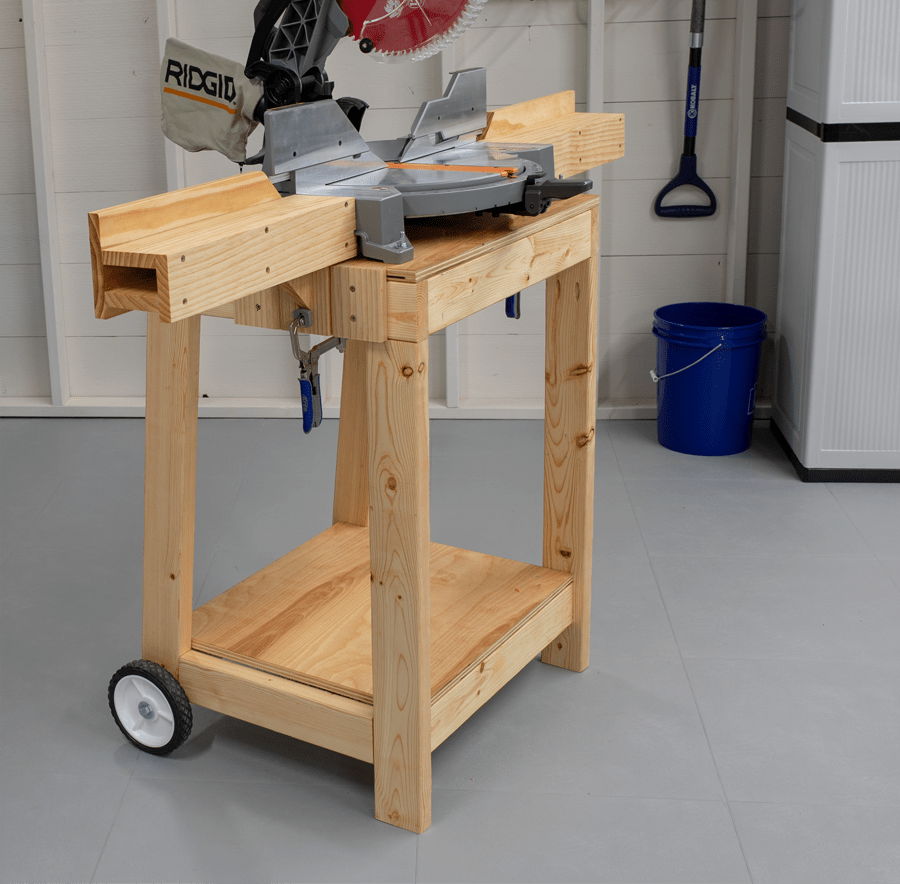
Image Source: learn.kregtool.com
Why Build a Miter Saw Stand?
Having a dedicated miter saw stand greatly enhances your woodworking experience. Here’s why:
- Improved Accuracy: A stable surface reduces vibrations and ensures precise cuts.
- Enhanced Safety: Prevents the saw from tipping or moving during operation.
- Increased Efficiency: Provides a comfortable working height and easy access to materials.
- Better Organization: Many stands include storage for tools, blades, and accessories.
- Portability: Makes it easy to move your saw to different locations.
Planning Your Miter Saw Stand: Choosing the Right Design
The best miter saw stand design depends on your specific needs and workspace. Consider these factors when planning your custom miter saw stand:
- Available Space: How much room do you have in your workshop or garage?
- Portability: Do you need to move the stand frequently? A portable miter saw stand or folding miter saw stand is ideal if you have to.
- Storage Requirements: Do you need drawers, shelves, or other storage options? Think about a miter saw stand with storage.
- Material Length Support: Will you be working with long pieces of lumber? Consider adding extension wings or rollers to your miter saw workstation.
- Budget: How much are you willing to spend on materials?
Design Options: A Quick Overview
Here is a breakdown of the common types of miter saw stands:
| Stand Type | Features | Pros | Cons | Best For |
|---|---|---|---|---|
| Basic Table | Simple platform for the saw | Inexpensive, easy to build | Limited functionality, no storage | Small workshops, occasional use |
| Portable Stand | Collapsible or wheeled design | Easy to move and store, lightweight | Less stable than stationary stands, limited weight capacity | Job sites, small projects |
| Folding Stand | Folds up for compact storage | Saves space, easy to transport | Can be less sturdy, may require assembly | Limited storage or portability needs. |
| Stand with Storage | Includes drawers, shelves, and other storage features | Keeps tools organized, maximizes workspace | More complex to build, can be bulky | Home workshops, frequent use |
| Extended Support Stand | Features extension wings or rollers for supporting long pieces of lumber | Allows for accurate cuts on long materials, improves safety | Takes up more space, may require additional hardware | Working with long boards, trim work |
Essential Tools and Materials
Before you begin, gather the necessary tools and materials. This list is a general guide and may vary depending on the specific design you choose.
Tools:
- Miter Saw (obviously!)
- Circular Saw or Table Saw (for cutting sheet goods)
- Drill/Driver with Drill Bit Set
- Tape Measure
- Pencil
- Safety Glasses
- Hearing Protection
- Clamps
- Level
- Square
- Screwdriver Set
Materials:
- Plywood (3/4″ and 1/2″ thickness)
- 2×4 Lumber (for framing and legs)
- Wood Screws (various sizes)
- Wood Glue
- Sandpaper
- Finishing Materials (paint, stain, polyurethane)
- Hardware (hinges, drawer slides, casters (for portable stands))
- T-Track (optional, for adding accessories)
- Measuring tape
Step-by-Step Miter Saw Stand Plans: Building a Basic Table
This plan outlines how to build a simple, sturdy miter saw table, which can form the foundation for more elaborate designs.
Step 1: Cut the Lumber
Refer to your miter saw stand plans and cut the 2×4 lumber according to the following dimensions:
- Legs: 4 pieces at 36″ (adjust to your desired working height)
- Frame Sides: 2 pieces at 48″
- Frame Ends: 2 pieces at 24″
- Support Braces: 4 pieces at 12″ (cut at a 45-degree angle on each end)
Cut the plywood for the top:
- Tabletop: 1 piece at 24″ x 48″
Step 2: Assemble the Frame
- Attach the Frame Sides and Ends: Using wood glue and screws, assemble the frame by joining the side and end pieces together. Ensure the frame is square using a square tool.
- Attach the Legs: Secure the legs to the inside corners of the frame, using wood glue and screws. Make sure the legs are flush with the top of the frame.
- Add Support Braces: Install the support braces between the legs and the frame corners, using wood glue and screws. These braces will add stability to the stand.
Step 3: Attach the Tabletop
- Apply Glue: Spread wood glue evenly over the top of the frame.
- Position the Tabletop: Place the plywood tabletop onto the frame, ensuring it is centered.
- Secure the Tabletop: Secure the tabletop to the frame using screws, spacing them evenly around the perimeter.
Step 4: Sand and Finish
- Sand the Stand: Sand all surfaces of the stand to smooth any rough edges and prepare it for finishing.
- Apply Finish: Apply your chosen finish, such as paint, stain, or polyurethane, to protect the wood and enhance its appearance.
Advanced Miter Saw Stand Designs: Adding Features and Functionality
Once you’ve mastered the basic table, you can explore more advanced designs to create a fully functional miter saw workstation.
Building a Portable Miter Saw Stand
To make your stand portable, consider adding these features:
- Casters: Attach heavy-duty casters to the legs of the stand. Two locking casters will prevent the stand from rolling while in use.
- Folding Legs: Use hinges to create folding legs, allowing you to collapse the stand for easy transport and storage.
Creating a Folding Miter Saw Stand
A folding miter saw stand is perfect for saving space. Here’s how to adapt the basic design:
- Hinge Placement: Install heavy-duty hinges at the points where the legs connect to the frame.
- Locking Mechanism: Add a locking mechanism, such as latches or braces, to secure the legs in both the open and closed positions.
- Collapsible Braces: Use folding braces to provide additional support when the stand is in use.
Adding Storage to Your Miter Saw Stand
A miter saw stand with storage is a game-changer for organization. Here are some storage options:
- Drawers: Build drawers underneath the tabletop to store tools, blades, and accessories. Use drawer slides for smooth operation.
- Shelves: Add shelves between the legs of the stand to store larger items, such as lumber and toolboxes.
- Pegboard: Attach a pegboard to the back of the stand to hang frequently used tools.
- Dust Collection: Integrate a dust collection system to keep your workspace clean.
Incorporating Extension Wings for Material Support
Working with long pieces of lumber requires additional support. Add extension wings to your miter saw workstation:
- Wing Construction: Build extension wings from plywood and 2×4 lumber.
- Attachment Methods: Attach the wings to the sides of the main tabletop using hinges or sliding T-track.
- Adjustable Height: Make the wings adjustable in height to accommodate different material thicknesses.
- Roller Supports: Install roller supports on the wings to allow materials to glide smoothly.
Tips for Building a Durable and Accurate Miter Saw Stand
- Use Quality Materials: Invest in high-quality lumber and hardware to ensure the stand is sturdy and long-lasting.
- Accurate Measurements: Precise measurements are crucial for creating a square and stable stand. Double-check your measurements before cutting.
- Secure Fastenings: Use wood glue in addition to screws to create strong and durable joints.
- Level Surface: Ensure the stand is level before attaching the miter saw. Use shims to correct any unevenness.
- Miter Saw Mounting: Securely mount the miter saw to the tabletop using bolts and washers. Follow the manufacturer’s instructions for mounting.
- T-Track Systems: Install T-track on the sides of the stand to easily attach accessories like stops, clamps, and feather boards.
Mounting Your Miter Saw: Ensuring a Secure Fit
Properly mounting your miter saw is critical for safety and accuracy. Here’s a step-by-step guide:
- Locate Mounting Holes: Identify the mounting holes on the base of your miter saw.
- Mark Hole Locations: Place the saw on the tabletop and mark the locations of the mounting holes.
- Drill Pilot Holes: Drill pilot holes through the tabletop at the marked locations.
- Attach the Saw: Secure the saw to the tabletop using bolts, washers, and nuts. Ensure the saw is flush with the surface and securely fastened.
- Counter Sink Bolts: Counter sink the bolts so they are below the table’s surface for unhindered material handling.
Finishing Touches: Enhancing Your Miter Saw Station
- Wire Management: Install cable clips or ties to keep cords organized and out of the way.
- Dust Collection: Connect a dust collection system to your saw to minimize mess and improve air quality.
- Lighting: Add a work light to improve visibility.
- Custom Accessories: Build custom accessories, such as a stop block or a measuring scale, to enhance the functionality of your stand.
Frequently Asked Questions (FAQ)
What is the ideal height for a miter saw stand?
Generally, the sweet spot is somewhere between 34 and 40 inches, though it really comes down to how tall you are and what feels best to you. The main goal is to set it up so you can work comfortably without having to hunch over too much.
Can I use reclaimed wood to build a miter saw stand?
Yes, you can, but ensure the wood is structurally sound and free of nails or screws. Prepare the wood properly by cleaning and sanding it.
What is the best material for a miter saw stand tabletop?
Plywood is a popular choice because it is strong, stable, and relatively inexpensive. MDF is another option, but it is not as durable as plywood.
How can I make my miter saw stand more stable?
Add support braces to the legs and frame, and use a thick tabletop. Ensure the stand is level and on a flat surface.
What are some essential accessories for a miter saw stand?
Essential accessories include extension wings, roller supports, stop blocks, clamps, and a dust collection system.
Building your own miter saw stand is a rewarding project that will improve your woodworking experience. With the right plans and a little effort, you can create a custom DIY miter saw station that meets your specific needs and helps you achieve accurate and professional results. Whether you opt for a simple miter saw table or a more elaborate miter saw stand with storage, the benefits of having a dedicated miter saw workstation are undeniable. Enjoy building a chop saw stand that perfectly fits your workspace and workflow!

Hi, I’m Tom Scalisi, and welcome to The Saw Blog! I started this blog to share my hands-on experience and insights about woodworking tools—especially saws and saw blades. Over the years, I’ve had the chance to work with a wide range of tools, and I’m here to help both professionals and hobbyists make informed decisions when it comes to selecting and using their equipment. Whether you’re looking for in-depth reviews, tips, or just advice on how to get the best performance out of your tools, you’ll find it here. I’m excited to be part of your woodworking journey!