
When ripping with a table saw, wood is cut along the grain using a specialized blade and a fence to guide the wood straight. This process, known as ripping, creates boards of uniform width. This article serves as your table saw ripping guide, covering everything from table saw fence setup for ripping and choosing the right ripping blade types to crucial table saw ripping techniques for ripping wood safely, including push stick use for ripping and avoiding kickback when ripping. We’ll also explore specific scenarios, like how to rip long boards and ripping thin strips on table saw, always keeping in mind wood grain direction when ripping.
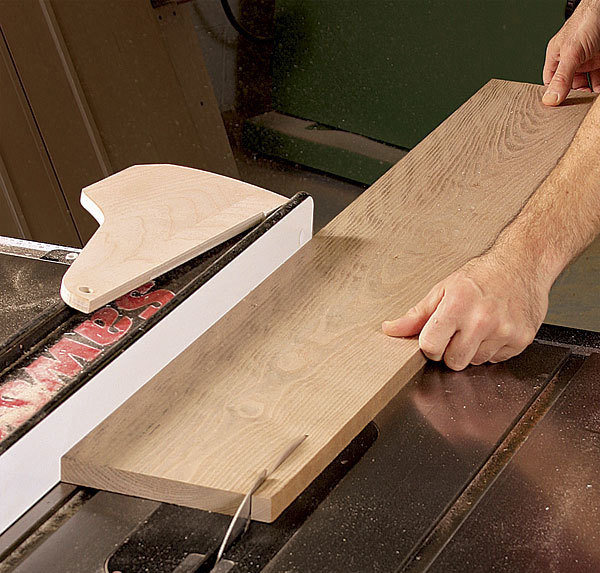
Image Source: images.finewoodworking.com
Table Saw Ripping: What You Need To Know
Ripping is simply cutting a piece of wood along its length, following the direction of the wood grain. It’s different from a “crosscut,” which is when you cut across the width of the board (like shortening a 2×4). Ripping is the go-to method whenever you need to make a wide board narrower to fit your project perfectly.
Why Ripping Matters
- Creating Consistent Widths: Ripping lets you make multiple boards with the exact same width. This is important for projects like building cabinets or furniture.
- Using Wood Efficiently: You can rip wider boards into narrower pieces to minimize waste.
- Customizing Lumber: Ripping lets you tailor lumber to your project’s specific needs.
Setting Up Your Table Saw for Ripping
A good setup is key for safe and accurate ripping. The following steps are critical for table saw fence setup for ripping.
Blade Selection: Choosing the Right Ripping Blade Types
The right blade makes a big difference. Choose a blade designed for ripping.
- Ripping Blades: These blades have fewer teeth with deeper gullets (the spaces between the teeth). This helps remove wood chips quickly and makes cleaner cuts along the grain. A 24-tooth ripping blade is a good starting point.
- Combination Blades: These can rip and crosscut, but aren’t as efficient for ripping as a dedicated ripping blade.
- Thin-Kerf Blades: These blades remove less material, making them easier on your saw’s motor, especially when ripping thick wood.
| Blade Type | Tooth Count | Best For |
|---|---|---|
| Ripping | 24-30 | Fast, clean rips along the grain |
| Combination | 40-50 | General purpose ripping and crosscutting |
| Thin-Kerf Ripping | 24-30 | Ripping thick wood with less motor strain |
Setting the Fence
The fence guides the wood as you rip. Make sure it’s set correctly.
- Measure the Distance: Use a ruler or measuring tape to set the fence to the desired width. Measure from the blade teeth to the fence.
- Lock the Fence: Secure the fence tightly. Make sure it doesn’t move during the cut.
- Check Alignment: Use a square to check that the fence is parallel to the blade. This is vital for accurate cuts.
Adjusting the Blade Height
The blade should be high enough to cut through the wood, but not too high.
- Optimal Height: The blade should extend about ¼ inch above the wood.
- Safety: A lower blade height reduces the risk of kickback.
- Efficiency: A lower blade height also reduces strain on the motor and the likelihood of burning the wood.
Creating Outfeed Support
How to rip long boards often requires outfeed support. Outfeed support helps keep long boards stable after they pass the blade.
- Roller Stands: These stands support the board as it exits the saw.
- Tables: Use a table or workbench to provide additional support.
Ripping Wood Safely: Key Precautions
Safety is the top priority when using a table saw. Here’s how to rip wood safely, including avoiding kickback when ripping.
Personal Protective Equipment (PPE)
Always wear safety gear:
- Eye Protection: Wear safety glasses or a face shield to protect your eyes from flying debris.
- Hearing Protection: Use earplugs or earmuffs to protect your hearing. Table saws are loud.
- Dust Mask: Wear a dust mask or respirator to avoid breathing in sawdust.
Preventing Kickback
Kickback is when the wood is thrown back towards you by the blade. It’s dangerous and can cause serious injuries. Here’s how to avoid it:
- Use a Riving Knife or Splitter: These devices keep the kerf (the cut in the wood) from closing and pinching the blade.
- Use Featherboards: Featherboards hold the wood tight against the fence, preventing it from lifting or moving.
- Feed the Wood Steadily: Don’t force the wood, and don’t stop in the middle of the cut.
- Never Rip Freehand: Always use the fence to guide the wood.
- Stand to the Side: Avoid standing directly behind the blade. Stand to the side to minimize the risk if kickback occurs.
Using Push Sticks and Push Blocks
Push stick use for ripping is critical for safety.
- Push Sticks: Use a push stick to guide the wood through the last part of the cut. This keeps your hands away from the blade.
- Push Blocks: Use push blocks for wider boards to apply even pressure.
Ripping Techniques: Step-by-Step Guide
Follow these steps for accurate and safe ripping. These are basic table saw ripping techniques.
- Prepare the Wood: Make sure the wood is free of knots and defects that could cause it to bind.
- Position the Wood: Place the wood against the fence with the edge flat on the table.
- Start the Saw: Turn on the saw and let it reach full speed.
- Feed the Wood: Slowly and steadily push the wood through the blade, keeping it tight against the fence.
- Use Push Stick/Block: As you approach the end of the cut, use a push stick or push block to finish guiding the wood through.
- Turn Off the Saw: Once the cut is complete, turn off the saw and wait for the blade to stop spinning before removing the wood.
Ripping Long Boards: Extra Considerations
How to rip long boards requires some extra care:
- Support: Use infeed and outfeed support to keep the board stable.
- Helper: If possible, have someone help you guide the board.
- Slow and Steady: Take your time and keep the board moving smoothly.
Ripping Thin Strips: A Special Case
Ripping thin strips on table saw can be tricky and dangerous. Here’s how to do it safely:
- Use a Thin Rip Jig: A thin rip jig holds the wood securely and keeps your hands far away from the blade.
- Move the Fence: Place the fence to the left of the blade instead of the right.
- Use a Push Stick: Always use a push stick to guide the wood through.
- Exercise Caution: Thin strips can easily bind and kick back, so be extra careful.
Wood Grain Direction When Ripping
Wood grain direction when ripping is very important. Always rip with the grain, not against it. Ripping against the grain can cause splintering and a rough cut.
How to Identify Grain Direction
- Look for the Lines: The grain runs parallel to the length of the tree.
- Check the End Grain: The rings on the end grain show the direction of the grain.
- Feel the Surface: The wood will feel smoother when you run your hand with the grain.
Common Mistakes to Avoid
- Ripping Without a Riving Knife/Splitter: This greatly increases the risk of kickback.
- Forcing the Wood: If the wood is hard to push, stop and check the blade, fence, and alignment.
- Ripping Wet Wood: Wet wood is more likely to bind and kick back. Let it dry first.
- Ignoring Kickback Signs: If you feel the wood starting to bind or lift, stop immediately.
Maintaining Your Table Saw for Optimal Ripping
A well-maintained table saw is safer and more accurate.
- Clean the Saw: Regularly remove sawdust and debris from the table, blade, and motor.
- Lubricate Moving Parts: Apply lubricant to the fence, blade height adjustment, and other moving parts.
- Check the Blade: Make sure the blade is sharp and clean. Replace it when necessary.
- Inspect the Power Cord: Check the power cord for damage. Replace it if it’s frayed or cracked.
Troubleshooting Ripping Issues
- Burning: Burning can be caused by a dull blade, slow feed rate, or misaligned fence.
- Splintering: Splintering can be caused by a dull blade or ripping against the grain.
- Inaccurate Cuts: Inaccurate cuts are usually caused by a misaligned fence.
- Kickback: Kickback is usually caused by pinching, binding, or lifting of the wood.
Frequently Asked Questions (FAQ)
- What is the best blade for ripping hardwood? A 24-30 tooth ripping blade is a good choice for hardwood.
- Can I use a miter saw for ripping? No, a miter saw is designed for crosscutting, not ripping.
- How often should I replace my table saw blade? It depends on how often you use it and the type of wood you cut. Replace it when it becomes dull or damaged.
- What is the best way to prevent tear-out when ripping? Use a sharp blade and score the cut line with a utility knife before ripping.
- Is it safe to rip plywood on a table saw? Yes, but use a blade designed for plywood to minimize splintering.
- What should I do if I experience kickback? Stay calm and let the saw do its thing. Do not try to pull the wood back.
Conclusion
Ripping wood on a table saw can be a safe and efficient process when you understand the techniques and safety precautions. By following this table saw ripping guide, using the correct ripping blade types, mastering table saw fence setup for ripping, prioritizing push stick use for ripping, and consistently ripping wood safely, you can achieve accurate and consistent results for all your woodworking projects. Always be mindful of wood grain direction when ripping and practice avoiding kickback when ripping. With practice, you’ll become proficient at table saw ripping techniques, even when tackling tricky tasks like how to rip long boards or ripping thin strips on table saw.

Hi, I’m Tom Scalisi, and welcome to The Saw Blog! I started this blog to share my hands-on experience and insights about woodworking tools—especially saws and saw blades. Over the years, I’ve had the chance to work with a wide range of tools, and I’m here to help both professionals and hobbyists make informed decisions when it comes to selecting and using their equipment. Whether you’re looking for in-depth reviews, tips, or just advice on how to get the best performance out of your tools, you’ll find it here. I’m excited to be part of your woodworking journey!