
Ever dream of crafting hit songs or producing crystal-clear podcasts? The magic often happens inside a recording studio. But how do you learn the secrets behind those amazing sounds? Choosing the right Recording Studio Program feels like navigating a maze of confusing jargon and big promises. You worry about picking a course that doesn’t teach you what you really need, wasting time and money.
Many aspiring audio engineers feel lost when trying to find a program that balances real-world skills with affordable costs. You want hands-on experience, not just boring lectures. Finding a program that truly prepares you for a career in audio production is crucial.
This guide cuts through the noise. We will break down what makes a great Recording Studio Program. You will learn exactly what features to look for, what questions to ask, and how to spot the best learning environments. Get ready to map out your path to becoming a sound expert!
Top Recording Studio Program Recommendations
![MixPad Free Multitrack Recording Studio and Music Mixing Software [Download]](https://m.media-amazon.com/images/I/71ltIxIuz1L.jpg)
- Create a mix using audio, music and voice tracks and recordings.
- Customize your tracks with amazing effects and helpful editing tools.
- Use tools like the Beat Maker and Midi Creator.

- Music software to edit, convert and mix audio files
- 8 solid reasons for the new Music Studio 11
- Record apps like Spotify, Deezer and Amazon Music without interruption
![MixPad Multitrack Recording Software for Sound Mixing and Music Production Free [Mac Download]](https://m.media-amazon.com/images/I/51kaO82jYOL.jpg)
- Mix an audio, music and voice tracks
- Record single or multiple tracks simultaneously
- Intuitive tools to split, trim, join, and many other editing features
- 8 solid reasons for the new Music Studio 11!
- Music software to edit, convert and mix audio files
- More details and easier handling with title bars - Splitting made easy - More tags for your tracks

- 248 Pages
- Author: David Franz
- Publisher : Berklee Press
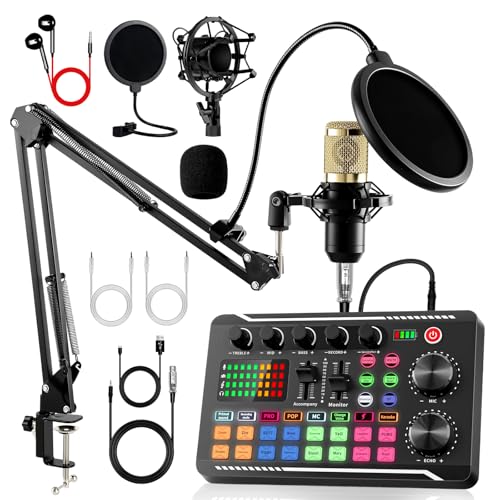
- All-in-One Professional Podcast Equipment Bundle: Complete podcast equipment bundle includes audio interface mixer, microphones, microphone boom arms, 3.5mm earphone, shock mounts, pop filters, foam caps, XLR cables, USB cable, 3.5mm audio cables. Zero extra purchases needed. Ideal for voice over starter
- Excellent Sound Quality(Cardioid pickup technology): Elevate your audio with our podcast equipment bundle, featuring advanced noise reduction and cardioid pickup technology. The dual-layer POP filter and windproof foam cap minimize background noise, the built-in Audio Interface Mixer delivers studio-quality sound
- Newly Upgrated F998 Sound Card: Featuring 16 background effects sound, 7 podcast & recording modes, 4 Voice changer modes, and 9 adjustable kinobs. Perfect for podcast beginners, no audio skills needed
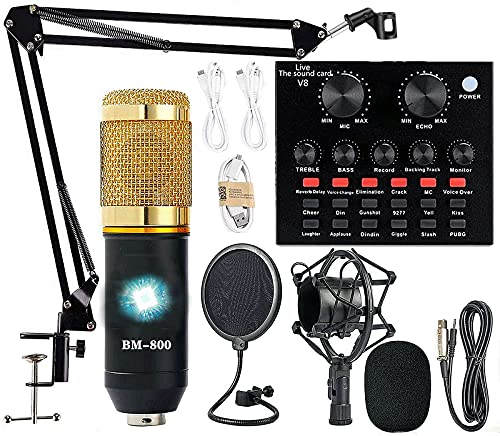
- Professional Podcast Equipment Bundle - The Podcast Equipment Bundle is equipped with BM-800 microphone, Mic adjustable suspension scissor arm stand, Shock mount, Pop filter, Anti-wind foam Cap, Power cable, Live sound card. This professional recording studio package was designed for podcasting, streaming and recording music and short video. What you get is a complete set of professional podcast equipment bundle.
- Excellent Sound Quality - The condenser microphone bundle has been designed with 2021 professional sound chipset, ensuring your voice is captured in high detail. The cardioid pickup pattern is more suitable for recording podcasts, vocals and other voice works. The condenser microphone records the sound source in front of the microphone directly and provides a rich, mellow sound.
- High Compatibility Podcast Kit - The podcast equipment bundle can be used in most mainstream operating systems such as Windows and Mac OS, in addition, the voice changer is compatible with smartphones (Android and IOS). This audio interface can be used on any mobile phone, computer, tablet iPad, PS4, Xbox, Switch and any game platform.

- Everything you need to record and produce at home in a single purchase.
- Rugged AudioBox USB 96 audio/MIDI interface for recording vocals and instruments.
- Versatile M7 large-diaphragm condenser microphone; ideal for vocals, acoustic instruments, and more.
The Ultimate Buying Guide: Choosing Your Recording Studio Program
Picking the right recording studio program is like choosing the perfect set of tools for a builder. It needs to fit your needs, your budget, and your skill level. This guide helps you sort through the noise so you can make a smart choice.
1. Key Features to Look For
A great recording program, often called a DAW (Digital Audio Workstation), must have certain strong features. These features let you capture, edit, and mix your music professionally.
Essential DAW Capabilities:
- Recording Quality (Bit Depth and Sample Rate): Look for support up to 24-bit/96kHz or higher. This means your recordings sound clear and detailed.
- MIDI Editing: If you use electronic instruments (keyboards, drum pads), strong MIDI tools let you easily change notes, timing, and velocity after recording.
- Plugin Support (VST/AU/AAX): The program must accept external effects and instrument plugins. This expands what your software can do.
- Automation: This lets you program changes over time, like making the guitar louder during the chorus or slowly adding reverb to a vocal track.
- Mixing Console View: A clear virtual mixer helps you balance the volume and effects of all your tracks easily.
2. Important Materials (Software Components)
When you buy a program, you are really buying access to several key digital “materials.”
What’s Inside the Box (Digitally Speaking):
- Included Stock Plugins: Does it come with good basic EQ (equalizer), compression, and reverb? Free, high-quality built-in tools save you money later.
- Virtual Instruments: If you don’t own expensive hardware synthesizers, good included software instruments (like realistic drums or pianos) are very important.
- Loop Library: A collection of pre-recorded sounds (loops) can help you start songs quickly.
3. Factors That Improve or Reduce Quality
The software itself doesn’t always determine the final sound quality. Your workflow and the program’s efficiency matter a lot.
Improving Quality:
- Low Latency Performance: Low latency means almost no delay between when you play a note and when you hear it through your headphones. This is crucial for comfortable recording.
- Stability: A program that rarely crashes keeps your creative flow going.
Reducing Quality (Watch Outs):
- CPU Hogging: If the program uses too much computer power, you might have to lower your recording quality settings to prevent dropouts or crackles. Older or poorly optimized software causes this problem.
- Confusing Interface: If the layout is hard to navigate, you waste time searching for basic tools, which can rush your decisions and lower the quality of your takes.
4. User Experience and Use Cases
How you plan to use the program dictates which one you should choose.
User Experience (UX):
Test the trial version if possible. Does the program feel intuitive? A good UX means you spend more time creating and less time troubleshooting. For beginners, simpler interfaces are often better.
Common Use Cases:
- Music Production (Songwriters/Producers): You need strong MIDI editing and virtual instruments.
- Podcasting/Voiceover: Focus on excellent noise reduction tools and easy batch processing for multiple voice files.
- Post-Production (Film Sound): Look for strong video synchronization features and surround sound support.
Recording Studio Program FAQs
Q: What is the biggest difference between a cheap program and an expensive one?
A: Expensive programs usually include more professional, finely tuned built-in effects and offer better technical support. However, a modern, cheaper program can often achieve the same sound quality if you use third-party plugins.
Q: Do I need a powerful computer for any recording studio program?
A: Yes, you need a reasonably modern computer. Complex projects with many tracks and effects demand a fast processor (CPU) and plenty of RAM (memory). This is a requirement for smooth operation.
Q: What does “bit depth” mean in simple terms?
A: Bit depth measures the dynamic range—the difference between the quietest and loudest sounds your software can handle without distortion or noise. Higher is better (24-bit is standard for professional recording).
Q: Should I buy software that only works on one operating system (Mac or PC)?
A: If you think you might switch computers later, choose a program that works on both, or check if your current choice supports your system well. Compatibility is important.
Q: Are free recording programs good enough to start with?
A: Yes, many free options are excellent for learning the basics of recording and editing. They help you understand workflows before you invest serious money.
Q: How important is the “latency” setting?
A: Latency is very important when recording live instruments or vocals. High latency makes you hear a delay, making it impossible to play in time. Good software manages this delay well.
Q: What is a “stock plugin”?
A: A stock plugin is an effect or instrument that comes bundled free with the recording program you purchase. They are the program’s native tools.
Q: How do I know if a program supports my existing audio interface?
A: Most professional programs use standard drivers like ASIO (for Windows) or Core Audio (for Mac). If your audio interface is modern, it will almost certainly work with major DAWs.
Q: If I buy a program, do I still need to buy microphones?
A: Absolutely. The software records the sound captured by your microphone and hardware. The software does not replace the need for physical input devices.
Q: Can I switch from one DAW to another later on?
A: Yes, you can switch. However, you will have to relearn the specific shortcuts and layout of the new program. Learning one DAW makes learning the next one much easier.

Hi, I’m Tom Scalisi, and welcome to The Saw Blog! I started this blog to share my hands-on experience and insights about woodworking tools—especially saws and saw blades. Over the years, I’ve had the chance to work with a wide range of tools, and I’m here to help both professionals and hobbyists make informed decisions when it comes to selecting and using their equipment. Whether you’re looking for in-depth reviews, tips, or just advice on how to get the best performance out of your tools, you’ll find it here. I’m excited to be part of your woodworking journey!