
Imagine unearthing a dusty box filled with old family photos, but instead of prints, you find rolls of film negatives. These tiny strips hold precious memories, a window into your past, but how do you bring them back to life? For many, the dream of reliving these moments hits a wall when it comes to digitizing them. Choosing the right scanner can feel like navigating a maze. You want clear, vibrant images, but the technical jargon and endless models can be confusing and frustrating.
But don’t let those negatives stay hidden! This guide is here to help. We’ll break down what you need to know to pick the perfect scanner. You’ll learn about the features that matter most, what to look out for, and how to avoid common pitfalls. By the end, you’ll feel confident in your choice, ready to transform those forgotten negatives into digital treasures you can share and enjoy for years to come.
Our Top 5 Scanner To Scan Negatives Recommendations at a Glance
Top 5 Scanner To Scan Negatives Detailed Reviews
1. KODAK Slide N SCAN Film & Slide Scanner Digitizer with 5” LCD Screen

Rating: 9.3/10
Rediscover your cherished memories with the KODAK Slide N SCAN Film & Slide Scanner Digitizer. This device lets you quickly turn old film negatives and slides into clear digital photos. It’s easy to use and helps you save those precious moments forever.
What We Like:
- Lets you save old photo memories by converting negatives and slides (135, 110, 126mm) to digital files.
- Has a big 5-inch LCD screen that lets you see and edit your photos right away.
- The gallery mode is great for sharing with family and friends or using it as a digital photo frame.
- Easy-load film inserts make scanning fast and simple.
- Built-in editing tools let you fix photos with just one touch.
- It looks stylish and fits nicely in your home.
- Connects easily to computers with a Type-C USB.
What Could Be Improved:
- You need to buy an SD card separately, as it’s not included.
This scanner is a wonderful way to bring your old photos back to life. You’ll love seeing your memories in a new, digital way.
2. Kodak Slide N Scan Max Digital Film Slide Scanner

Rating: 8.6/10
Dust off those old photo albums! The Kodak Slide N Scan Max Digital Film Slide Scanner (RODFS70) is here to help you bring your cherished memories back to life. This cool device turns your old film negatives and slides into digital files, so you can see and share them easily.
What We Like:
- It saves your old color and black & white negatives (135, 110, 126mm) and 50mm slides (135, 110, 126mm) into digital files.
- The big 7-inch LCD screen lets you see your photos clearly.
- You can even use it as a digital picture frame!
- Loading film is super easy and fast with the special tray.
- It comes with everything you need, like adapters for different film types and a cleaning brush.
- Editing is a breeze with just one touch – no complicated steps!
- It looks really stylish and fits nicely in your home.
- It works with SD or SDHC cards up to 32GB and connects to computers with Type-C USB.
What Could Be Improved:
- An SD card is not included, so you’ll need to buy one separately.
- An HDMI cable is not included if you want to connect it to a TV.
This scanner makes it simple to preserve your past. It’s a fantastic way to relive those special moments and share them with everyone.
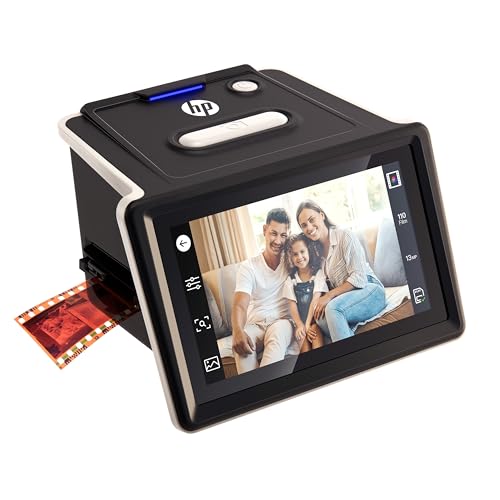
3. HP FilmScan Touch Screen Film & Slide Scanner Digitizer with 5” LCD Screen
Rating: 8.7/10
Rediscover your cherished photo memories with the HP FilmScan Touch Screen Film & Slide Scanner Digitizer. This handy device lets you easily convert old negatives and slides into digital JPEG photos. Its large 5-inch LCD touch screen makes viewing, editing, and saving your pictures a breeze. Get ready to share your past with friends and family!
What We Like:
- Preserve your memories: Easily convert color and black-and-white negatives and slides to digital photos.
- Big, clear touch screen: The 5-inch LCD screen lets you preview and edit photos with a wide viewing angle.
- Easy to use film loading: The quick-feed tray handles 135, 110, and 126 film strips and mounted slides.
- Simple editing tools: Adjust size, color, and brightness right on the device. It even automatically crops your images.
- Everything you need is included: It comes with holders, adapters, a cleaning brush, and a USB cable.
- Great gift idea: Perfect for anyone who loves photography, from beginners to experienced users.
What Could Be Improved:
- Film must be in strips: The scanner works best with film strips, not individual frames cut too short.
- Slides need to be mounted: You’ll need to use mounted slides (standard 50mm frames) for best results.
This HP FilmScan scanner is a fantastic way to bring your old photos back to life. It’s simple to operate and makes digitizing your memories fun and easy.
4. BEONEGLOBAL ClearScan S5 Film Scanner High-Resolution Film&Slide Scanner with 5” LCD – Convert 135

Rating: 9.2/10
Rediscover your precious memories with the BEONEGLOBAL ClearScan S5 Film Scanner. This handy device easily turns your old 135, 126, 110, and Super8 negatives and slides into sharp, digital JPEG photos at a high 24MP resolution. It’s designed for quick and simple use, letting you bring your film collection back to life without any fuss.
What We Like:
- The front-panel controls are placed perfectly below the screen. This makes operating the scanner easy and comfortable.
- It scans at a high 24MP with a good CMOS sensor. This ensures your digital photos are clear and show true colors.
- The large 5-inch LCD screen lets you see your scanned pictures right away. You can check them before you save.
- Loading films and slides is quick and smooth. The design helps prevent jams.
- Scanning is super easy. Just press a button to scan or make simple edits.
- You can save your scans to the built-in memory or an SD card. Transferring files to your computer with a USB cable is also simple.
What Could Be Improved:
- The built-in memory is only 128MB, which is quite small. You will likely need to buy an SD card.
- An SD card is not included with the scanner.
The BEONEGLOBAL ClearScan S5 offers a simple and effective way to digitize your old film. It’s a great tool for anyone wanting to preserve their photographic history.
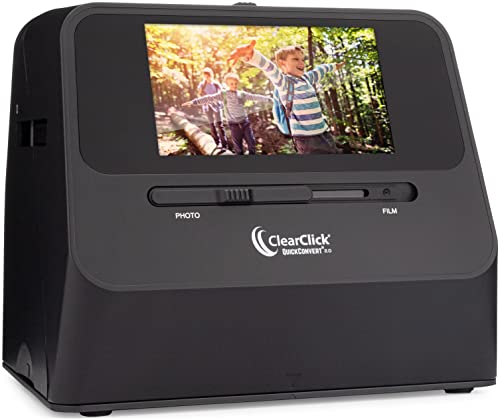
5. ClearClick QuickConvert 2.0 Photo
Rating: 8.6/10
Bring your old memories back to life with the ClearClick QuickConvert 2.0 Photo, Slide, and Negative Scanner. This handy device lets you easily turn your precious photos, slides, and negatives into digital files. It’s super fast and doesn’t even need a computer to work!
What We Like:
- Scans photos, slides, and negatives quickly in just 2-3 seconds.
- No computer or complicated setup needed – just turn it on and scan.
- Captures images at 14 megapixels (22 megapixels interpolated) for great detail.
- Built-in rechargeable battery lets you scan anywhere without cords.
- A 5-inch screen lets you see what you’re scanning instantly.
- You can scan photos right from your albums or mounts.
- Comes with a 2-year warranty and support from a US-based small business.
What Could Be Improved:
- It scans one item at a time; there’s no automatic feeder.
- It can’t scan photos larger than 4×6 inches (it does not support 5×7 photos).
This scanner is a fantastic tool for anyone wanting to preserve their memories digitally. It’s simple to use and delivers great results without any hassle.
Your Guide to Scanning Old Negatives
Do you have boxes of old film negatives tucked away? These little strips of film hold precious memories. Scanning them can bring those photos back to life. This guide will help you choose the best scanner for your needs.
Why Scan Your Negatives?
Scanning negatives lets you:
- Save old photos from fading or damage.
- Share memories easily with family and friends online.
- Print new copies of your favorite pictures.
- Organize your photo collection digitally.
Key Features to Look For
Resolution (DPI)
Resolution tells you how much detail a scanner can capture. It’s measured in dots per inch (DPI). Higher DPI means more detail. For good quality scans, aim for at least 2400 DPI. If you plan to make large prints, look for 4800 DPI or higher.
Speed
Scanning can take time. Some scanners are faster than others. If you have many negatives, a faster scanner will save you a lot of time.
Ease of Use
Some scanners are very simple. Others have lots of settings. If you’re new to scanning, choose a scanner with an easy-to-understand interface.
Software
Good scanning software helps you edit your images. Look for software that can remove dust and scratches. It should also let you adjust colors and brightness.
Types of Scanners
Dedicated Film Scanners
These scanners are made just for film. They often give the best results. They have special holders for negatives and slides.
Flatbed Scanners with Transparency Adapters
These are regular scanners for documents and photos. Some come with a special lid or attachment for scanning film. They are more versatile if you also need to scan paper.
All-in-One Printers
Some printers can also scan negatives. They are convenient if you already have one. However, the quality might not be as good as dedicated scanners.
Important Materials and Build Quality
Most scanners are made of plastic. Look for a sturdy build. A scanner that feels cheap might break easily. The scanning bed on flatbed scanners should be smooth glass. This prevents new scratches on your film.
Factors That Improve or Reduce Quality
Scanner Resolution
As mentioned, higher DPI is better for detail.
Dust and Scratch Removal
Many scanners have built-in tools to fix dust and scratches. These features are very helpful for old negatives.
Color Accuracy
Good scanners reproduce colors faithfully. This means the scanned image looks like the original negative.
Light Source
The light inside the scanner is important. A good light source ensures even illumination across the film.
Your Technique
Keep your scanner clean. Handle negatives with care. Dust on the negative will show up in the scan. Use a soft brush or canned air to clean them.
User Experience and Use Cases
For the Hobbyist Photographer
If you love photography and want to preserve your film work, a dedicated film scanner is a great choice. You can get high-quality scans for printing or sharing online.
For Preserving Family History
If you have boxes of old family photos on negatives, a user-friendly scanner will make the process easier. You can digitize these memories for future generations.
For Archiving Collections
Professional archivists or serious collectors might need scanners with advanced features for precise color control and high resolution.
Frequently Asked Questions About Negative Scanners
Q: What’s the difference between DPI and PPI?
A: DPI stands for Dots Per Inch and is used for printers. PPI stands for Pixels Per Inch and is used for digital images and scanners. For scanners, you’ll usually see PPI, but people often use DPI interchangeably.
Q: Do I need special software to scan negatives?
A: Most scanners come with their own software. Some advanced users might prefer third-party software for more control.
Q: Can I scan color and black and white negatives?
A: Yes, most scanners can handle both color and black and white negatives.
Q: How long does it take to scan a negative?
A: It depends on the scanner and the resolution. It can take from less than a minute to several minutes per negative.
Q: Will scanning damage my negatives?
A: No, scanning is a non-contact process. The scanner doesn’t touch the negative, so it won’t harm it.
Q: How much do negative scanners cost?
A: Prices vary widely, from around $100 for basic models to over $500 for professional ones.
Q: What is a transparency adapter?
A: It’s a special part of a flatbed scanner that allows you to scan film, slides, and negatives. It shines light through the film.
Q: Can I scan slides too?
A: Yes, many scanners that scan negatives can also scan slides. Just make sure it has the correct holders.
Q: How do I clean my negatives before scanning?
A: Use a soft brush or canned air. Never touch the surface of the negative with your fingers.
Q: What’s the best way to store my scanned images?
A: Save them on your computer’s hard drive, an external hard drive, and in cloud storage for extra safety.
In conclusion, every product has unique features and benefits. We hope this review helps you decide if it meets your needs. An informed choice ensures the best experience.
If you have any questions or feedback, please share them in the comments. Your input helps everyone. Thank you for reading.

Hi, I’m Tom Scalisi, and welcome to The Saw Blog! I started this blog to share my hands-on experience and insights about woodworking tools—especially saws and saw blades. Over the years, I’ve had the chance to work with a wide range of tools, and I’m here to help both professionals and hobbyists make informed decisions when it comes to selecting and using their equipment. Whether you’re looking for in-depth reviews, tips, or just advice on how to get the best performance out of your tools, you’ll find it here. I’m excited to be part of your woodworking journey!