
A compound miter saw is a versatile power tool used for making accurate crosscuts, miter cuts, and bevel cuts in wood and other materials. This guide will walk you through everything you need to know about miter saw basics, compound miter saw angles, cutting crown molding miter saw, miter saw safety tips, bevel cuts miter saw, crosscuts with miter saw, miter saw blade types, achieving accurate miter saw cuts, using a dual bevel miter saw, and essential miter saw techniques.
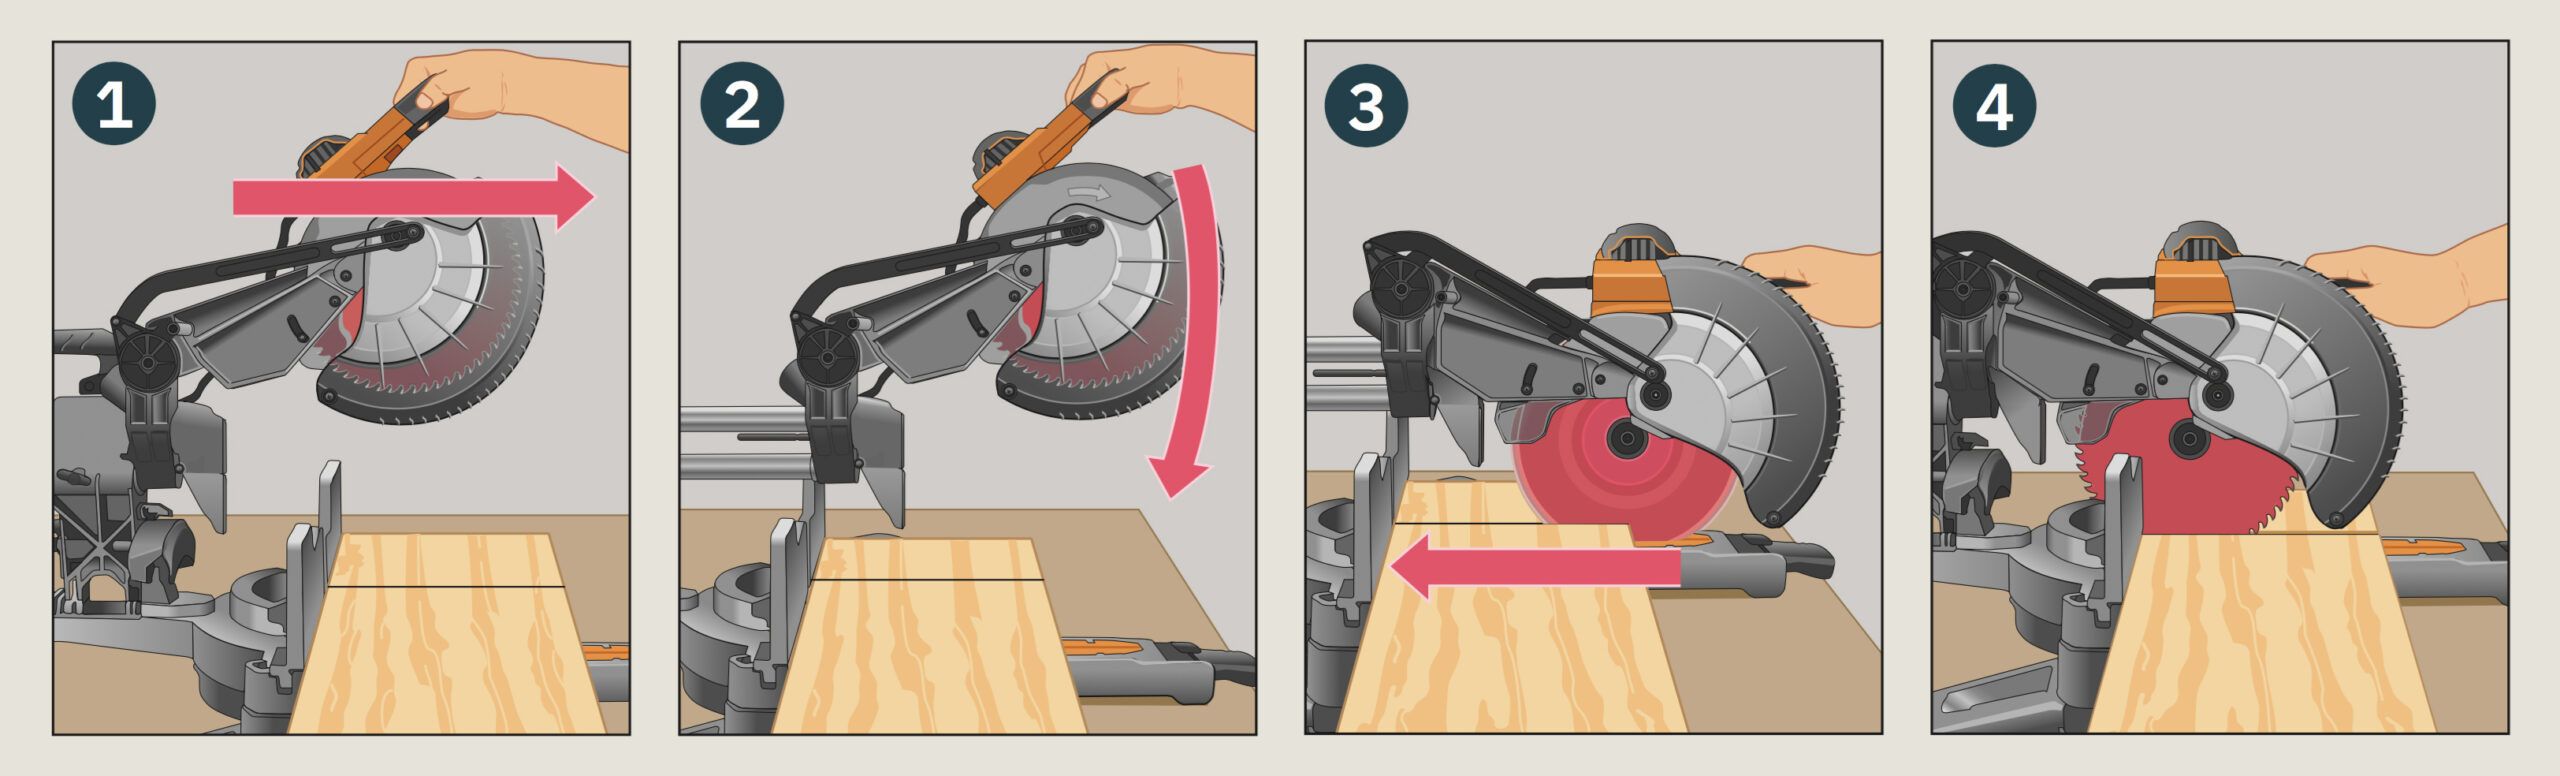
Image Source: s42814.pcdn.co
Getting Started with Miter Saws
Before you even think about cutting wood, it’s essential to understand the anatomy of a miter saw and how each part functions. Knowing your tool well is the first step toward accurate and safe cuts.
Miter Saw Components: A Quick Overview
| Component | Function |
|---|---|
| Base | Provides a stable platform for the saw. |
| Fence | A vertical guide that supports the workpiece during the cut. |
| Miter Scale | Indicates the miter angle (left or right). |
| Miter Lock | Secures the miter angle setting. |
| Bevel Scale | Indicates the bevel angle (tilt of the blade). |
| Bevel Lock | Secures the bevel angle setting. |
| Blade Guard | Protects the user from the blade; should retract automatically. |
| Trigger | Activates the motor and blade. |
| On/Off Switch | Controls the power to the saw. |
| Dust Port | Allows connection to a dust collection system. |
| Hold-Down Clamp | Secures the workpiece to the fence and base. |
Essential Safety Gear
Miter saw safety tips are paramount. Never operate a miter saw without the proper safety gear:
- Safety Glasses: Protect your eyes from flying debris.
- Hearing Protection: Miter saws are loud.
- Dust Mask or Respirator: Protect your lungs from fine dust particles.
- Work Gloves: Improve your grip and protect your hands.
- Close-Toed Shoes: Protect your feet.
Safety Best Practices
- Read the Manual: Familiarize yourself with the saw’s specific features and safety instructions.
- Inspect the Saw: Check for loose parts, damaged cords, or any other issues before each use.
- Secure the Workpiece: Use clamps to hold the material firmly against the fence.
- Keep Hands Clear: Never place your hands near the blade path.
- Let the Blade Stop: Wait for the blade to come to a complete stop before lifting it from the workpiece.
- Unplug When Changing Blades: Avoid accidental start-ups.
- Don’t Force the Cut: Let the blade do the work.
- Never Remove Safety Guards: These are there to protect you.
- Ensure Proper Lighting: A well-lit workspace is crucial for safety.
Making Straight Cuts: Crosscuts with Miter Saw
The most basic cut you’ll make with a miter saw is a crosscut, which is simply cutting the material straight across at a 90-degree angle. Here’s how to do it properly:
- Set the Miter Angle: Ensure the miter angle is set to 0 degrees. Lock it securely.
- Place the Wood: Position the wood flat on the base, with one edge firmly against the fence.
- Secure the Wood: Use a clamp to hold the wood in place. This is especially important for smaller pieces.
- Start the Saw: Turn on the saw and let the blade reach full speed.
- Lower the Blade: Slowly and steadily lower the blade through the wood.
- Complete the Cut: Keep the blade running until it has completely cleared the wood.
- Release the Trigger: Let the blade stop completely before raising the saw head.
Deciphering Miter Cuts: Creating Angled Crosscuts
A miter cut involves cutting the wood at an angle other than 90 degrees. This is commonly used for creating corners in frames and trim work.
- Set the Miter Angle: Loosen the miter lock and rotate the saw head to the desired angle. Use the miter scale for accuracy. Tighten the miter lock.
- Place the Wood: Position the wood as you would for a crosscut, ensuring it’s flush against the fence.
- Secure the Wood: Clamp the wood securely.
- Start and Cut: Follow the same procedure for starting the saw and lowering the blade as you would for a crosscut.
Fathoming Bevel Cuts: Tilting the Blade
A bevel cut involves tilting the saw blade to create an angled cut through the thickness of the wood. This is often used for creating decorative edges or joining pieces at non-right angles.
- Set the Bevel Angle: Loosen the bevel lock and tilt the saw head to the desired angle. Use the bevel scale for accuracy. Tighten the bevel lock.
- Place and Secure the Wood: Position and secure the wood as you would for a crosscut.
- Start and Cut: Follow the same procedure for starting the saw and lowering the blade.
Comprehending Compound Cuts: Miter and Bevel Together
A compound cut combines both a miter angle and a bevel angle. This is frequently used in crown molding installation and other complex joinery.
- Set Both Angles: Set both the miter angle and the bevel angle to the required settings. Double-check that they are accurate.
- Place and Secure the Wood: Position and clamp the wood carefully.
- Start and Cut: Start the saw and lower the blade steadily, maintaining control throughout the cut.
Cutting Crown Molding Miter Saw: A Detailed Guide
Cutting crown molding miter saw requires precision and a solid understanding of angles. Crown molding is installed at an angle where the ceiling meets the wall, and the cuts need to match this angle for a seamless fit. There are two common methods: cutting “flat” and cutting “nested.”
Method 1: Cutting Crown Molding Flat
To do this, you’ll lay the crown molding flat on the saw’s base. You’ll need to figure out two specific angles—the miter and the bevel—based on the “spring angle” (which is just the tilt of the molding when it’s against the wall and ceiling). Don’t worry about the math, though; there are plenty of easy charts and online calculators that can give you the exact numbers you need.
- Determine the Angles: Use a crown molding angle calculator to find the correct miter and bevel angles based on your crown molding’s spring angle.
- Set the Angles: Set the miter and bevel angles on your saw accordingly.
- Position the Molding: Lay the crown molding flat on the saw, with the ceiling side facing up.
- Make the Cut: Start the saw and lower the blade smoothly through the molding.
Method 2: Cutting Crown Molding Nested
This method involves “nesting” the crown molding in the saw, mimicking the angle at which it will be installed. This method generally requires only miter cuts and no bevel cuts. The spring angle is achieved by the angle at which you nest the molding.
- Build a Jig (Optional): While not essential, a jig can help to hold the crown molding securely at the correct angle.
- Position the Molding: Place the crown molding against the fence and the saw’s table, mimicking its installed position.
- Set the Miter Angle: Determine the appropriate miter angle based on whether you’re cutting an inside or outside corner.
- Make the Cut: Start the saw and lower the blade carefully through the molding.
Inside vs. Outside Corners
When cutting crown molding, you’ll encounter inside and outside corners.
- Inside Corners: The two pieces of molding meet inside the corner. The longer point of the mitered cut will be on the top edge of the molding.
- Outside Corners: The two pieces of molding meet outside the corner. The longer point of the mitered cut will be on the bottom edge of the molding.
Tips for Accurate Crown Molding Cuts
- Practice Cuts: Before cutting your actual crown molding, make some practice cuts on scrap pieces to ensure your angles are correct.
- Measure Carefully: Accurate measurements are crucial for a seamless fit. Use a precise measuring tape and double-check your measurements.
- Use a Stop Block: For repetitive cuts, use a stop block to ensure each piece is cut to the exact same length.
- Cope Inside Corners (Alternative): For inside corners, consider coping one of the pieces. This involves cutting away the back of one piece of molding to match the profile of the other. Coping provides a tighter, more forgiving fit, especially in corners that aren’t perfectly square.
Miter Saw Blade Types: Choosing the Right One
The miter saw blade types you choose greatly affect the quality of your cuts. Different blades are designed for different materials and purposes.
| Blade Type | Teeth | Application |
|---|---|---|
| General Purpose | 40-60 | Cutting a variety of woods; a good all-around option. |
| Fine-Tooth Finish Blade | 60-80+ | Producing smooth, splinter-free cuts in hardwoods and delicate materials. |
| Combination Blade | 50-70 | Suitable for both ripping and crosscutting. |
| Metal Cutting Blade | High | Cutting non-ferrous metals such as aluminum and copper. |
| Abrasive Cut-off Wheel | N/A | Cutting steel and other ferrous metals. |
Blade Maintenance
Keep your blades sharp and clean for optimal performance. Dull blades can cause splintering and increase the risk of kickback. Clean blades regularly with a brush and blade cleaner to remove resin and pitch. Replace blades when they become excessively dull or damaged.
Achieving Accurate Miter Saw Cuts
Accurate miter saw cuts are essential for professional-looking results. Here are some tips to ensure your cuts are precise:
- Calibrate Your Saw: Check the accuracy of your saw’s miter and bevel scales and adjust them if necessary.
- Use a Square: Use a speed square or combination square to verify that the fence is square to the blade.
- Secure the Workpiece: A wobbly workpiece will lead to inaccurate cuts. Always use clamps.
- Make Gradual Cuts: Avoid forcing the blade through the wood. Let the blade do the work.
- Avoid Blade Deflection: Use a blade stabilizer if you’re cutting thick or dense materials.
- Check Your Measurements: Double-check all measurements before making the cut.
- Test Cuts are Key: Always perform test cuts on scrap material before cutting your final pieces.
Using a Dual Bevel Miter Saw
A using a dual bevel miter saw has the ability to tilt the blade to the left and right. This allows you to make bevel cuts in either direction without having to flip the workpiece, saving time and increasing efficiency. This is especially useful when cutting crown molding or other trim that requires complex angles.
Benefits of a Dual Bevel Saw
- Increased Efficiency: No need to flip the workpiece for opposite bevel cuts.
- Greater Flexibility: Easier to make complex cuts and angles.
- Improved Accuracy: Reduces the risk of errors when flipping the workpiece.
Considerations When Choosing a Dual Bevel Saw
- Cost: Dual bevel saws are generally more expensive than single bevel saws.
- Weight: They may be heavier and more difficult to transport.
- Size: Dual bevel saws can be larger, requiring more workspace.
Miter Saw Techniques: Advanced Tips
- Cutting Curves: While miter saws are primarily for straight cuts, you can use a series of small, angled cuts to approximate a curve. This is not ideal for precise curves but can work in a pinch.
- Cutting Dadoes and Rabbets: With the right blade and technique, you can use a miter saw to cut dadoes (grooves) and rabbets (notches) in wood. This requires multiple passes and careful setup.
- Cutting Metal: Some miter saws can be used to cut metal with the appropriate blade. However, it’s essential to use a saw specifically designed for metal cutting and to follow all safety precautions.
Frequently Asked Questions (FAQ)
What is the difference between a miter saw and a chop saw?
A chop saw typically only makes 90-degree crosscuts, while a miter saw can make angled cuts (miter cuts). A compound miter saw adds the ability to make bevel cuts.
Can I cut metal with a miter saw?
Yes, but you need to use a miter saw specifically designed for metal cutting and the appropriate metal-cutting blade. Never use a wood-cutting blade to cut metal.
Who is a miter saw best suited for?
Miter saws are best suited for carpenters, woodworkers, and DIY enthusiasts who need to make accurate crosscuts, miter cuts, and bevel cuts in wood and other materials.
How do I prevent tear-out when cutting wood with a miter saw?
Use a sharp, fine-tooth blade, clamp the wood securely, and use a zero-clearance insert. Score the cut line with a utility knife before cutting to help prevent splintering.
What is the best way to calibrate a miter saw?
Use a combination square and a protractor to check the accuracy of the miter and bevel scales. Adjust the saw according to the manufacturer’s instructions. There are many videos online showing how to do this.
By following these guidelines and practicing regularly, you can become proficient in using a compound miter saw and achieve accurate, professional-looking results in your woodworking projects.

Hi, I’m Tom Scalisi, and welcome to The Saw Blog! I started this blog to share my hands-on experience and insights about woodworking tools—especially saws and saw blades. Over the years, I’ve had the chance to work with a wide range of tools, and I’m here to help both professionals and hobbyists make informed decisions when it comes to selecting and using their equipment. Whether you’re looking for in-depth reviews, tips, or just advice on how to get the best performance out of your tools, you’ll find it here. I’m excited to be part of your woodworking journey!