
A band saw is simply a power tool that uses a long blade running in a continuous loop over a set of wheels. It is mostly used for cutting wood. Even if you have never touched one before, this guide will show you how to use it safely and the right way. We will cover everything you need to know, from picking the right blade to mastering the moves that help you get a perfect cut every time.
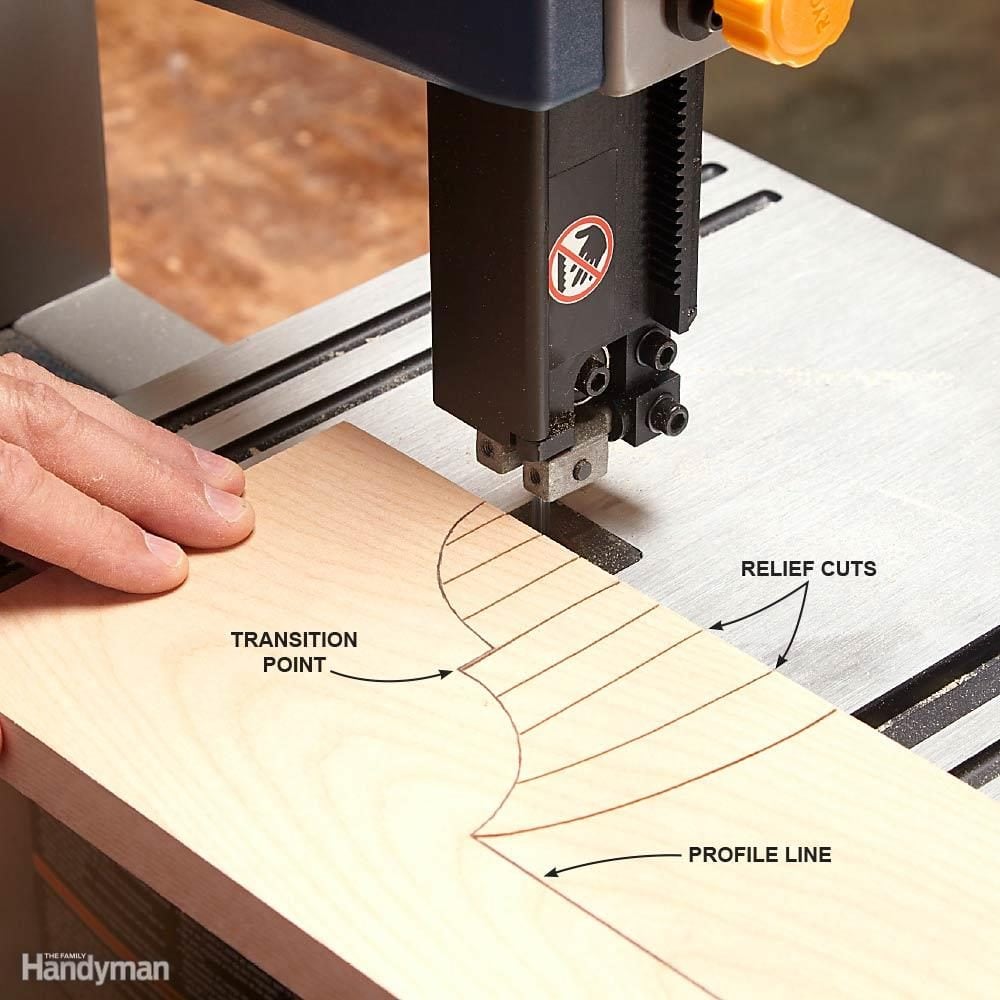
Image Source: www.familyhandyman.com
Getting Started With Your Band Saw
Before you even switch on your band saw, familiarizing yourself with its parts and functions is crucial.
Core Parts of a Band Saw
- Frame: The main body that houses all the components.
- Wheels: Rotate to drive the blade. Most band saws have two wheels, but some have three.
- Blade: The continuous loop of toothed metal that does the cutting.
- Table: The flat surface where you place the material you’re cutting. It can often be tilted for angled cuts.
- Blade Guides: Support the blade above and below the table, preventing it from wandering during the cut.
- Motor: Provides the power to turn the wheels.
- Tracking Adjustment: Allows you to center the blade on the wheels.
- Tension Adjustment: Controls the tightness of the blade.
- Fence: A guide that runs parallel to the blade for straight cuts.
- Miter Gauge Slot: A slot in the table to accommodate a miter gauge for angled crosscuts.
Setting Up Your Workspace
A clean, well-lit workspace is important for safe and accurate band saw operation.
- Clear the Area: Remove any clutter from around the band saw.
- Good Lighting: Ensure you have adequate lighting to see the cut line clearly.
- Stable Surface: The band saw should be placed on a level and stable surface.
Band Saw Safety Tips: Prioritizing Protection
Safety should always be your first concern when using a band saw.
- Wear Safety Glasses: Protect your eyes from flying debris.
- Use a Dust Mask: Avoid breathing in sawdust, especially when cutting treated wood.
- Hearing Protection: Band saws can be noisy; wear earplugs or earmuffs.
- Appropriate Clothing: Avoid loose clothing, jewelry, or long hair that could get caught in the blade.
- Push Sticks: Use push sticks or pads to guide the material, keeping your hands away from the blade.
- Inspect the Blade: Always check the blade for cracks, damage, or dullness before each use.
- Proper Tension: Ensure the blade has the correct tension. Too loose and it will wander; too tight and it could break.
- Turn Off the Saw: Always turn off the saw and wait for the blade to stop completely before making adjustments or clearing debris.
- Never Reach Over the Blade: Avoid reaching over the blade while the saw is running.
- Unplug the Saw: Unplug the saw before performing any maintenance or blade changes.
Important Safety Checklist
| Item | Action |
|---|---|
| Safety Glasses | Wear at all times. |
| Dust Mask | Use when cutting wood. |
| Hearing Protection | Wear when operating the saw. |
| Clothing | Avoid loose items. |
| Push Sticks | Use for small or awkward pieces. |
| Blade Inspection | Check before each use. |
| Power | Unplug before adjustments. |
Band Saw Blade Selection: Choosing the Right Tool
Selecting the correct blade is important for achieving the best results and extending the life of your band saw.
- Width: A wider blade is best for straight cuts, while a narrower blade is needed for curves.
- Thickness: A thicker blade is more durable but requires more power.
- Tooth Configuration: Different tooth patterns are designed for different materials.
- Regular Tooth: Suitable for general-purpose cutting of wood and plastic.
- Skip Tooth: Best for cutting softer materials like plastic and non-ferrous metals.
- Hook Tooth: Aggressive cutting action, ideal for thicker wood.
- Teeth Per Inch (TPI): The number of teeth per inch affects the smoothness and speed of the cut.
- High TPI (14-24): Produces a smoother finish, ideal for thin materials and intricate cuts.
- Low TPI (3-6): Cuts faster and removes more material, suitable for thick stock and resawing.
Blade Selection Chart
| Material | Blade Width | TPI | Tooth Type |
|---|---|---|---|
| Soft Wood | 1/4″ – 3/8″ | 6-10 | Hook/Regular |
| Hard Wood | 3/8″ – 1/2″ | 8-12 | Regular |
| Thin Wood | 1/8″ – 1/4″ | 14-24 | Regular |
| Non-Ferrous Metal | 1/4″ – 3/8″ | 10-18 | Skip |
| Plastic | 1/4″ – 3/8″ | 10-14 | Skip/Regular |
How to Adjust a Band Saw: Optimizing Performance
Proper adjustment is necessary for accurate cuts and prolonging blade life.
Adjusting Blade Tension
Blade tension is important. Too loose, and the blade will wander, leading to inaccurate cuts. Too tight, and it can break or damage the saw.
- Consult the Manual: Refer to your band saw’s manual for the manufacturer’s recommended tension settings.
- Use the Tension Gauge: Most band saws have a tension gauge. Adjust the tension knob until the gauge indicates the correct setting for your blade size.
- Check Blade Flex: Pluck the blade like a guitar string. It should produce a clear, consistent tone. If it sounds dull or flat, increase the tension.
Aligning Blade Guides
Blade guides support the blade and prevent it from twisting or bending during the cut.
- Upper Guides: Adjust the upper guides so they are close to the material being cut, but not touching it.
- Lower Guides: Position the lower guides so they are just behind the blade’s teeth.
- Side Bearings/Blocks: Ensure the side bearings or blocks are snug against the blade, but not binding. There should be a very slight gap.
Tracking the Blade
Blade tracking refers to the position of the blade on the wheels.
- Turn on the Saw: Briefly turn on the saw and observe the blade’s position on the wheels.
- Adjust the Tracking Knob: Use the tracking knob to adjust the blade’s position until it is centered on the wheels.
- Check Regularly: Check the tracking periodically, especially after changing the blade.
Band Saw Cutting Guide: Basic Band Saw Techniques
Straight Cuts
For making straight cuts:
- Use a Fence: Attach a fence to the band saw table parallel to the blade.
- Set the Fence: Adjust the fence to the desired width.
- Feed Slowly: Feed the material slowly and steadily along the fence.
- Keep Pressure Consistent: Maintain consistent pressure against the fence.
Curved Cuts with Band Saw
For cutting curves:
- Choose a Narrow Blade: A narrow blade allows for tighter curves.
- Mark the Cut Line: Clearly mark the cut line on your material.
- Feed Slowly: Feed the material slowly, following the marked line.
- Relief Cuts: For tight curves, make relief cuts perpendicular to the curve to relieve tension in the wood.
- Practice: Practice on scrap material to get a feel for the saw’s handling.
Resawing with a Band Saw
Resawing is cutting a board lengthwise to create thinner pieces.
- Use a Wide Blade: A wide blade provides more stability for resawing.
- Set the Fence: Set the fence to the desired thickness.
- Use Feather Boards: Use feather boards to keep the material tight against the fence and table.
- Feed Slowly: Feed the material slowly and steadily.
- Adjust Height: Adjust the height of the upper guide to match the thickness of the material.
Band Saw Fence Setup: Achieving Precision
Setting up the fence accurately is critical for straight and consistent cuts.
- Clean the Table: Ensure the table surface is clean and free of debris.
- Attach the Fence: Securely attach the fence to the table.
- Align the Fence: Use a square to ensure the fence is perpendicular to the blade.
- Lock the Fence: Tighten the locking mechanism to secure the fence in place.
- Test: make test cut to confirm all your steps are accurate.
Band Saw Projects for Beginners: Start Simple
Starting with simple projects can help you build your skills and confidence.
- Cutting Boards: Simple rectangular or shaped cutting boards are a great way to practice straight and curved cuts.
- Wooden Toys: Basic wooden toys, like cars or animals, involve simple shapes and curves.
- Small Boxes: Constructing small wooden boxes requires accurate cuts and joinery.
- Picture Frames: Making picture frames provides practice with angled cuts and mitering.
Project Ideas
| Project | Skills Practiced | Materials Needed |
|---|---|---|
| Cutting Board | Straight Cuts | Wood |
| Wooden Car | Curved Cuts | Wood |
| Small Box | Accurate Cuts | Wood, Glue |
| Picture Frame | Angled Cuts | Wood |
Band Saw Maintenance: Keeping Your Saw in Top Shape
Regular maintenance will keep your band saw running smoothly and prolong its life.
- Clean the Saw: Regularly remove sawdust and debris from the saw.
- Lubricate Moving Parts: Lubricate the blade guides and other moving parts as needed.
- Check the Tires: Inspect the tires on the wheels for wear and tear. Replace them if they are cracked or damaged.
- Sharpen or Replace Blades: Dull blades can cause inaccurate cuts and put extra strain on the motor. Sharpen or replace blades as needed.
- Inspect the Motor: Check the motor for any signs of overheating or damage.
- Store Properly: When not in use, store the band saw in a dry, protected area.
Maintenance Schedule
| Task | Frequency |
|---|---|
| Clean Sawdust | After each use |
| Lubricate Parts | Monthly |
| Inspect Tires | Quarterly |
| Sharpen/Replace Blade | As needed |
| Inspect Motor | Annually |
Frequently Asked Questions (FAQ)
Can I cut metal with a band saw? Yes, with the correct blade and speed settings. Use a blade designed for metal cutting and reduce the saw’s speed.
How do I prevent the blade from wandering? Ensure the blade has the correct tension, the blade guides are properly aligned, and you are feeding the material slowly and steadily.
What is the best blade for cutting curves? A narrow blade with a high TPI is best for cutting tight curves.
How often should I replace the blade? Replace the blade when it becomes dull or damaged, or when it no longer cuts accurately.
How do I adjust the speed of my band saw? Some band saws have variable speed settings. Consult your owner’s manual for instructions on adjusting the speed.
Who is qualified to repair a band saw? A qualified technician should perform complex repairs. Simple maintenance, like blade changes and cleaning, can be done by the user.
What is the ideal band saw for beginner woodworkers? A smaller benchtop model with a 9″ to 10″ throat capacity is often suitable for beginners due to its affordability and manageable size. Look for features like adjustable blade guides, a tilting table, and a reliable motor.

Hi, I’m Tom Scalisi, and welcome to The Saw Blog! I started this blog to share my hands-on experience and insights about woodworking tools—especially saws and saw blades. Over the years, I’ve had the chance to work with a wide range of tools, and I’m here to help both professionals and hobbyists make informed decisions when it comes to selecting and using their equipment. Whether you’re looking for in-depth reviews, tips, or just advice on how to get the best performance out of your tools, you’ll find it here. I’m excited to be part of your woodworking journey!