
Changing a Dewalt table saw blade isn’t hard, but it needs to be done right to keep you safe and your saw working well. How to loosen table saw blade? You loosen the blade by using the wrenches that came with your saw to undo the arbor nut. This guide will show you how to handle dewalt table saw blade replacement safely and easily with clear table saw blade change steps. We’ll walk you through the whole table saw blade change procedure, from removing the old blade to properly installing the new one.
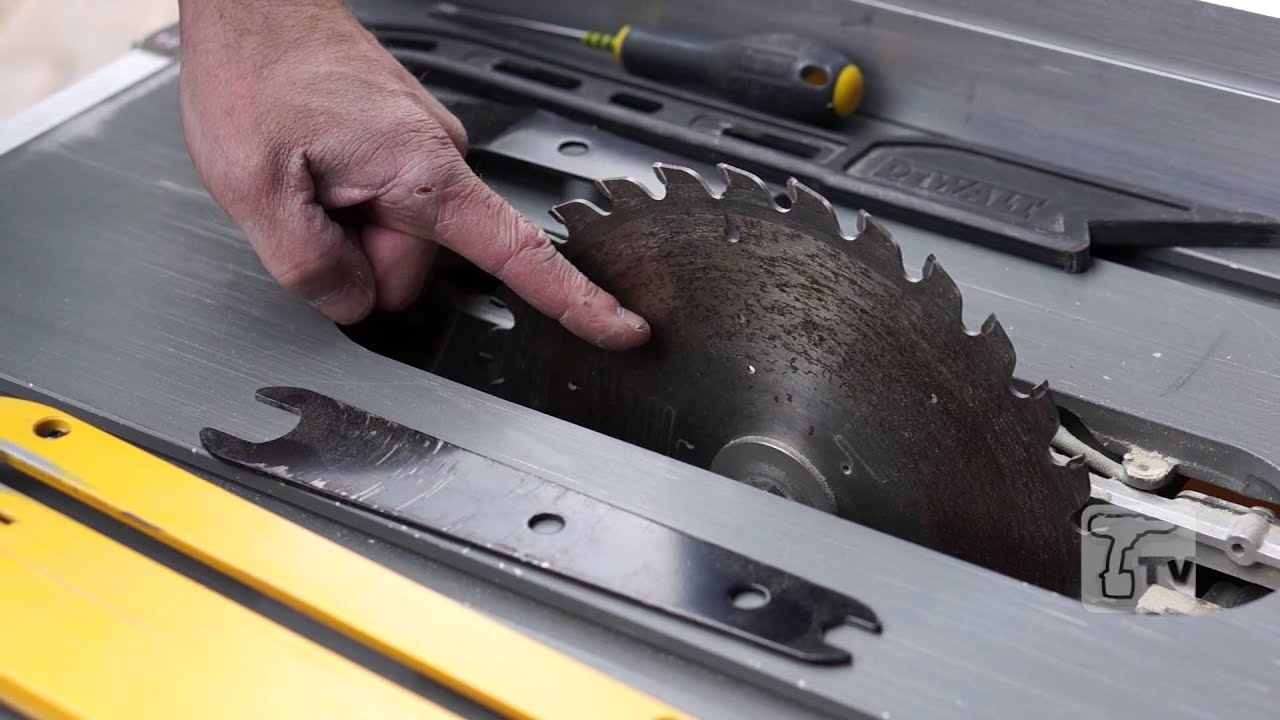
Image Source: i.ytimg.com
Why Change Your Table Saw Blade?
To get clean, professional cuts, your table saw blade needs to be in tip-top shape. If the blade is dull or has any damage, your cuts will end up looking messy and uneven. Even worse, a bad blade can actually make the saw dangerous to use.
Here are a few common reasons why it might be time to swap out your old blade for a new DeWalt replacement:
- Dullness: Over time, blades lose their sharpness, making it harder to cut through wood cleanly.
- Damage: Hitting a nail or staple can damage the teeth of the blade.
- Different Cuts: Different blades are made for different types of cuts. For example, you might want a ripping blade for cutting with the grain or a crosscut blade for cutting against the grain.
- Material Changes: Some blades are better for certain materials, like plywood or hardwoods. Using the wrong blade can lead to poor results.
Safety First: Protecting Yourself
Replacing table saw blade safely is the most important part. Before you even think about touching your saw, follow these safety rules:
- Unplug the Saw: This is the MOST important step. Make sure the saw is unplugged from the power outlet. This prevents accidental starts while you’re working on it.
- Wear Safety Glasses: Sawdust and small pieces of wood can fly up while you’re working. Safety glasses will protect your eyes.
- Wear Gloves: Gloves will protect your hands from sharp blade teeth and splinters.
- Read Your Manual: Your saw’s manual has specific instructions for changing the blade. Read it carefully before you start.
- Think Clearly: Make sure you are not tired or rushed. Focus on what you are doing.
Important Safety Checklist:
- [x] Unplug the saw
- [x] Wear safety glasses
- [x] Wear gloves
- [x] Read the manual
- [x] Stay focused
Gathering Your Tools and Supplies
Before you start the table saw blade change steps, get everything you need ready:
- New Table Saw Blade: Choose the right blade for the type of cutting you’ll be doing.
- Arbor Wrenches: Most DeWalt table saws come with two wrenches that fit the arbor nut. If you don’t have them, you can buy replacements.
- Blade Wipes or Cleaner: To clean the new blade before you install it.
- Clean Rags: For wiping down the saw and blade.
- (Optional) Blade Stabilizer: These can help reduce vibration and improve cut quality.
- (Optional) Work Gloves: To protect your hands.
Here’s a quick table to keep track of your tools:
| Tool/Supply | Purpose |
|---|---|
| New Table Saw Blade | To replace the old one |
| Arbor Wrenches | To loosen and tighten the arbor nut |
| Blade Wipes/Cleaner | To clean the new blade |
| Clean Rags | To wipe down the saw |
| Blade Stabilizer | Optional, to reduce vibration |
| Work Gloves | Optional, to protect your hands |
Dewalt Table Saw Blade Removal: Step-by-Step
Now, let’s get that old blade out. Here are the dewalt table saw blade removal steps:
Step 1: Raise the Blade to its Highest Position
Turn the blade height adjustment wheel to raise the blade as far as it will go. This gives you more room to work.
Step 2: Remove the Throat Plate
The throat plate is the insert around the blade on the table. Different saws have different ways to remove it. Most DeWalt saws have a lever or latch. Look for this, unlock it, and lift the throat plate out.
Step 3: Lock the Arbor
Most DeWalt table saws have an arbor lock button. Press and hold this button. You might need to rotate the blade slightly until the lock engages. This will keep the blade from turning while you loosen the nut.
Step 4: Loosen the Arbor Nut
This is where you’ll use your arbor wrenches.
- Important: The arbor nut on most table saws has a left-handed thread. This means you turn it clockwise to loosen it (the opposite of regular nuts).
- Place one wrench on the arbor nut and the other on the flat spot on the arbor shaft (behind the blade).
- Squeeze the wrenches together clockwise to loosen the nut. It might take some force.
- Once the nut is loose, you can remove it by hand.
Note: Some newer DeWalt saws are equipped with a standard right-handed thread. Always check your manual before attempting to loosen the nut.
Step 5: Remove the Outer Flange and the Old Blade
After you take off the arbor nut, there is usually a flange (a metal washer) on the outside of the blade. Remove this. Now, carefully lift the old blade off the arbor. Be careful of the teeth; they are sharp!
Here’s a table of all the key steps:
| Step | Action | Important Notes |
|---|---|---|
| 1. Raise Blade | Turn the blade height wheel to raise the blade all the way. | Gives you more room to work. |
| 2. Remove Plate | Unlock the throat plate and lift it out. | Each saw has a different way to remove it. |
| 3. Lock Arbor | Press the arbor lock button. | Might need to rotate the blade slightly to engage the lock. |
| 4. Loosen Nut | Use two wrenches and turn the nut clockwise. | Left-handed thread on most saws! |
| 5. Remove Blade | Take off the outer flange and lift off the blade. | Be careful of the sharp teeth! |
Table Saw Blade Installation Guide: Putting in the New Blade
Now that the old blade is out, it’s time for the new one. Follow this table saw blade installation guide:
Step 1: Clean the Arbor and Flanges
Before you put the new blade on, wipe down the arbor and both flanges (the inner and outer ones) with a clean rag. This removes any sawdust or grime that could affect the blade’s alignment.
Step 2: Mount the New Blade
Carefully slide the new blade onto the arbor. Make sure the blade is facing the right direction! Most blades have an arrow on them. This arrow should point in the direction of the blade’s rotation (usually forward, toward the front of the saw).
Step 3: Reinstall the Outer Flange and Arbor Nut
Put the outer flange back on, making sure it’s seated properly against the blade. Then, thread the arbor nut back onto the arbor by hand.
Step 4: Tighten the Arbor Nut
- Again, using your two arbor wrenches, hold one wrench on the arbor shaft and the other on the nut.
- Tighten the nut counter-clockwise (remember, it’s a left-handed thread).
- Tighten it firmly, but don’t overtighten it. You don’t want to strip the threads.
Step 5: Replace the Throat Plate
Put the throat plate back into its slot and lock it in place.
Step 6: Test the Blade
Plug the saw back in (carefully!). Turn it on and let the blade spin for a few seconds. Watch for any wobble or vibration. If the blade seems to be running smoothly, you’re good to go. If you see any problems, stop the saw immediately, unplug it, and check that the blade is properly installed.
Here’s a checklist of the blade installation steps:
- [x] Clean the arbor and flanges
- [x] Mount the new blade in the correct direction
- [x] Reinstall the outer flange and arbor nut
- [x] Tighten the arbor nut firmly
- [x] Replace the throat plate
- [x] Test the blade for wobble
Fine-Tuning and Dewalt Table Saw Maintenance
Once you’ve changed the blade, here are a few other things you should check as part of your dewalt table saw maintenance:
- Blade Alignment: Use a reliable square to confirm the blade is exactly perpendicular to the table. If it’s not, adjust the trunnion as indicated in your saw’s manual.
- Fence Alignment: Ensure your fence is parallel to the blade. An inaccurate fence can cause kickback and dangerous cuts.
- Dust Collection: Empty your dust collection bag or canister. A clean dust collection system improves visibility and reduces health risks.
- Lubrication: Check the moving parts of your saw (height adjustment, bevel adjustment) and lubricate them as needed. Use a dry lubricant to avoid attracting sawdust.
Best Way to Change Table Saw Blade: Tips for Success
Here are some extra tips for making the process easier:
- Use a Blade Stabilizer: A blade stabilizer is a large washer that fits between the blade and the outer flange. It helps dampen vibration and can improve the quality of your cuts.
- Keep Your Wrenches Handy: Store your arbor wrenches in a convenient place so you can easily find them when you need to change the blade.
- Clean Your Saw Regularly: Keeping your saw clean will help it run smoothly and extend its lifespan.
Changing Blade on DeWalt Table Saw: Dealing With Issues
Sometimes, things don’t go smoothly. Here are some common problems and how to fix them:
- Arbor Nut Stuck: If the arbor nut is really stuck, try using a penetrating oil like WD-40. Spray it on the threads and let it sit for a few minutes before trying to loosen the nut again.
- Blade Wobbles: If the blade wobbles, check to make sure it’s properly seated on the arbor and that the flanges are clean. Also, check for damage to the blade itself.
- Stripped Threads: Be extremely careful not to strip the threads on the arbor nut or the arbor shaft. If this happens, you’ll need to replace the damaged part.
Conclusion: Keep Your Saw Sharp and Safe
Changing your DeWalt table saw blade is a simple task with a huge impact. By following these steps and prioritizing safety, you can keep your saw working its best and ensure accurate, clean cuts for all your woodworking projects. Remember to always unplug the saw, wear safety gear, and read your manual before you start. And don’t forget to keep your saw clean and well-maintained for years of reliable service.
Frequently Asked Questions (FAQ)
How often should I change my table saw blade?
It depends on how often you use your saw and what you’re cutting. If you notice the blade is dull, burning the wood, or causing splintering, it’s time to change it.
Can I use any table saw blade on my DeWalt saw?
No. Use blades that are the correct diameter for your saw and have the correct arbor size. Check your manual for the exact specifications.
What does it mean if the blade is “burning” the wood?
Burning means the blade is getting too hot and scorching the wood. This is usually a sign that the blade is dull or that you’re feeding the wood too slowly.
What is the best way to clean my table saw blade?
Use a blade cleaner or degreaser and a stiff brush to remove any resin or pitch buildup. Be careful not to cut yourself on the teeth.

Hi, I’m Tom Scalisi, and welcome to The Saw Blog! I started this blog to share my hands-on experience and insights about woodworking tools—especially saws and saw blades. Over the years, I’ve had the chance to work with a wide range of tools, and I’m here to help both professionals and hobbyists make informed decisions when it comes to selecting and using their equipment. Whether you’re looking for in-depth reviews, tips, or just advice on how to get the best performance out of your tools, you’ll find it here. I’m excited to be part of your woodworking journey!